GPSLogger II Manual [PRINT-VERSION]
-NOT FOR SALE / NOT FOR REPRINT -
Before you going to print this manual - please considered if this is necessary - save our environment!
![]()
DISCLAIMER
This software is provided AS IS, without a warranty of any kind. ALL EXPRESS OR IMPLIED CONDITIONS, REPRESENTATIONS AND WARRANTIES, INCLUDING ANY IMPLIED WARRANTY OF MERCHANTABILITY, FITNESS FOR A PARTICULAR PURPOSE OR NON-INFRINGEMENT, ARE HEREBY EXCLUDED. emacberry.com AND ITS LICENSORS SHALL NOT BE LIABLE FOR ANY DAMAGES SUFFERED BY LICENSEE AS A RESULT OF USING, MODIFYING OR DISTRIBUTING THE SOFTWARE OR ITS DERIVATIVES. IN NO EVENT WILL emacberry.com OR ITS LICENSORS BE LIABLE FOR ANY LOST REVENUE, PROFIT OR DATA, OR FOR DIRECT, INDIRECT, SPECIAL, CONSEQUENTIAL, INCIDENTAL OR PUNITIVE DAMAGES, HOWEVER CAUSED AND REGARDLESS OF THE THEORY OF LIABILITY, ARISING OUT OF THE USE OF OR INABILITY TO USE SOFTWARE, EVEN IF emacberry.com HAS BEEN ADVISED OF THE POSSIBILITY OF SUCH DAMAGES.
This software is not designed or intended for use in on-line control of aircraft, air traffic, aircraft navigation or aircraft communications, or in the design, construction, operation, or maintenance of any nuclear facility. This software is not designed or intended for use while operating any motorized vehicle. Licensee represents and warrants that it will not use or redistribute the Software for such purposes.
No guarantee is made for accuracy or reliability for any purpose whatsoever.
Used Symbols
| Information | |
| Hint / Tip | |
| Warning | Caution | Danger | |
| Indicates a setting/option in the application settings that needs to be enabled | |
| Indicates a setting/option in the application settings that needs to be disabled | |
| Indicates a setting/option in the application settings that needs to be checked | |
| Indicates a setting/option in the application settings that needs to be un-checked | |
| Indicated a setting/option in the application settings where you can select a value from a given list | |
| Indicated a setting/option in the application settings that requires a number or text input | |
| ABC > XYZ | In the application settings/section with the name ABC select item/section/setting XYZ |
Use of metric system for Units
This manual uses the metric system in all descriptive texts and examples. The app supporting different unit formats like: Metric, Imperial (feet & yard) or Nautical and will adopt its behavior to your selection.
Introduction & Initial Setup
General information about GPSLogger & this manual
Introduction
Initially I started with this project in the year 2009, my first daughter had just been born, and I anticipated that quite soon I would have to answer questions like (when we are on a walk): What distance have we already walked? or How long is this going to take until we are back home?
Now she is driving her own car, and doesn’t care what her old father is yelling from the backyard…
Over this period of time I have added features & functionalities I personally found valuable for my outdoor sports activities (like hiking or cycling) - or my indoor training (pain cave) - others have been added on request of users.
One of my main use cases in the past few years, is to use my mobile device as a bike computer replacement since I do not see any value spending ~600,-€ (or more) for a decent device, when I already have powerful hardware with me. My phone has a large display, it has a decent CPU & memory, it can be online, I have a handle bar mount, and I am in the lucky position that I can write the code myself .
I don’t have a single clue how many bike computers I could have bought, if I had just worked in my regular job, instead of investing my time into the development of GPSLogger.
Download
via Google Play
![]()
https://play.google.com/store/apps/details?id=com.emacberry.gpslogger
Download via F-Droid
You need to add a custom repository in order to be able to install GPSLogger II All details can be found in the short F-Droid Tutorial - Thanks Johann!

https://f-droid.org/packages/com.emacberry.gpslogger
via amazon appstore
Recommended for BlackBerry 10 Users (yes the app will still work on your BlackBerry 10 device)!
![]()
https://www.amazon.com/gp/product/B00L9GLGGQ
Initial Setup
When you install the app and launch it for the first time you will be presented with a welcome dialog, containing some general information and the link to the Privacy Policy of the application. Please read it carefully, but since this legal stuff can be a bit difficult to read, you might find How GPSLogger II will process your data a bit easier to understand.
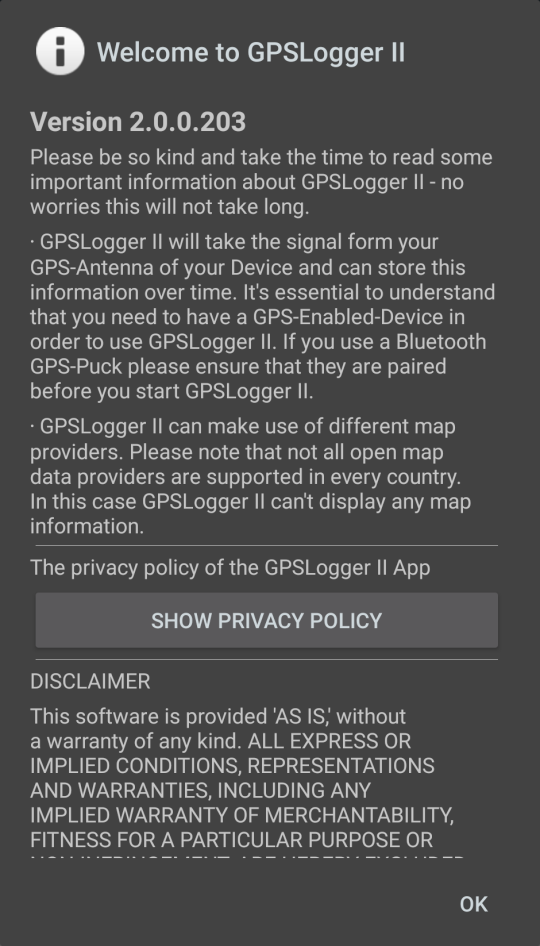 The bottom line is - location information is sensitive data and you as the user having full control over what will be
happening with this data. Of course, you are able to share recordings or live locations via the app, but all these
additional features require your consent, and you need to actively configure/enable them. So you are in full
control of what is happening - the app is a tool in your hands - use it wisely.
The bottom line is - location information is sensitive data and you as the user having full control over what will be
happening with this data. Of course, you are able to share recordings or live locations via the app, but all these
additional features require your consent, and you need to actively configure/enable them. So you are in full
control of what is happening - the app is a tool in your hands - use it wisely.
I do earn my money with something completely different - GPSLogger II is just a hobby, and I am happy to provide the app for free. Even this website does not use any tracking, or even cookies.
In the case of an update of GPSLogger (and there have been quite some updates in the past), the app will start with the latest change log information which always includes the option to read the Privacy Policy.
The ChangeLog (which is quite long now) can be also accessed at any time from the application settings via the App
Changelog. (I guess I’ll have to add the log to this manual some day)
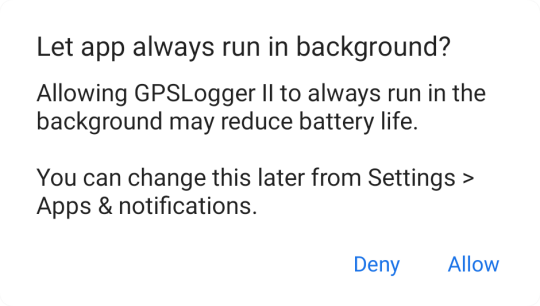
Once you’ve felt the warm welcome the next thing is that the app is going to ask you for the core permissions the app is going to need in order to work as designed.
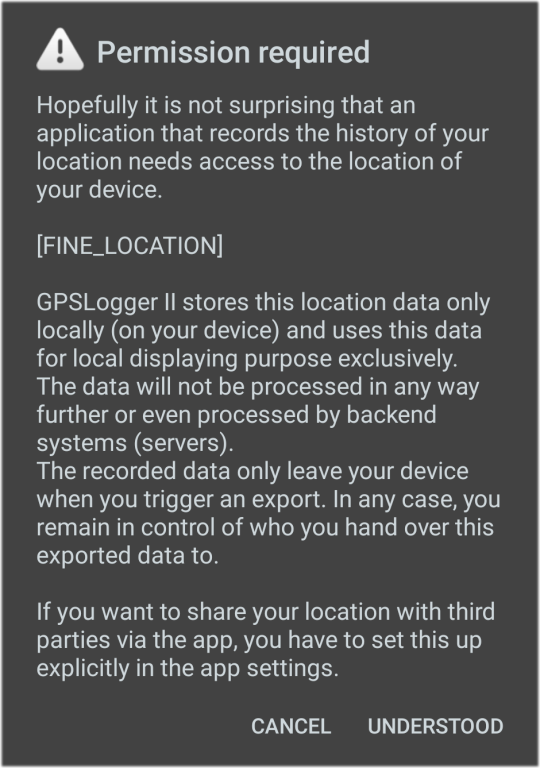 The permission to read the device location is the only core permission the app actually needs - If you
feel uncomfortable with allowing the app to access the device location, you don’t have to - but in such a case you
shouldn’t be surprised that the app does not provide great value.
The permission to read the device location is the only core permission the app actually needs - If you
feel uncomfortable with allowing the app to access the device location, you don’t have to - but in such a case you
shouldn’t be surprised that the app does not provide great value.
You can deny the request from the start up - but you should grant the app the permission to access the device location later via the application permission settings of your Android OS.
You’ll find all details about why certain permissions are requested in the Requested Permissions Section.
The last step of the initial setup is the Setup-Wizard selection dialog. You might not have realized it yet, but GPSLogger has many options and is highly configurable. The downside of this flexibility is, that it can be quite complicated for a new user to find the right place where certain features have to be enabled or configured.
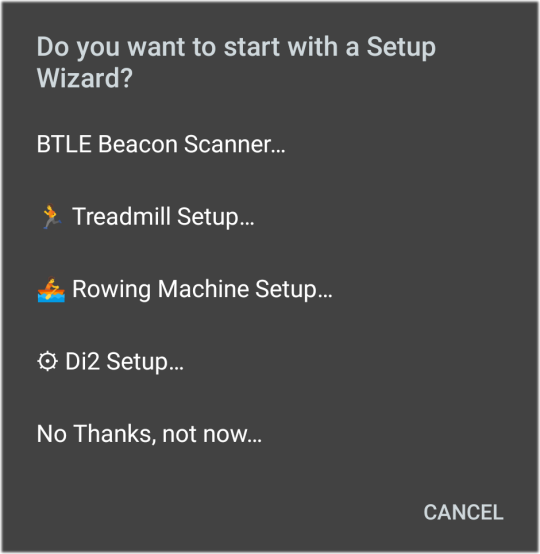
In order to address this challenge the app currently has four different wizards guiding you though the setup process for certain functionalities. You have probably read/heard somewhere about the app, and you want to use it e.g. for your Shimano Di2 Shifting - or something completely different - or you want to use the app to scan BluetoothLE Beacons in your environment.
So you can select one of the four available wizards, or simply select No Thanks, not now… (you can start the wizards any time later from the main menu).
BTLE Beacon Scanner…
The Beacon Scanner is constantly looking for BluetoothLowEnergy Beacons in your environment and is able to record the found
beacons (you need to start the record process).
Treadmill Setup…
If you own a Treadmill supporting the Bluetooth FitnessMachineStandard you can simulate and record any outdoor run with
GPSLogger.
Rowing Machine Setup…
If your Rowing Machine supporting the Bluetooth FitnessMachineStandard you can simulate and record different (currently
hard coded) outdoor rowing sessions.
Shimano Di2 Setup…
If you own a Wi-Fi module (EW-WU101 or EW-WU111) for your Di2, you can connect GPSLogger with your shifting system and
remote control your device via the left & right shifting lever buttons.
Staring GPSLogger for the first time - on Android 7 (or later)
The Android OS’ have different possibilities to extend the battery life of your device - one of these is to restrict the ability to allow apps to make use of the running-as-background-service capabilities. Such a restriction is counterproductive when using GPSLogger for recording.
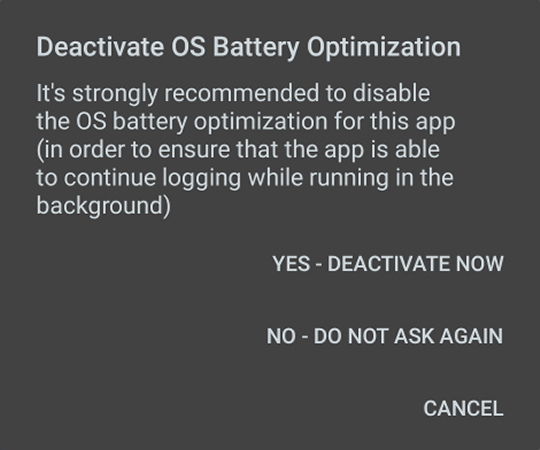
 So the app is requesting you to disable the OS battery optimization for GPSLogger in multiple ways. For details see
the FAQ: How to disable OS battery optimization.
So the app is requesting you to disable the OS battery optimization for GPSLogger in multiple ways. For details see
the FAQ: How to disable OS battery optimization.
Details about this core feature can be found in
the Running as Android-Background Service Section.
Information about requested Application Permissions
To use the core functionality of GPSLogger (recording the GPS location of your device), only one single permission is required: ACCESS_FINE_LOCATION. All the other permissions listed below are only required if you make use of certain additional functionality & feature of the application. If you don’t want to use the feature you don’t have to grant the corresponding permission.
Location (& Bluetooth) related
- ACCESS_COARSE_LOCATION
- ACCESS_FINE_LOCATION
- ACCESS_LOCATION_EXTRA_COMMANDS
GPSLogger II only stores this location data locally (on your device) and uses this data exclusively for local display purposes. The data will not be processed in any further way or even processed by the backend systems (servers). The recorded data only leaves your device when you trigger an export. In any case, you remain in control of whom you hand over this exported data to.
If you want to share your location with third parties via the app, you have to set this up explicitly in the app settings.
One personal note concerning location permission requests when using only Bluetooth (Treadmill or Rowing Machine) - As soon as an app wants to establish a connection to another Bluetooth device the requesting app needs the permission to access the device location. This does not sound very logical, but it is what it is.
- ACCESS_BACKGROUND_LOCATION
To ensure a smooth recording of your location history (and the subsequent display in the app), please allow GPSLogger II to track your location all the time (even when running in the background).
GPSLogger II will use location in the background to show you your activities (walks, runs or bike rides) on a map.
You can recognize via a fixed (permanent) notification that the ‘background location tracking service’ is in use. It is therefore always transparent for you when the application has access to your location and is recording data (if you have requested it to do so).
The recorded location data remain on your device and is not processed any further.
Connectivity related
- INTERNET
- ACCESS_WIFI_STATE
- ACCESS_NETWORK_STATE
To be able to download any data (like online map information) the app needs to be able to access the internet - if you do not use any of the online features (the app is designed to work strictly OFFLINE), you do not have to grant these permissions. Accessing Wi-Fi & Network state is used in order to detect, if the app could establish an online connection and might use it as a fallback if the device is currently offline.
GUI related
- WAKE_LOCK
- VIBRATE
When recording data in the background the app might be configured to notify you in case of certain events - in order to catch your attention the app might wake up from locked state and/or vibrate.
File System related
- WRITE_EXTERNAL_STORAGE
- READ_EXTERNAL_STORAGE
When you want to be able to create a backup of your data & settings (that would remain on your device even when uninstalling the application), the app need the permission to WRITE and READ from the external storage.
This also applies when you want to export some data/recorded paths. Details about the export functionality and more details about external storages and the need for the READ/WRITE_EXTERNAL_STORAGE permission can be found in the Export & eMail Section.
Sending eMail related
- GET_ACCOUNTS
- USE_CREDENTIALS
Some GPSLogger features allow the sending of eMails to recipients you have specified in the application settings. The configuration of a secure SMTP connection can be quite complicated (depending on your eMail provider). In order to allow the app to make use of installed email accounts on your device (e.g. your Google-Account) both these permissions are required. They will be only used to simplify the email account SMTP Setup process.
Background/Service/functional related
- RECEIVE_BOOT_COMPLETED
- FOREGROUND_SERVICE
- REQUEST_IGNORE_BATTERY_OPTIMIZATIONS
The permissions FOREGROUND_SERVICE & REQUEST_IGNORE_BATTERY_OPTIMIZATIONS are used in order to allow the application background service to do its job without being paused/terminated by the Android OS. The RECEIVE_BOOT_COMPLETED is only required, when you want to enable the autostart options of the application.
External Sensor / BluetoothLE Beacon Scanner related
- BLUETOOTH
- BLUETOOTH_SCAN
- BLUETOOTH_CONNECT
- BLUETOOTH_ADMIN
When you want to connect any External Sensors or want to use the built in BluetoothLowEnergy Beacon Scanner the app requires the permission to access your Bluetooth hardware. The connect and/or admin right is used in order to restart bluetooth on your device (turn it off & on again).
Other
- ANSWER_PHONE_CALLS
When you have connected your Shimano Di2 with GPSLogger, then you can configure one of the D-Fly Channels to pick up your phone (when a call arrives). Obviously this specific permission is only related to this specific function and obviously only used when you want it to do so.
Registered Weblinks
need revision
Support for direct download of *.map files (zips) from openandromaps.org
- download.openandromaps.org
- ftp.gwdg.de
Why the app is free - what’s my motivation - There has to be a catch!
You are probably right - Google started a long time ago with the don’t be evil slogan… but that changed IMHO quite a while ago and hopefully in the meantime we have all become aware that we are paying for all the free Google services with our privacy.
I, as developer take your privacy extremely seriously, GPSLogger II is not collecting any data from you (not in the background nor in the foreground). Of course the app logs your location and saves this data on your device.
YOU ARE THE ONLY ONE who has the full control what will happen with this data. Of course when you make use of the export/share functionality this data will be exposed to a 3’rd party - but that’s always YOUR decision.
See also the formal Privacy Policy of GPSLogger II - Please note, that the only reason why Personal data is accessed by the app is in order to be able to send eMails (in your name) for supporting features like EmergencyAlerts, HappyPartner or (SimplifiedExportVia)Email.
My motivation
I started my career in the 90’ as a developer - over time I moved into a management role. Software-Development is really just a hobby for me, and it’s that back to your roots feeling that drives me. Also, I don’t want to lose the connection to the craftsmanship of software development & architecture. So I do earn my money with something different from trying to sell your data, and I do not rely on a large user base. For me, it’s enough when some people around the globe find GPSLogger useful. And as already stated - I am happy to give something back to the world (since life has been very generous to me).
Just a last remark on all this. I am probably my most loyal heavy user - if you are interested, I have briefly described my main use cases on the main app page of GPSLogger.
Logged Data
How GPSLogger will log your data?
The core idea since the initial version of the app is, that it does not have to be actively running with a visible screen while recording. You should be able to use your device for something else - or simply carrying the device in your pocket or bag/backpack while GPSLogger is logging the data.
Running as Android-Background Service
By default, an application have certain amount of screens (called GUI) and the code is running when the so called Activity is visible for the user. Even if GPSLogger have also such GUI part as mainly described here the main recording work will be done running in an Android-Background Service.
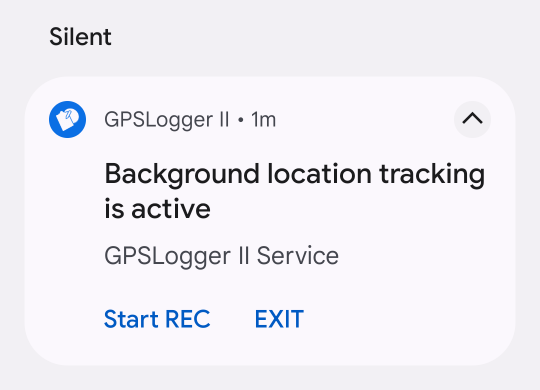 Starting a Background Service on Android requires that the code running will show the user always a (sticky)
notification. Please note, that it was not my design decision to make this notification sticky!
Starting a Background Service on Android requires that the code running will show the user always a (sticky)
notification. Please note, that it was not my design decision to make this notification sticky!
This is a requirement for all 3’rd party apps running on Android (to make it possible for the user to realize that something is running in the background) - needless to say that Google makes an exception when it comes to apps/services they run themselves on your phone.
But since the sticky notification is required anyhow, you have the option to start/stop logging or terminate the app via the embedded notification actions.
Information for Android 7 (or later)
The Android OS have different possibilities to extend the battery life of your device - one of these possibilities is to
restrict the ability to allow apps to make use of the running-as-background-service capabilities. Of course such a
restriction will be counterproductive when using GPSLogger. So the app is requesting you to disable the OS battery
optimization for GPSLogger in multiple ways. For details see the FAQ:
How to disable OS battery optimization
GPSLogger is designed to be battery friendly
Battery lives matters - that’s one of the core principles that drives me, during the development of the application. As developer, you have influence on the overall energy consumption of a device. So all parts of the applications have been designed in a way to make the code as energy efficient as possible (this means to use very simple structures and almost no frameworks).
Just as one example: GPSLogger don’t use an internal database while logging, instead the data will be directly written on your device. This makes the code a bit more complex, but on the other hand side this saves a lot of CPU-cycles (and with that plenty of energy will be saved).
The majority of the battery-usage of the app (while logging in the background) is caused by requesting & receiving the GPS-signal. So by adjusting the GPS-update interval in the application settings you have a direct influence on the overall battery-consumption of the application - adjust it to your use case!
Have also in mind that different sensors might use additional energy - my personal observation is, that using the build in magnetic sensor (aka compass) of my current Pixel3 phone have an almost insane negative impact on the overall battery life - while the intense usage of the barometer sensor seams to have almost no impact. So the total battery consumption really depends on your hardware and the settings (update frequency) you are using.
And without going too much into details here - since you might like to use different update-intervals for different use cases the app offers a Multi Preferences/Modes Feature allowing you to adjust quick & easily the settings.
Data is stored ‘as it is’ (raw)
GPSLogger is following a very simply (but strict) principle: always keep the original data! It’s almost the nature of GPS (and other sensor) data to be a bit flaky. It can be required for certain use-cases to apply some optimizations (like smoothing values over a certain time period). But you don’t have to be afraid, there are two very important things you should know:
-
All calculations/manipulations will happen after the raw source data have been captured and stored inside the GPL file. So all optimizations will always happen afterward - the original data will never be altered/modified!
This ensures that when ever something will be messed up inside the application (e.g. cause of a bug) it can be always be fixed with update of the GPSLogger application! -
All possible data post-processing can be disabled via the application setting (or needs to be enabled by the user at the first place). IMHO it’s essential that the user can decide if and when how the sensor data should be manipulated. GPSLogger is no BLACKBOX nor it does any miracles - If you have a question - do not hesitate to ask!
Sensor data will be logged independent of each other
Even if it might not make a big difference for the user - but in case you are technically interested: GPSLogger stores the data/fields for each supported sensor as separate/different record-type. By following this approach, it’s quite easy to introduce new sensor types/data without invalidating any existing files.
When multiple sensors provide their measurement at the same time, the app creates multiple entries (obviously of a different type and with different data) and queue it in a synchronous writing process.
Recording with a resolution of one millisecond
Even if most (if not all) website processing location based information have a minimum resolution of one second GPSLogger stores and process all it’s data with a precision of one millisecond. This additional precision caused several issues (e.g. when you upload data to sites like Strava) - but at the end of the day these challenges are solved.
My assumption is, that the source of this one-second-limitation is, that a) most available GPS providers will not provide data more frequent and b) a lot of common sport activity tracking hardware (like sport watches or bike computers) have the same one-second-resolution (probably cause of hardware limitations).
This resolution is also present in some quite popular file formats, like Garmin’s FIT format or TCX (where the fields of the type dateTime has also only the resolution of one second).
I am convinced that this difference matters! (might be not such a big surprise, since I have implemented it)
In the past few years I have developed some sort of passion for riding with my road bike. While cycling, I’m typically pushing the pedals with a cadence greater than 60 revs per minute. With other words in one second I do more than a single rotation of the crank. When I additionally process data from a power-meter (pedals) then it’s IMHO essential to know in which fraction of a second a certain power value was provided - specially when reading power-meter data from left and right pedal individually (what I actually do).
So for me, it’s a bit difficult to understand, how almost the complete world is accepting this one-second-limitation - especially when reviewing/comparing different power-meters (based on data recorded with ‘BLACKBOX’ Garmin bike computers and exported FIT files) - IMHO it’s no big surprise that data from two sensors must be different in such a comparison. [I am sorry for this rant].
What values/data will be logged?
Internal device sensors
GPS & NMEA-Data
GPS/GLONASS/Galileo based location information
GPSLogger is processing location objects provided by the OS of your device. The app does not have much influence on the quality & frequency in which the OS is going to be able to provide such location objects (despite the app can request to receive the location in a lower frequency then the OS is able to provide the data).
Have said that - specially when you are indoors, the chances that your GPS signal is quite bad, is quite high (this also applies if you are outdoors but surrounded by high buildings or trees).
On your device there might be alternative location information providers available (e.g. WLAN-based), but GPSLogger is not using them by purpose!
The following information is stored everytime a new gps based location have become available to the app:
- Timestamp (in milliseconds) when the location was received on the device [Please note that the location object itself contains also a time information - this internal time information will be ignored!]
- Latitude
- Longitude
- Elevation in WGS841 (also known as Altitude or Height)
- Course (also known as Heading or Bearing)
- Speed (in m/s)
- Accuracy (of the location information)
- Number of Satellites used to generate the location
- GeoIdHeight (if available)2
When you make use of the indoor rowing/treadmill functionality of GPSLogger then the device GPS signal will be ignored (the GPS location provider will not be requested to send any data to the app) and instead simulated location objects based on the selected route and your current provided speed (no matter if you are rowing or running) will be created. In this case the stored location information is internally marked as simulated by using the value -10 as Number of Satellites. Obviously no accuracy or any additional NMEA-data will be available for this type of simulated activities.
NMEA Sentences
- Timestamp (in milliseconds)
- Collection of NMEA-Sentences as PLAIN-ASCII String (the device might provide multiple sentences with the identical timestamp)
More information about the format and the content of NMEA-Sentences can be found in wikipedia.
Magnetic Sensor (if available)
You caught me - I am a liar! Have I said, that all sensor data will be recorded independent of each other? I am sorry - for historic reasons this statement is not correct for the magnetic sensor data.
When a new GPS location information arrives, the original course value withing the gps location information will be overwritten with the newest (if not older than 1 sec) course value the magnetometer has provided. Shame on me!
Barometer Sensor (if available)
- Timestamp (in milliseconds)
- Current ambient air pressure (in hPa or mbar [as decimal])
VAM Data
When you record an activity where you have loaded a navigation path and the app could extract climb data (see Climb View for details) GPSLogger will store (while you are in such a detected climb section) multiple VAM data records in order to be able to show your velocità ascensionale media (translated in English to mean average ascent speed) performance after your activity.
- Timestamp (in milliseconds)
- Current VAM (ascent speed in m/s [as decimal])
BTLE Beacons (in range)
Details about the Build in UUID Beacon Scanner can be found in the corresponding section of this manual.
The scanner is logging the following value (per detected beacon):
- Timestamp (in milliseconds)
- Containing data package (as plain byte[])
- Beacon type & address (as String)
- Type and address are seperated by a @ character from each other
- Type can be either 0: FD6F or 1: FD64
- RSSI (as Number [Integer])
- NanoSeconds (as Number [long])
- Total Number of visible beacons - including the current one (at the time the beacon was detected for the first time)
External Sensors
Details about the currently supported additional external sensors can be found in the corresponding section of this manual. This section here covers only the data fields that will be recorded per sensor.
Heart rate Data
- Timestamp (in milliseconds)
- Current heart rate (in beats per minute [as integer])
Cadence Data
- Timestamp (in milliseconds)
- Current cadence (in revolutions per minute [as integer])
Cycling Power-meter Data
- Timestamp (in milliseconds)
- Current power (in WATTs [as integer])
- Power-meter index (could be 0: center, 1:left, 2:right)
- Balance between L/R (when available)
Shifting information (Shimano Di2)
Initially the app stores in a path the configured number of front & rear gear teeth (so when you change this gear setup later, your recording will always include the information that was present when recording).
- Timestamp (in milliseconds)
- Front gear position (0-4)
- Rear gear position (0-14)
- Resulting gear ration (only cause of historic reasons - the data is actually obsolete)
GearShifting Data has one speciality that should be mentioned: The app will always record shifting events, even if they occur while the app is in the PAUSED-RECORDING mode (so they can’t be missed).
FTMS Rower Data
- Timestamp (in milliseconds)
- too much (will be done when I even will have more time to do this)
Concept2 Rower Data
- Timestamp (in milliseconds)
- way too much (will be done when I even will have way more time to do this)
How to access / export the data
The GPS file format
When I will be ever in the right mode, I am going to release details in GitHub. For earlier file versions there exist external reading code - but since the changes introduced with the V6 implementation nobody seamed to be interested in an updated version - so probably this will take some time (but the format is no secret!).
File Export
The JSON-Export is the closest format you can get from GPSLogger - this will include (almost) all fields and data. Why almost? The BTLE-Beacon information currently will not be written into the JSON file. Use the dedicated CSV-Export when you want to get your hands on the BTLE Beacon data (see the Build in UUID Beacon Scanner) for details.
-
WGS84 ellipsoid elevation information might not match the Mean sea level (MSL) elevation information you expect as user! If you are interested in the details & differences of WGS84 compare to the natural elevation you might like to read the ‘Earth Gravitational Model’ article in wikipedia. ↩
-
The GeoIdHeight is the delta between the WGS84 elevation and the Mean sea level (MSL) height (based on EGM2008) - This value will be extracted from the plain NMEA-sentences data (since is not provided OS location objects directly). The good news is, even if the value is dependant from your current location, that the GeoIdHeight does not change that frequent.
So since the extraction of the value from the NMEA-sentences requires additional CPU-usage the app is extracting the value only every 30 seconds. Please note we accept the current present GeoIdHeight even if it’s 5 minutes old (and the device was not able to extract a newer value).
The option to use the EGM2008 Altitude Reference model has been introduced in GPSLogger v2.0.0.188/195 - all previous recorded paths does not contain a GeoIdHeight value in the location recond. In such a case the app is able to calculate the GeoIdHeight value by itself. This is quite some intense math-stuff and with that, expect some noticable delay after you load such a path into GPSLogger and General Settings > Altitude Reference Model . ↩
User Interface & Views
GUI - Graphical User Interface
The main application screen consist of:
- The Main View(s)
- The ActionBar including the main menu
- The StatusBar (can be disabled)
- The NavigationBar (if a path is loaded)
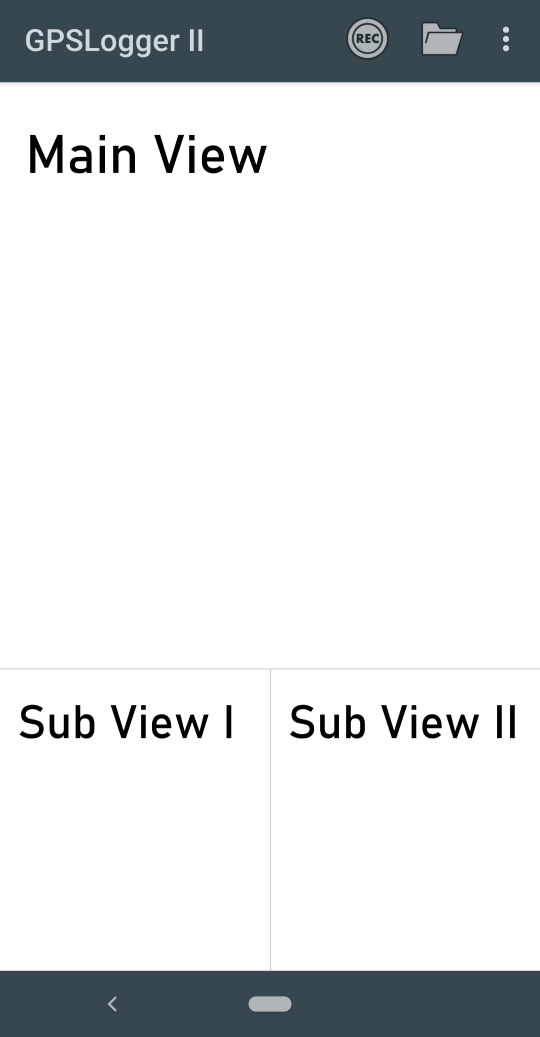
The Main View(s)
The application supports up to three different views visible at the same time - the main view and two additional Sub Views (I+II). You can:
- Fully customize which view will be used in each of the three available sections
- Switch between all the available views by swiping left/right (on a map view you have to start with
- the swiping near the left/right margin of the map screen)
- Specify the ratio between the main- and the two sub-views (default is 1:1, the screenshot shows 3:1 - the ratio between Sub View I & II is always 1:1)
- Define, if a sub view should be locked (view switching will be disabled)
- The two additional views can be enabled/disabled via the main menu (Show/Hide View 1 and Show/Hide View 2)
All the view configurations can be adjusted in the Appearance & Startup Settings, so that the application will start with the screen layout you prefer.
Please note that TabBar is not visible when multiple views will be displayed. Then the only remaining option to change
the current view is by swiping left/right.
The ActionBar
The ActionBar will be only visible when you are in the view-mode of the application - as soon as you start recording the ActionBar will be hidden, and you can access the main menu via the corresponding overlay button.
If enough space on your display the ActionBar will show (beside the
menu) the
 Start Recording Button & the
 Open PathManager
ActionButtons.
Open PathManager
ActionButtons.
Additionally, the action bar show a Tab(ulator)Bar that allow you to quickly switch between the current active main-view. Please note that the TabBar will be only shown if the main view is active only and can also be disabled via the application settings.
When you make use of the Multi-Preferences feature the ActionBar will show the current active profile name instead of GPSLogger II.
The StatusBar
- Can be configured to be rendered as overlay or as own screen part
- Fields are fully customizable (including the option to toggle between the use of Emojis or Text)
Appearance & Startup Settings - Showing the recording status as first entry:
- [L]: logging/recording
- [P]: paused (lower case [p] indicates that the pause was triggered by the AutoPAUSE feature)
The NavigationBar
 The navigation bar is only visible when you have loaded a recorded path (or after you have stopped the recording) Beside
the slider that allow you to move quickly to any position in the recorded path (timeline) you have the option to use the
media-control-buttons:
The navigation bar is only visible when you have loaded a recorded path (or after you have stopped the recording) Beside
the slider that allow you to move quickly to any position in the recorded path (timeline) you have the option to use the
media-control-buttons:
| Icon | Description |
|---|---|
 |
Jump to the START of the path |
 |
Move 15 records back |
 |
Move to previous record |
 |
Move to next record |
 |
Move 15 records forward |
 |
Jump to the END of the path |
Please note, that not all records have to be location records - so moving one record backwards/forwards might just select a different record type (see How GPSLogger will log your data?)
Additional Overlay Buttons
The app wil show some additional buttons as overlay over the Main View - the appearance of each depends on from the
current use case and logging state. E.g. the  will be only shown when the app is recording (and the ActionBar is hidden).
| Icon | Description |
|---|---|
|
Opening the main menu of the application |
 |
The compass, in the upper left corner of the map, can be used in order to toggle the map orientation: Always North or Current Heading |
 |
Pause the current recording (when the recording is paused the overlay button will slightly pulse) |
 |
Stop the current recording (only visible if device is not in lock state) |
 |
Iterate between the different configured OpenMapData Providers |
 |
Center map on current position (only visible if map view is paned) |
 |
Center map on next (navigation) target (only active when a navigation path is loaded) |
 |
Zoom IN (only visible if one of the visible views supporting zoom function) Pinch-to-zoom is also supported |
 |
Zoom OUT (only visible if one of the visible views supporting zoom function) Pinch-to-zoom is also supported |
 |
Reset Off-road Navigation (only available if a navigation path is loaded that does not contain turn-by-turn instructions) |
 |
Calculate new next Waypoint (only available if a navigation path is loaded that does not contain turn-by-turn instructions) |
The available Views
In the following section some sample screenshots of the different views can show overlay buttons, others does not. The appearance of the overlay buttons can depend on the visibility of a certain view but don’t have too. In the following sections the overlay buttons will not be described - since they might not belong necessarily to the view.
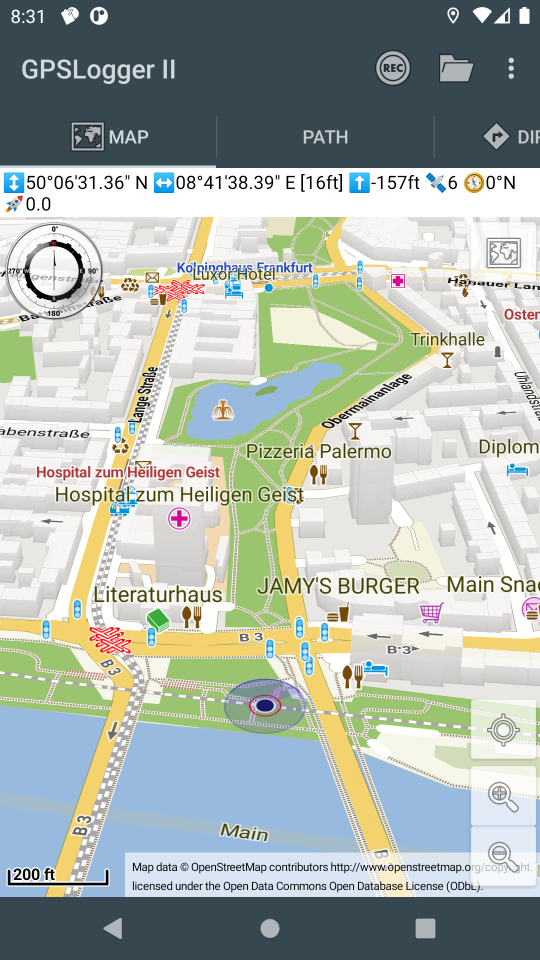
OpenMapData View
GPSLogger have implemented two different Map views - depending on your Android Version and your device you can use the vector data based map rendering or an image based map rendering.
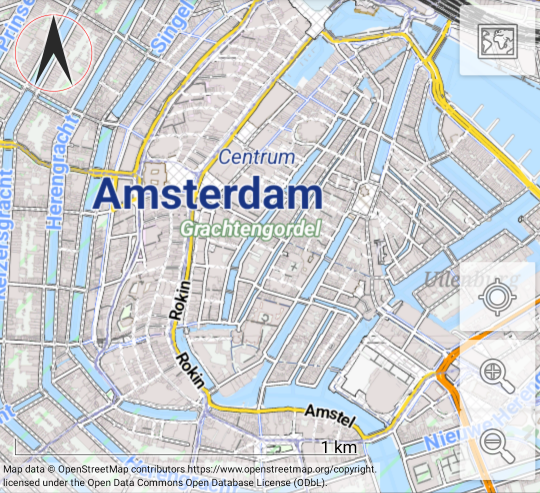
Vector tile based (using native OpenGL)
GPSLogger makes use of the VTM (Vector Tile Map), that was developed within the OpenScienceMap project. VTM makes use of OpenGL which implies that it is extremely fast. The VTM library is provided by mapsforge.
 Map features & interactions:
- The map image will be generated on the fly using OpenGL
- The map can be zoomed seamless
- The map can be rotated (textual information will be aligned based on the rotation)
- The map can be tilted (touch & hold with two fingers & move fingers up or down)
- Buildings will be rendered in 3D
- Supporting also image tiles [of course with the limits of image based map data (zoom steps, suboptimal text display and other things)]
To use the full power of the VTM map should use an open map data provider that will deliver vector tile data. This is
either the OSM OpenMapVectorTiles (online) provider (mapzen) or the OpenStreetMap (Offline) provider (working with
local *.map files). Details about the different map tiles provider can be found in the OMD Section of this manual.
When you use the OpenMapData provider called OpenStreetMap (Offline), then the map will be created on base of so called Render Theme. In such a theme the styling of each part of the map is defined (streets, rivers, bridges, tunnels, land usage, etc…). A Render Theme can have own options that would allow you to select different layers or even language preferences that should be visible on your map (see Render Themes for details).
The VTM Map is only usable as the Main View of GPSLogger. The Secondary View I+II use the second type of the map view.
I did not manage to implement 3 different VTM maps on a single screen, running simultaneously without any stability issues. That’s the reason why I decided for this workaround (VTM Map only in the Main View).
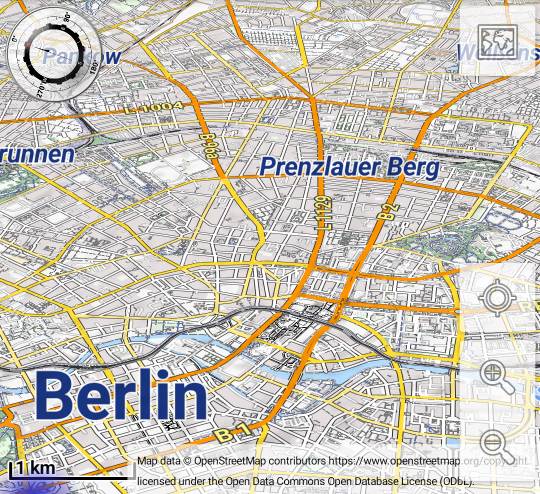
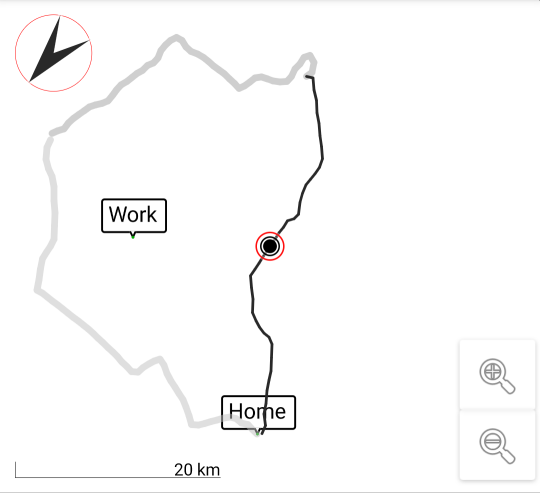
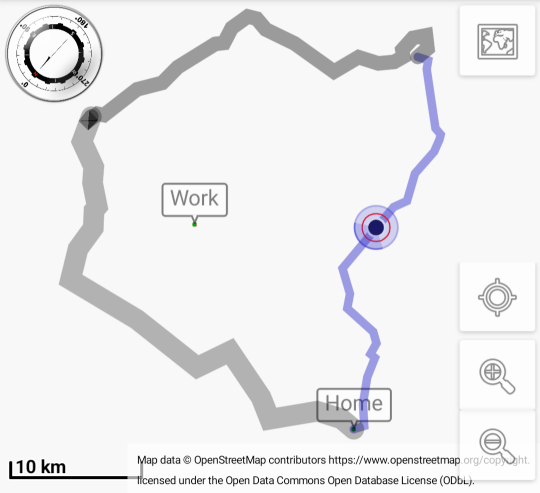
The simplest way to distinguish between the two different map versions is the compass in the upper left corner - if it’s the complex compass image then it’s the VTM map, if it’s the simpler black arrow, then you are dealing with the image tile based map version.
Image Tile based
This map view using pixel based images to display a map. The map will be assembled from multiple images - so called tiles. This tile images can have two different sources:
- Online Image Tile Server
- Images created from locally stored *.map files (via the Mapsforge library)
No matter if you use an online tile server or the local created images - once GPSLogger have downloaded or created a tile image it will be locally cached in an internal database, so it can be reused later. This means that you are able to use an online OpenMapData Provider even when you are offline, if all the required image tiles of a specific region are already stored in your local cache.
Supported map interactions:
- The map can be zoomed in steps (since each zoom level have the half/double resolution of his predecessor)
- The map can be rotated (but since the image is pixel based the texts will also be rotated as they are)
- The map can be panned (only if the map is aligned to North - so you can either rotate or pan)
Online Image Tile Server
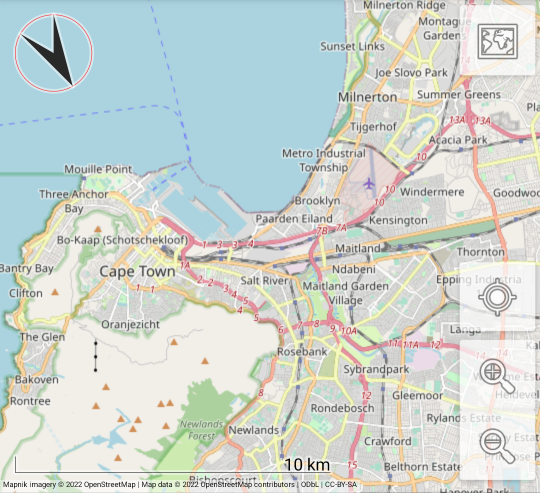 Here on this screenshot you see the OpenStreetMap Carto Style from their none public tile server (see OSM Tile Usage
Policy).
Here on this screenshot you see the OpenStreetMap Carto Style from their none public tile server (see OSM Tile Usage
Policy).
In general every TileServer that delivers images (in the required projection) can be configured & used with GPSLogger as
long as the server supporting public http(s) access.
Mapsforge (OSM Offline *.map files)
When you use the OpenMapData provider called OpenStreetMap (Offline), then the image tiles will be created with the help of a so called Render Theme via the Mapsforge library locally on your device. In the render theme the styling of each part of the map is defined (streets, rivers, bridges, tunnels, land usage, etc…). A Render Theme can have own options that would allow you to select different layers or even language preferences that should be visible on your map (see Render Themes for details).
 Here in this example screenshot you see the Elevate Render-Theme (created & maintained by Tobias Kühn)
Compass View
 A very basic view - displaying your current direction, where the needle is static (pointing up) and
the N is pointing into the direction of the magnetic north. When your device have a
build in magnetic sensor then the app can behave like a physical compass.
A very basic view - displaying your current direction, where the needle is static (pointing up) and
the N is pointing into the direction of the magnetic north. When your device have a
build in magnetic sensor then the app can behave like a physical compass.
My personal experience with the magnetic sensor is, that the overall power consumption is significant higher when the sensor is enabled in the application settings, It can be very useful e.g. when GeoCaching but it really depends on your individual use case (if it’s worth the additional power consumption).
Special Thanks to Rob Antonishen for the very nice compass svg file and granting the permission to use it in the app.
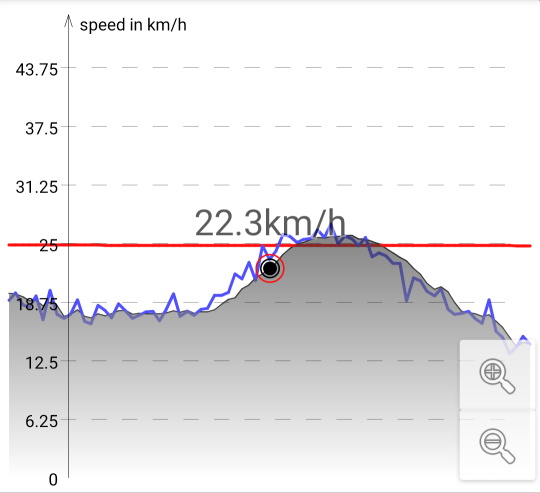
Speed View
Speed information based on the GPS signal can be is very flaky. In order to smooth out the noise in the GPS speed
information GPSLogger applies by default an average median calculation when displaying the speed information. The grey
graph show you always the result of this internal calculation. [Taking the set of the last max. 10 speed values, order
them, remove the first and the last (so removing the min. & max.) and then calculate the average value of the remaining
set.]. You can disable the speed smoothing via Application Settings > General Settings > GPS-Sensor & Smoothing
Settings > Smooth Speed
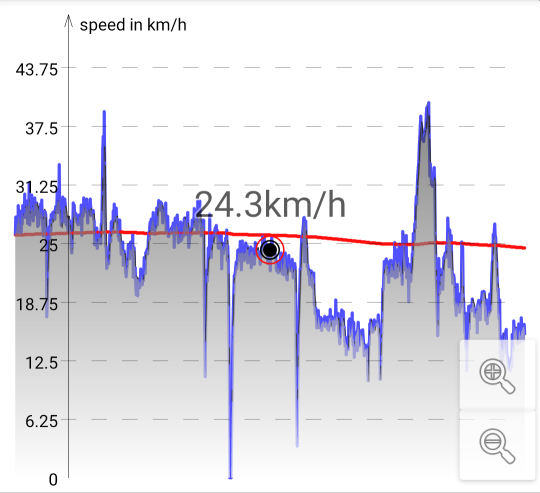
- Graph red: Showing average speed over time (always calculated based on overall distance & overall duration)
- other: depends on the combination of two application settings -> see table below
| Overwrite GPS-Speed | Smooth Speed | Graph: | Graph blue: |
|---|---|---|---|
| Speed information from the GPS fix | -none- | ||
| Speed information based on the distance & time | Speed information from the GPS fix | ||
| Average median speed value (from GPS fix) of max. last 10 sec. | Speed information from the GPS fix | ||
| Average median speed value (from distance & time) of max. last 10 sec. | Speed information based on the distance & time |
 The difference between calculated median speed and the original GPS speed is not really noticeable in the overall view -
but when you start to zoom in, you can see the difference (it’s very typical that the original gps speed is jumping
up & down).
The difference between calculated median speed and the original GPS speed is not really noticeable in the overall view -
but when you start to zoom in, you can see the difference (it’s very typical that the original gps speed is jumping
up & down).
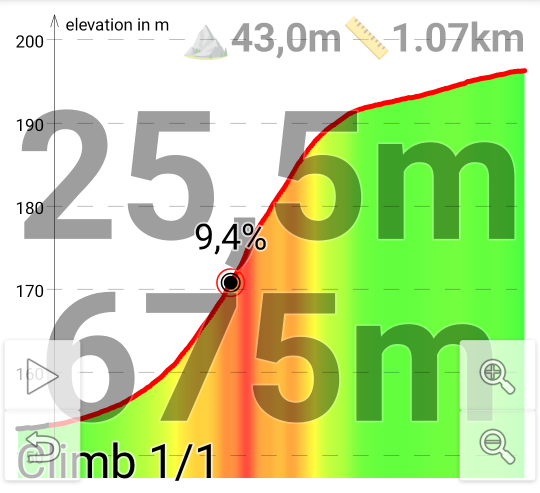
Elevation View
Elevation information from the GPS signal can have multiple issues. The challenges are different compared to speed data, but the overall challenge remains the same: the original data is not really suitable to be displayed 1:1. Details about the possibilities to enhance elevation data can be found in the Elevation Data optimizations section.

- Graph: Showing elevation data over time
- Graph red: Showing slope/grade over time (min/max -/+33%)
- Graph blue: If present, then showing the original elevation data from the GPS Sensor. This is the case, if in the
Barometer Sensor settings Use as Elevation provider or if additional
smoothing will be applied after path loading
Direction View
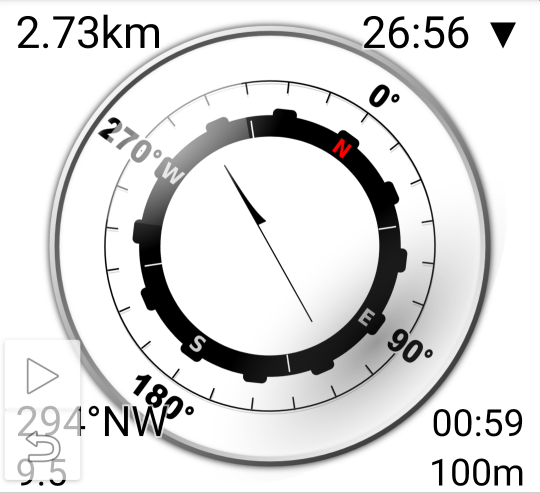
- The compass rose N is pointing into the direction of the magnetic north.
- The compass needle is pointing into the direction (as the crow flies) of your target (assuming you hold the device right in front of you)
- Upper left corner: Total distance to destination
- Upper right corner: Estimated time of arrival at destination (When you are currently moving faster than the average speed you will see an arrow pointing down, indicating that the estimated time of arrival might be lower, or an arrow pointing upwards to indicate that the time might be higher when your speed continue to be less than the overall average speed)
- Lower left corner top: Course to target waypoint
- Lower left corner bottom: Relative speed to target waypoint
- Lower right corner top: Estimated time of arrival at target waypoint
- Lower right corner bottom: Distance to target waypoint
GPS-Data View
When you want to use GPSLogger as simple GPS display, this is probably the view you would like to use. The view will display the current latitude and longitudes values (depending on your selected format) in the largest possible font so that both values are completely displayable on the selected screen size.
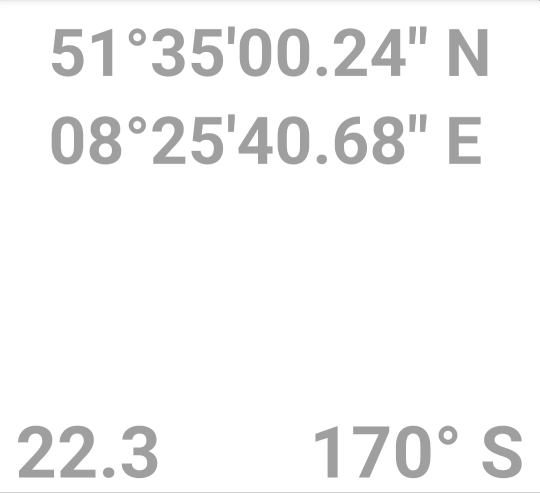
- 1’st row (maximum possible font size): Current Latitude
- 2’nd row (maximum possible font size): Current Longitude
- Lower left corner: Current Speed (without unit)
- Lower right corner: Current Course
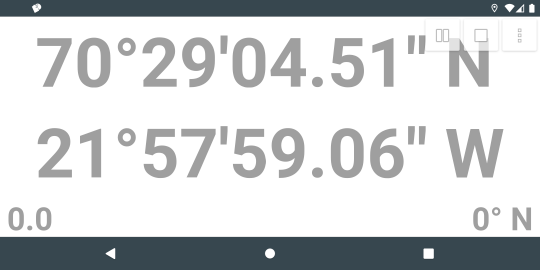 You probably want to use this View stand alone e.g. in your cockpit (boat - not aircraft!) in landscape mode to get the
maximum font size possible.
You probably want to use this View stand alone e.g. in your cockpit (boat - not aircraft!) in landscape mode to get the
maximum font size possible.
Navigation Views
Before the Multi View I-IV have been available GPSLogger had only the ability to display 3 different views at the same time (Main view & SubView I+II). The three available Navigation views have been implemented in order to allow the user to configure the screen depending on his personal use case. All the available information is also available as part of the MultiViews. See Multi View I - Multi View IV Section for details.
Direction View
Of course the core is the direction-to-go pointing arrow. This view assumes, that you have your device in front of you while moving (actively looking onto the device display).
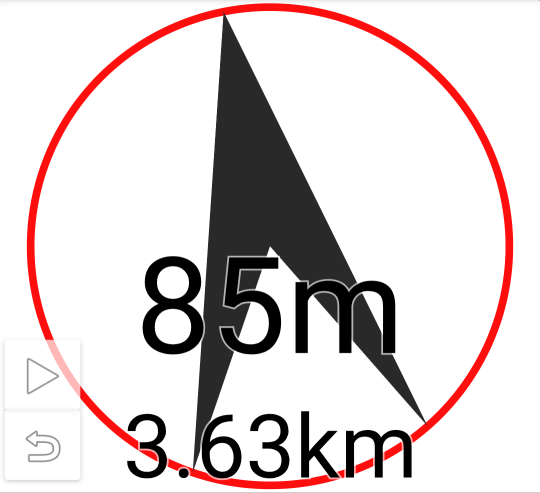
- Arrow: pointing in the direction (as the crow flies) of the next navigation target (can be a TurnByTurn position or a Off-road navigation waypoint)
- Medium Font middle: Distance to the waypoint
- Medium Font bottom: Remaining overall distance after the waypoint
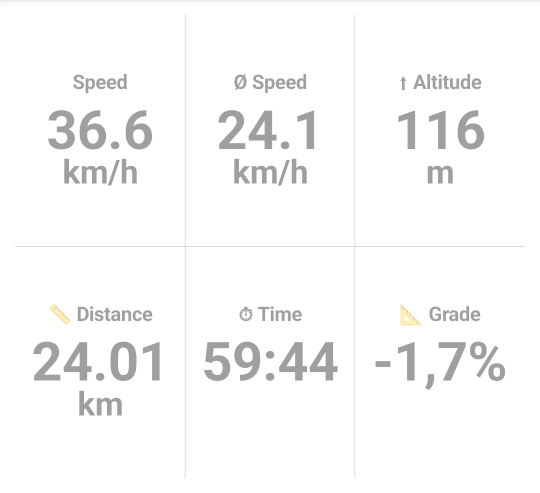
Distance & Timing View
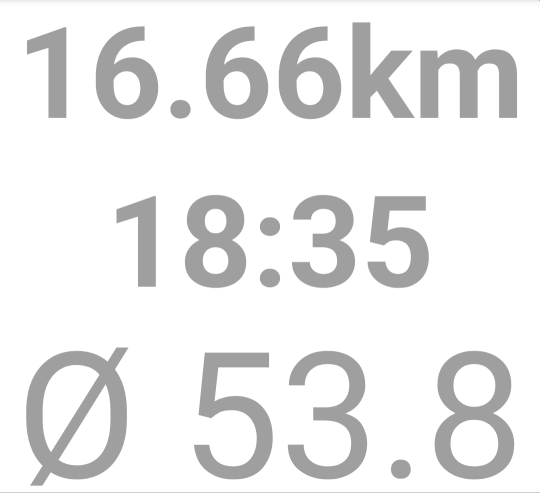
- Medium Font top: Total distance/length
- Medium Font middle: Total time/duration
- Medium Font bottom: Average speed (without unit - so here in the example 53,8 km/h)
Speed View
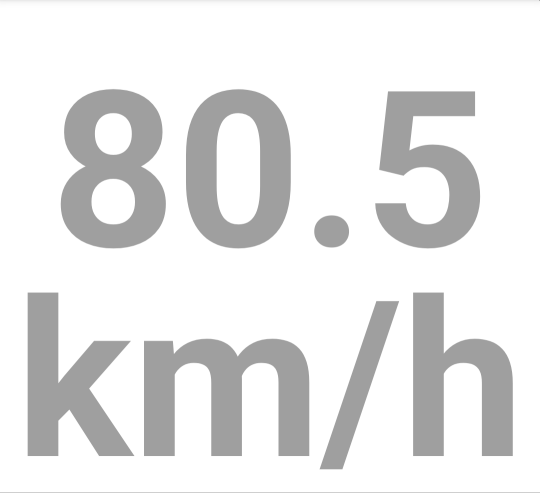
- Large Font top: Current Speed
- Large Font bottom: Speed unit
Heartrate View (ANT+/BTLE)
Data for the Heartrate View is only available if you have paired a BTLE/ANT+ Heartrate Sensor with GPSLogger. Please see External Sensors / Heartrate for details.
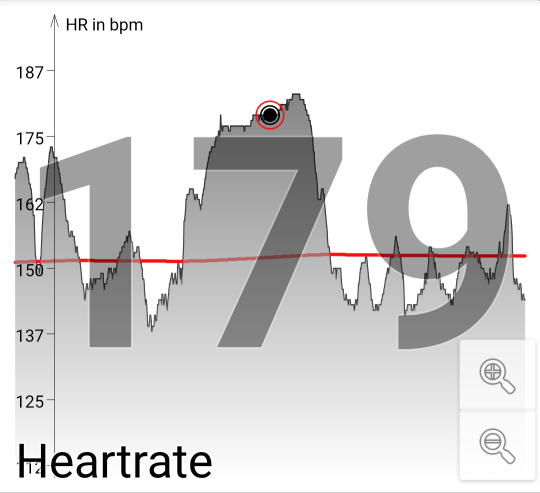
- Large Font: Showing current heartrate/pulse either in beats per minute or in a % value of you maximum pulse (see Settings)
- Graph: Showing heartrate/pulse over time
- Graph red: Showing average heartrate/pulse over time
Cadence View (ANT+/BTLE)
Data for the Cadence View is only available if you have paired a BTLE/ANT+ Cadence Sensor with GPSLogger. Please see External Sensors / Cadende for details.
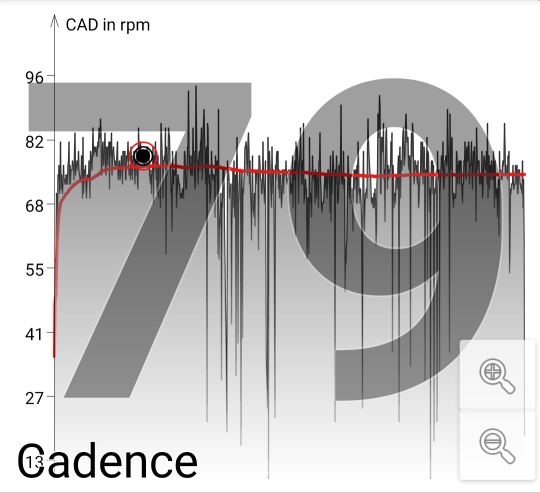
- Large Font: Showing current cadence in rotations per minute (rpm)
- Graph: Showing cadence over time
- Graph red: Showing average cadence over time
Shifting View (Di2)
Data for the Shifting view is only available if you have connected your Shimano Di2 with GPSLogger. Please see Shimano Di2 Support for details.
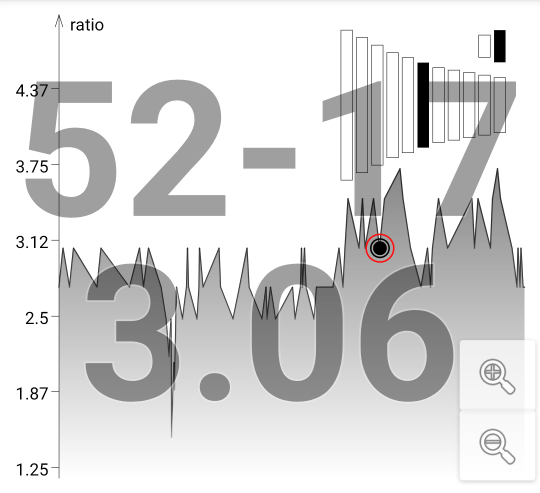
- Large Font top: Number of front-gear teeth - number of rear-gear teeth
- Large Font bottom: resulting gear-ratio
- Upper right corner: Schematic gear positions
- Graph: Showing ratio over time
Power View (BTLE)
Data for the Power View is only available if you have paired an BluetoothLE Power Sensor with GPSLogger. Please see External Sensors / Cycling Power for details.
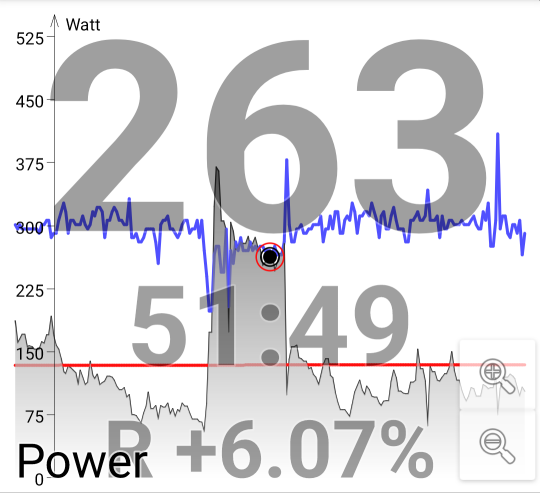
- Large Font top: Current cycling power
- Medium Font middle: Current ratio between left & right leg (balance - here in the example left leg provided 51%, while right delivered just 49% of the 263 watts)
- Medium Font bottom: the average balance between left & right (here in the example the right leg provided in average 6.07% more power than the left)
- Graph: Showing cycling power over time
- Graph red: Showing the average power
- Graph blue: Showing the balance between left & right leg over time (lower than half of the screen: left leg provided
more power, over the half of the screen: right leg provided more power)
Barometer View
Data for the Barometer View is only available if your device have build in a barometer sensor and if you have enabled the Barometer Sensor in the Application settings.
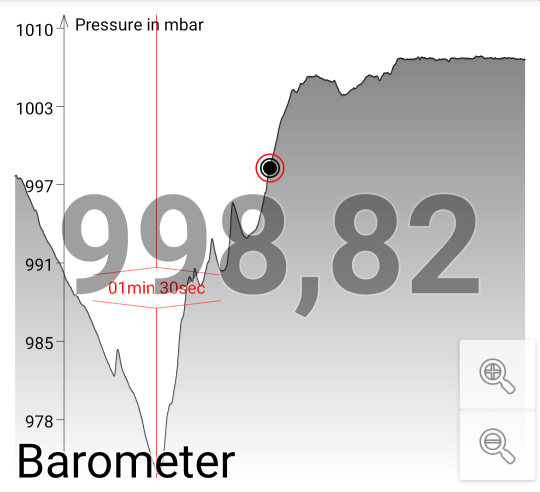
- Large Font: Showing current pressure in millibar
- Graph: Showing pressure over time
Here in the sample screenshot you also see how a pause in the recording data will be rendered in the different time axis
based views. In this example the pause took 1 minute and 30 seconds.
TargetSpeed View
Implemented for a specific use case of a friend - mainly give you a target speed based on the current slope.
Climb View
The Details about the Climb are described in a separate section of this manual
MultiView I-IV
The Details about the Multi View I - Multi View IV are described in a separate section of this manual
BTLE-Beacon View
Data for the BTLE-Beacon View is only available if you have enabled the build in BluetoothLowEnergy beacon scanner and you have started the recording process. Please see Build in BluetoothLowEnergy Beacon Scanner for details.
![]()
- Large Font: Showing current visible beacons
- Graph: Showing number of visible beacons over time
Path View
The Path View is the initial created view of GPSLogger - so everything have started from there. At the first days of the application there was almost none map support on the BlackBerry Platform available. So the initial approach of GPSLogger was to show the user a x-y-axis graph of his path. This might also explain, why the activities/tracks/routes that you record with the app have the internal name path.)
 The Path view is drawing the latitude/longitude positions
on a simple X/Y axis without any projection. This means, that each pixel on the display have a different length or
height in the real world.
The Path view is drawing the latitude/longitude positions
on a simple X/Y axis without any projection. This means, that each pixel on the display have a different length or
height in the real world.
This seams to be ridiculous bad from today’s point of view - but hey I was young and needed the money! What else can I say as lame excuse. Seriously this view is just included in GPSLogger for nostalgic reasons. I don’t expect that any current user have this view enabled.
The Path View does not allow much user interaction - zoom in & zoom out, that’s it basiaclly - even a pan option is not
available in this initial view.
 If you want to have an accurate view of your
path (map projection wise), please use the OpenMapData View with OpenStreetMap (Offline) provider - when you do not
have any additional *map files in your offline maps directory (only the world.map present), then the presentation of the
OpenMapData View is the view you should use. It’s also 100% offline.
If you want to have an accurate view of your
path (map projection wise), please use the OpenMapData View with OpenStreetMap (Offline) provider - when you do not
have any additional *map files in your offline maps directory (only the world.map present), then the presentation of the
OpenMapData View is the view you should use. It’s also 100% offline.
When you compare both screenshots here the difference is quite noticeable! (Even if you ignore all the other difference
like: compass, map attribution or the different styling of path & background-path rendering.)
PathManager
Manage & access previously recorded path data (*.gpl files)
need revision
Main-Menu
Import
Import from Routing Server
Recreate all Thumbnails
The thumbnails shown in Pathmanager will be created based on the current active OpenMapDataProvider. If you frequently change the provider or yu have any other reason why you do not like the current displayed thumbnails, you can start a background process to recreate all thumbnails of your present paths.
Please have in mind, that this process will take a while to complete, since this requires that the app needs to load each path data (at least latitude/longitude) in order to be able to create the map preview. Please also note that depending on the used OMD-Provider
Sync Data…
Even if GPSLogger does not use a Database when you record a path, the information which paths you have stored on your device (previously recorded or imported) is stored in a small database.
The Information displayed in PathManager is based on the database (not on the actual *.gpl files present in your filesystem). This is cause of performance reasons (access to a database is much faster, then scanning the filesystem each time).
By default, the app frequently synchronize the database with the filesystem in order to ensure that all your recorded and imported path will be displayed in the PathManager. This synchronization is running in the background and this implies that the result might be delayed.
When ever you have the feeling that something is missing in PathManager, please make use of the Sync Data function, in order to force a synchronization of the database with the filesystem.
Filter
Show all
Show imported only
Show recorded only
Information shown per path
- Thumbnail
- Name
- Date
- Distance & Time
- addon: imported (without TurnInfo) / has TurnInfo / has Note
Instant Actions
- Path Details/Information
- More…
- Load Navi(gation) path
More-Menu
Path Details
Edit Path Name
Create Path Note
Load path
Loading Navi(gation) Path
- Path containing turn-by-turn Information
- Path that does not contain turn-by-turn Information
Loading reverse Navi(gation) Path
Load Path into Background
This is quite a history function, from a time when no navigation was implemented - his will load the path and add it as bold, gray line (only visible in the path- & map-view)
Share via emacberry.com
Remove Share from emacberry.com
Upload to Strava
only present if your account is connected see the Strava Section of this manual
Export
When selecting the Export menu Item a sub-menu will appear that allow you to select one of:
- KML [Keyhole Markup Language]
- FIT [Flexible and Interoperable Data Transfer]
- GPX (v1.0) [GPS exchange format]
- GPX (v1.1) [GPS exchange format]
- CSV
- GPS NMEA-Sentences as TXT
- UUID 0x’s as CSV
- JSON (GPSLogger2)
- Original GPSLogger II GPL
Details about the different file formats can be found in the Export & eMail Section
When selecting the Email menu Item a sub-menu will appear that allow you to select one of:
- KML [Keyhole Markup Language]
- FIT [Flexible and Interoperable Data Transfer]
- GPX (v1.0) [GPS exchange format]
- GPX (v1.1) [GPS exchange format]
- UUID 0x’s as CSV
- JSON (GPSLogger2)
- Original GPSLogger II GPL
Details about the different file formats can be found in the Export & eMail Section
Refresh Thumbnail & Data
Synchronize a single path with the information displayed in PathManager (including re-rendering the thumbnail) - see also: Sync Data…
Simulate
Delete
The additional confirm dialog could be disabled in the Storage Settings > Confirm deletion
LocationManager
Manage & access your locations (*.gpp-files)
need revision
Overview
the Location Manager mainly works exactly like the Path Manager - probably the main reason why you would like to access the Location Manager is in oder to configure/enable your Auto-START and STOP locations (and tag them as commute start or endpoints).
Open Map Data (OMD)
Overview
Understanding the different map sources that are available in GPSLogger II can be quite irritating at the start - as an excuse: map support has a long history (in the app) and a lot of changes have been implemented - which might make things a bit more complicated - including all the different Settings/options.
Rule of Thumb: All map providers are handled inside the app/settings as OpenMapData [OMD] Provider - no matter if the source is online or offline…
Requirements
- App-Permission to access the internet
- App-Permission to access/store data on shared volume (pre Android 11)
- Online connection to be able to initially download map tiles from an Open Map Data provider that can later be used offline
- Online connection to be able to download map vector data (from mapzen) and use this data later offline (this is not recommended since you don’t know exactly if you have already all required map data locally on your device)
- Online connection to download OpenStreetMap based map-files once and then use these maps later while offline with corresponding theme files. Of course, you can download the map files with any other device and then copy these files to your android device to a place where GPSLogger has read access (this can be quite tricky on Android 11 and higher because of the introduced file system restrictions
Supporting three different Map types
I) Image-tile-based Online Maps
multiple different map sources are available - including the possibility to specify your own tile server URL
By default, all maps require an online connection - in order to download so-called “map tiles” to you local device - once a tile has been downloaded to the device it will be cached locally and will not be requested again. Please note that each zoom level requires another map tile to be downloaded.
GPSLogger offers support for different providers of such online map tiles - this list will be frequently updated and will be checked with every app update (currently used are Bing, esri, Mapbox and few others) - you can also configure your own tile server provider when you know the URL’s [e.g. to use Google Maps ;-)]
II) Vector-tile-based Online Map
a single online source (mapzen) - with a single/hardcoded (limited) theme
Since a couple of releases ago, GPSLogger II also supports an online OpenStreetMap Vector based map data provider [in contrast to the map tiles (images)] - this will reduce the amount of data that needs to be transferred and which is also zoom level independent. This vector data will also be cached locally, once it has been requested from the online source.
III) Vector-tile-based Offline Map
a single offline source (your *.map files) - with multiple & configurable themes
In order to make you totally independent of previously downloaded/cached map data GPSLogger II offers a third kind of OpenMapData provider - which is called OpenStreetMap (Offline). The big difference between II) and III) is, that in the offline variant you need to download & store *.map files (in the mapsforge format) e.g. from openandromaps.org on your device.
Please continue reading the OpenStreetMap Offline Section for more details
Some important things you should remember for offline *.map files:
- You need *.map files in the V4+ format (with multi-language support)
- *.map files can be downloaded directly with your mobile device e.g. from openandromaps.org (open the download link with GPSLogger II in order to get everything automatically extracted in the right place)
- You need a valid RenderTheme in order to display Offline OSM-Map data (GPSLogger comes with at least two preinstalled ones)
- The selected RenderTheme has to support the installed *.map version
- You can have multiple *.map files in the selected osm maps folder - but as soon as there is a single invalid corrupted *.map file in this folder, it could mess up the complete map system
Summary
There are three different types of map providers in GPSLogger:
- they are the online map tile-based providers (the map tiles are basically just images)
- plus two additional OpenStreetMap vector-data-based ones - one for online use and the other one for strict offline usage
More to know
- Basic Map configuration (no matter if online or offline) will be done in the application settings: Open Map Data
(online maps). In this section you can:
- Select the Map Data Provider which will be used at each start of the application - so this is the DEFAULT-Map provider - You then can go through all available OMD providers in the main app by pressing that “map icon” - but again - to configure the provider (no matter if online or offline) at app start - this is the only place!
- Select your preferred Map Data Providers: Since when you toggle though all the available OMD-Providers there will be for sure, some that you don’t fine useful for your use case - so here you can select/deselect from ALL in the app available OMD providers the ones that you would like to use within the app (I personally have selected only three that I really use myself)
- The other settings are hopefully more self explanitory… (at least not that essential)
- All online Map types can also be used when you are offline - but obviously only once the required region data has been already downloaded and stored in the internal cache.
- To update map tiles in the cache or to free disk space you can/need to delete single cache files via the Open Map Data (online maps) settings section and there via the Manage local Cache files…
- When you select the OpenMapData Provider OpenStreetMap (Offline) then you need:
- Additional *.map files (V4.0)
- To select a matching render theme (GPSLogger has two built in)
- The complete configuration of the OMD Provider ‘OpenStreetMap (Offline)’ has to be done in the separate settings section called OpenStreetMap Settings (offline map)
Offline OpenStreetMap Data
supported by Mapsforge & VTM
Overview
In GPSLogger II you will find an “OpenMapData Provider” called OpenStreetMap (Offline) in the map provider list. Once you have selected the OpenStreetMap Offline provider the new map source is active… but you could/should configure it.
As always in GPSLogger II a function brings some additional options via the Settings - for the OpenStreetMap Offline maps you will find its own section Offline OpenStreetMap Settings which allows you to adjust the rendering of the offline OpenStreetMap data… but before you will be able to use the full power of the new feature you will need to download *.map data files to your device first!.
OSM Mapsforge Format
There exists multiple different file formats to store OpenStreetMap map data (OSM XML, PBF Format, o5m, OSM JSON or Level0L to name a few) - For various reasons these file types are not usable for mobile devices - The Mapsforge ‘map’ format is the choice to use OSM data on a mobile device. Converting the data is not an easy task - and even more importantly takes some time to complete. I have spent the complete weekend loading the OSM-Data for GERMANY in a PostgresSQL running on my notebook. Luckily enough there are different sources where you can download converted (& additional enriched) *.map files for your mobile device. Beause of the file size this data is not included in GPSLogger II - you need to download one or multiple *.map files to your device in order to use this new feature of GPSLogger II.
At the following URL’s you can download Mapsforge *.map files:
-
https://www.openandromaps.org/downloads
An excellent source for enriched OSM data - included altitudes - great for hiking or mountain-biking
Render Themes
need revision
Download *.map files with your Android device/browser
Direct download link support for openandromaps *.map files in GPSLogger
Important if you use Android 12 (or higher)
I really love Google for all the changes that have been introduced with Android 11 and 12 (SDK 30/31). Not only are you no longer able to read/save data in the file system (SDK30) - also using your app with web-links has been massively limited. Even if I understand the reasons for these changes - it makes things that have been convenient for the users sort of complicated.
In order to be able to open download links from openandromaps with GPSLogger (using Android 12 or higher) you need to enable the link URL’s in the OS application Settings section. (Open by default > Links to open in this app) So please enable/add:
- download.openandromaps.org
- ftp.gwdg.de
see FAQ: Opening Web Links with GPSLogger using Android 12 (or later) for details
On your android device - open the following link https://www.openandromaps.org/downloads or select one more specific region from the list:
- Europe
- Deutschland
- Canada
- USA
- Russia
- South & Middle America
- Australia, New Zealand, Oceania
- Asia & Middle East
- Africa
Once you have opened one of the download sections, scroll down to the region/country you would like to download and then press the ‘download button’ with the text ‘Karten/Map+Poi’
Please note: You can download multiple *.map files - they will be combined in the app (the more *.map files you install the more device memory is required - which could lead to app instabilities at the end).
Once you have pressed the download button, your android device should present you with a dialog that allows you to select an app, that should handle this download - and (if everything went right) GPSLogger II should be listed as an app, that can handle this ZIP-Download. Of course select GPSLogger II to handle the download, and you are done! (Of course download and processing will take a while - but be patient). You will be notified once the process is completed.
Please note, that openandromaps site states, that you need to install a Render Theme - this can be ignored - since GPSLogger already comes with two (built-in) themes.
IF your device does not show a dialog (to let you select the app that should process the download) after the download-button on the openandromaps website, please look at this FAQ: Troubleshoot opening openandromaps.org web links….
When you manually download the ZIP files from openandromaps and extract them manually: You only need to copy the *.map file (the *.db *.poi will not be used by GPSLogger).
Download *.map files elsewhere
You can of course download the *.map files on any other device (including your PC or Mac) - the Links are the same - but you need to extract the maps manually and copy the files over to your android device and place them in a location that is readable for GPSLogger.
With the latest changes in Android 11 this process can get quite complicated - since there are only a few places where you can store files on your device that are readable by applications like GPSLogger. This makes it almost impossible to share *.map files across multiple applications.
Map & Theme file location on your mobile device
NEED TO be REVISED (because of Android 11 restrictions)
By default, GPSLogger II creates a subdirectory ‘osm’ on your external Storage (typically the internal emulated SD-Card) and creates two sub folders ‘maps’ and ‘themes’. On BlackBerry10 this folder typically can be found here: ‘/misc/android’ - when you access your BB10 via the WiFi-Share function then the folder should be: /media/misc/android/osm
osm/maps
store your downloaded *.map files in this folder on your device - please be so kind and restart GPSLogger II in order that the new maps will be included for rendering the map tiles
osm/themes
If you want to use additional/external rendering themes, store them in the ‘osm/themes’ folder - make sure that all additional resources are also located in the appropriate sub folders.
By default, GPSLogger II includes the two themes from the Elevate theme family (v 5.0 05/12/21) created by Tobias Kuehn see elevate-mountain-hike-theme @ openandromaps.org
- Elevate
- Elements
additionally, I have made a small modification called Elevate-2x where just the size of the symbols have been adjusted (enlarged) - but this is a very small modification and all credits goes to Tobias Kuehn.
The Elevate theme family is licensed under a Creative Commons Attribution-NonCommercial-ShareAlike 3.0 Unported License: http://creativecommons.org/licenses/by-nc-sa/3.0/
alternative folders
not recommended on Android 11 and higher
As ‘always’ - GPSLogger II allows you to specify alternative locations for the ‘maps’ and ‘themes’ - to change the folders you need to open the ‘Offline OpenStreetMapping Settings’ from the applications Settings menu and press the Browse… button and navigate to the folder that containings your *.map files (or theme xml files). E.g. when you have a removable SDCard it can make sense to download the map data via a PC/MAC and then copy the data over to the SD-Card (instead of downloading the *.map files via your mobile device)
Typically, you find an external SDCard in the /storage folder of your device - where your external SD-Card has some sort of cryptic name like ‘BAC8-1217’
In contrast to the internal SDCard that will be accessible via /sdcard or /storage/emulated/0/
Turn-by-Turn Navigation
Overview
GPSLogger supports different input formats for navigation turn-by-turn Information…
The app makes use of the online routing engine openrouteservice.org (HeiGIT gGmbH / University of Heidelberg). One of the reasons why GPSLogger makes use of openrouteservice.org is simply because I had the chance to be part of the development team and contributed the current active road bike profile (beside some other internal core things).
You have multiple options to start the turn-by-turn navigation function in GPSLogger:
- When creating a route with openrouteservice.org the route can be exported as JSON and then directly imported into GPSLogger (as an alternative you can ‘beam’ the route to emacberry.com backend and import the route from PathManager)
- A path that has TurnInfo can be loaded as (reverse) navigation path (from PathManager)
- You can touch & hold any point on the map and then select from the popup-menu the item Directions…
- When you are recording, you can select from the application main menu the item Bring me Back which will start an online routing request back to your staring location
Details about how to plan a route can be found in the Plan a Route Section
Requirements
- Temporary online connection to request routing data from the routing-service.
or - A Path in PathManager that is marked with the has TurnInfo addon
Once the navigation path (your planed route) is loaded the application doesn’t need the online connection any longer. But if you leave the planed route by more than 50 m, then the application will try to find the shortest way back to the initial planed route - for this type of Detour-Routing-Requests GPSLogger requires an online connection.
Show next TurnInfo as embedded image
need revision
Off-road Navigation
Overview
It’s not always possible to extract turn-by-turn instructions for a previous recorded path (or a path that you have downloaded from another source) [e.g. a cycling or hiking (round) trip that you have downloaded in GPX or KML format]. The reason for this missing turn-by-turn information is mainly, that there is no OpenStreetMap data available in the given region - or even simpler - there are no roads, path’s or tracks - it’s really just all OFF-ROAD terrain.
When you want to follow a path without turn-by-turn instructions, then it’s impossible for the app to know if there are any junctions on your route. The app will always point into the direction of the next calculated waypoint on the given route.
DISCLAIMER
IN NO EVENT WILL emacberry.com OR ITS LICENSORS BE LIABLE FOR ANY INJURIES OR OTHER DAMAGES, HOWEVER CAUSED AND REGARDLESS OF THE THEORY OF LIABILITY, ARISING OUT OF THE USE OF THE SOFTWARE, EVEN IF emacberry.com HAS BEEN ADVISED OF THE POSSIBILITY OF SUCH DAMAGES.
DANGER
The app is JUST pointing into the direction of the next calculated Waypoint. There does not have to be a direct link from your current location to the target the app is pointing to.
YOU ALWAYS HAVE TO REVIEW the TERRAIN and the WAY AHEAD of YOU
Use this function ONLY if you are aware of the risk of injury, if you feel sufficiently physically fit and trust the application.
Outdoor Navigation - Theory of Operation
Having in mind that a path is nothing more than a list of locations which follow each other the concept of outdoor navigation that is working in GPSLogger II is quite easy to understand.
Before you start you have to know, in which direction your previously recorded path (or imported GPX file) is pointing to. The locations on the path are ordered from point A to the point B or from B to A (or if they are ordered clockwise or counterclockwise for round-trips). This is a very important aspect for "your" way and the direction you want to take. In this documentation it is assumed that you have a path that is going from point A to point B and you want to follow it in the same direction (so you are currently at location A and want to arrive at location B).
For the proper functionality of the outdoor navigation in GPSLogger II, two settings in the option’s dialog have been introduced which have a major influence on the behaviour of the navigation software. If you have understood the concept of how outdoor navigation is working in GPSLogger II you can adjust these two values ‘When Waypoint is reached’ & ‘Distance to next Waypoint’ to your likings. In this documentation it is assumed the following (default) values are present:
- When Waypoint is reached: 15 m/50 ft
- Distance to next Waypoint: 250 m/820 ft
Please note that you do not have to be in logging mode in order to use the outdoor navigation function of GPSLogger II.
-
Start GPSLogger II and open the Path-Manager
-
Select the path you would like to follow
-
Select Load NaviPath
or (if you are at location B and want to go to location A, then you have to select)
Load inverted NaviPath -
GPSLogger will now calculate the nearest Waypoint (on the loaded Path) from your current location – this Waypoint becomes the first location, to which GPSLogger II will be guiding you (pointing towards the direction in the direction view).
Please note, that the direction view is highly dependent based on your current course. In order that your BlackBerry® device is able to calculate your current course you have to be in movement. In any other case you will notice that the compass needle will be just rotating randomly – in the case of your device having difficulties to calculate the course please switch to the path view because this provides you with a good orientation of which direction you have to go (also use the ZOOM IN function in this case).
Please note additionally that it could happen, that the next waypoint will not be calculated correctly (reported by a user) in this case please make use of the
Reset Navigation overlay button. In order to re-run the find the closest point on the path to your current
location and calculate the next waypoint. -
Now you should move towards the direction GPSLogger II is pointing to. Please mind (depending on your physical start location) that GPSLogger II cannot take any natural barriers like buildings or rivers into account. It will be assumed you are already quite close to one of the locations that are along the path.
-
When the distance between your current location and the point to which GPSLogger II is pointing at the moment is less than 15 m/50 ft (depending on your ‘When Waypoint is reached’ setting) the current waypoint is considered as reached and the next waypoint in sequence will be automatically calculated and will be set as the new location to reach.
-
Now you are in a loop of step 6) until you reach the final/last location (waypoint) that is recorded on the path, and you should then finally have reached your final destination.
Depending on your sample interval GPSLogger II will change the color of the path from light grey to dark grey when GPSLogger II believes you are on the path. “Being on the path” means, that you consequently reached the calculated location. Once GPSLogger II is in this mode only waypoints that are ahead in the navigation path will be considered as possible next waypoints. You can reset this behavior by using the Reset Navigation overlay button.
How GPSLogger II will calculate the next waypoint?
Once you have reached (or are close to) the location to which GPSLogger II has guided you, the next waypoint will be calculated automatically. Therefore, GPSLogger II will “look ahead” in the loaded navigation path and calculates the distance to each waypoint from your current location – once the distance of a waypoint is greater than 250 m/820 ft (depending on your ‘Distance to next Waypoint’ setting) it is qualified to be the next waypoint to which GPSLogger II will guide you. Each location on your navigation path could potentially become a waypoint during the outdoor navigation.
Technically GPSLogger II will not keep you on the navigation path exactly waypoint by waypoint of the loaded navigation path – it is more that the application will find the next point (on the path) in the specified distance from your current location and take this point as the next waypoint.
What happens, if you do not reach a waypoint?
If your ‘When Waypoint is reached’ setting is too small, or you have to go an alternative route (e.g. because of an obstacle), it could happen that you do not reach the waypoint to which GPSLogger II is trying to guide you to.
In this case GPSLogger II is able to detect, that you are actually moving away from the target (instead of approaching it) and the nearest waypoint on the path will be calculated again automatically which could take few moments. Once the calculation is finished you will be directed to the new location. If this autocorrection fails then there are additional menu items that could be used to get you back on your way.
Additional Overlay Buttons
| Icon | Description |
|---|---|
|
Reset Navigation When you press space GPSLogger II falls back to it’s start procedure of the outdoor navigation. The nearest location in the path will be calculated and the nearest location will be your next target. You will notice, that the color of the path is changing again to light grey and GPSLogger II will consider all locations in the path again as possible next waypoints. |
|
Next Waypoint (+) Calculating the next possible waypoint based on your current location. |
Outdoor navigation challenges
When you are using outdoor navigation there is a big difference compared to street navigation or what is called Turn by Turn navigation. In street navigation you can rely on edge calculations and relations. Outdoors you do not have any kind of edge model that could be used. This difference causes an issue you might encounter when you would like to start a round trip.
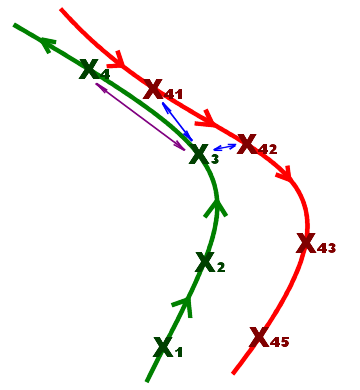 The image to the left is showing a typical round trip start situation. The start and the end of the round trip have the
same waypoint. The green line in this diagram is the starting path while the red one is the end of the round trip.
The image to the left is showing a typical round trip start situation. The start and the end of the round trip have the
same waypoint. The green line in this diagram is the starting path while the red one is the end of the round trip.
At the start of the navigation (or if the application failed to detect the arrival at a waypoint) GPSLogger II is calculating the distance of the current location to all points of the path. GPSLogger then assumes that the point with the closest distance to your current location is the best that can be chosen to start/continue with the navigation. Most of the time this works quite solidly – but in the illustrated situation once you start at location X3 you will realize, that this approach could lead to the wrong conclusion.
When you start your round trip near X3, then GPSLogger II will calculate the closest point to your current location – and the result of this calculation will be either X41 or X42 (both of them are of course on the way back home) and not X4 which is the point you want to arrive at.
Furthermore, you have to know that once GPSLogger II believes you are on the path it will be just looking ahead on the path to calculate the next waypoint. So once GPSLogger II has taken X42 as your current location on the path it will continue guiding you to X43, X44 and X45. This is surely not what you want! The good news is that GPSLogger II will try to autocorrect this error. Once the distance of the location is increasing (a couple of times) instead of (expected) decreasing, GPSLogger II itself will assume it is somehow off the current path and start to look again for the point that is closest to your current location – in the example you are hopefully much closer to X4 and GPSLogger II should finally find it.
So when you are on a round trip that has a common start and end point, then expect some problems concerning the
direction to which you will be guided. Once you will leave the common part GPSLogger II will autocorrect its next target
location, and you should be finally on the right way.
Benefits of logging while navigating
Even if you do not have to run the logger while you are following another path it can have some benefits. When you are using the outdoor navigation function of GPSLogger II you will have the additional Timing-View and the direction view information about the distance along the path between your current position and the final end point and depending on your current speed the estimated time of arrival (ETA).
Calculating the ETA based on the current speed only can be quite inaccurate. When you are actually logging GPSLogger II can use your average speed to calculate the ETA - in most of the cases this will be way more accurate. But there is more
- when the ETA is calculated based on the average speed then you will see an additional up/down arrow behind the ETA. This arrow depends on your current speed compared to the average speed - when you are actually faster than the current average speed, then the final calculated ETA will be smaller and vice versa.
Special function in logging mode: ‘Bring me Back (route)’
This function will take the recorded path, invert it and load it automatically as navigation path. Now instantly the pointer (in direction mode) guides you to the last waypoint (in the specified distance). Once you have reached that point the application will calculate automatically the waypoint before that - this continues until you reach the origin (start point).
So this is a macro function for the manual steps: Stop logging (& save path), open Path-Manager, select path & finally ‘ Load inverted NaviPath’.
Plan a Route
(forked from openrouteservice.org)
Overview
Since a couple of months ago GPSLogger allows you to follow a previously planed route with turn-by-turn instructions. The planing & transfer process of these routes has been sub-optimal in the past, and so I am very happy to let you know that I can provide now a separate site that is dedicated to route planing that should give you all the features needed and is easy to use.
Requirements
- PC/Mac to use the website (not optimized for mobile usage)
- Temporary online connection (to transfer the route to GPSLogger)
You find the service at the following URL: https://route.emacberry.com/
Creating a route (based on OpenStreetMap data) is now very easy and IMHO convenient to use. Some turn instructions might be confusing but are related to the data source - some optimizations are applied during the import, but it is always recommended checking the final route, before you start your trip.
Save a created Route on the website
Typically, all route services and websites I am aware of require registering and creating an account - GPSLogger II route service is different! - No registration - no login - no personal data is stored. If you want to save/store a created route, simply create a browser bookmark of the site, and you are done. You can simply restore the route by opening the bookmark at any later time.
Here is an example route link: https://route.emacberry.com/directions?n1=52.033868&n2=8.853757&n3=15&a=52.038178,8.834279,52.035162,8.864551,52.026251,8.861246,52.024944,8.847771,52.027809,8.831999,52.037987,8.834236&b=1c&c=0&g1=-1&g2=0&h2=3&k1=en-US&k2=km
Transfer a route to your mobile device
I have decided to use a very simple way to connect the website with your mobile device - during the planning phase your web browser and your mobile phone have something in common: your current location! It’s true that this is not highly secure - but since GPSLogger is not used by 10 million people the location is some sort of unique id. Please also note, that no additional/personal or device related information will be transferred. So to send your current route it’s just two simple steps (Please note, that of course it’s required that you allow both your browser and mobile device to get your current location):
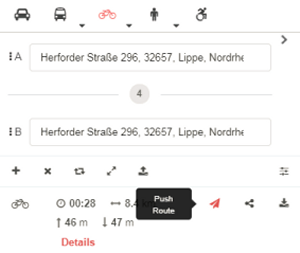 After you have completed your route you can select the Push Route icon -
this will open a dialog with some additional information - press the PUSH button to finally submit the
current route to the emacberry.com backend.
After you have completed your route you can select the Push Route icon -
this will open a dialog with some additional information - press the PUSH button to finally submit the
current route to the emacberry.com backend.
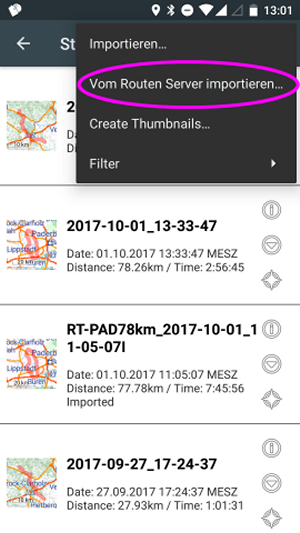 Once the route is submitted to the backend you can open the GPSLogger II PathManager and select from the Menu
the Import Route from Server… function. This will request (based on your current location) the latest route that
was submitted to the backend within the last 15min and in the range of 5 km of your current location.
Once the route is submitted to the backend you can open the GPSLogger II PathManager and select from the Menu
the Import Route from Server… function. This will request (based on your current location) the latest route that
was submitted to the backend within the last 15min and in the range of 5 km of your current location.
So in order to use this feature, make sure, that your browser running on your PC/mac and your mobile device show the
same location information.
Export as GPSLogger II Route JSON file
If you don’t like to transfer the route via the emacberry.com backend to your mobile device you can always use the export function as an alternative and transfer the route JSON file manually over to your mobile device. Once the file is copied to your mobile you can import the created route JSON file as any other GPX, KML or TCX via the PathManager import functionality [or open the file on the device (e.g. the eMail attachment)\ and select GPSLogger from the list of available file handlers].
External Sensors
Overview
As already mentioned in the Logged Data Section GPSLogger supports some additional external sensors. Mainly this feature has been added for my own cycling & running activities, so please understand that there might be a limitation when it comes to support of specific sensor brands or types.
The implementation is based 1:1 on the Protocol specifications (either ANT+ or BluetoothLowEnergy/Bluetooth) - so if your sensor is supporting the standard implementation of the protocol, it should work 🤞 (I’ll keep my fingers crossed).
Once you have paired a Sensor with GPSLogger, the app will always (try to) connect to the sensor during the startup. So it’s pair once - use forever. Of course, you can remove previously paired sensors vie the application settings. You also have the possibility to select from the list of paired sensors which you actually want to use (this especially applies to multi profiles).
You can make use of the audio announcement feature in order to get feedback about the connection state of each of your sensors. Additionally, you can enable the display of connection status information via the Application Settings.
BluetoothLowEnergy / Bluetooth
In the year 2022 we mainly talk about BluetoothLowEnergy (als known as BluetoothLE, BTLE or just BLE) Sensors. The probability that you buy a Bluetooth Sensor is IMHO quite low. But be aware that a lot of old fitness equipment still uses the old 5.3Khz Bluetooth (and not BTLE) technology. This kind of hardware can’t be used with GPSLogger.
So if you see the sign printed on your sensor - but it does not work with GPSLogger, then the chance is quite high that this is an old device. You might like to double-check with an app like nRF Connect for Mobile from Nordic Semiconductor if your sensor is visible by any way. If nRF Connect does not list/show your sensor, GPSLogger isn’t able to use it either.
If nRF Connect shows your sensor in the list, but GPSLogger is not able to connect to it - please get in contact with me - TIA!
Heartrate
Make sure your sensor is supporting the transfer of pulse data as described in the Bluetooth Heartrate Service Specification. There exists some old chest straps that make use of an old/deprecated Bluetooth standard which is quite energy consuming. Please note, that it’s not possible to use such an old-5.3Khz-technology-sensor with GPSLogger.
The Heartrate Service exposes heart rate and other data related to a heart rate sensor intended for fitness applications.
- Heart Rate Measurement
- Heart Rate Measurement Value - Unit: beats per minute (bpm)
- Sensor Contact Status
- Energy Expended - Unit: kilo Joules
- RR-Interval (The RR-Interval value represents the time between two R-Wave detections)
-
Body Sensor Location: Other, Chest, Wrist, Finger, Hand, Ear Lobe or Foot
- Heart Rate Control Point: Resets the value of the Energy Expended field in the Heart Rate Measurement characteristic to 0
I myself use quite a cheap chest strap from Genonaute (from Decathlon)1 - but can also confirm that the Dual Sensors from Polar, Garmin or Wahoo will work. And thanks to Holger we also solved an issue with the G.PULSE 3 in 1.
Cadence / (Speed &) Cadence
The Cycling Speed and Cadence (CSC) Service exposes speed-related data and/or cadence-related data while using the Cycling Speed and Cadence sensor (Server). The Service provides:
- The CSC Measurement characteristic (CSC refers to Cycling Speed and Cadence) is a variable length structure containing
a Flags field and, based on the contents of the Flags field, may contain one or more additional fields:
- Cumulative Wheel Revolutions - Unit less
- Last Wheel Event Time - Unit has a resolution of 1/1024s
- Cumulative Crank Revolutions - Unit less
- Last Crank Event Time - Unit has a resolution of 1/1024s
-
Sensor Location: Other, Top of shoe, In shoe, Hip, Front Wheel, Left Crank, Right Crank, Left Pedal, Right Pedal, Front Hub, Rear Dropout, Chainstay, Rear Wheel, Rear Hub, Chest, Spider or Chain Ring
-
SC Control Point see Bluetooth Specification sc_control_point.xml for details
- The CSC Feature characteristics:
- Wheel Revolution Data Supported (Y/N)
- Crank Revolution Data Supported (Y/N)
- Multiple Sensor Locations Supported (Y/N)
If you have a single Cadence sensor, then only the Cumulative Crank Revolutions and the Last Crank Event Time will be present in a CSC Measurement - anyhow the app will ignore any additional speed data (since the value will be taken based on your GPS).
I use multiple CAD-Sensors on different bikes: the one from Garmin, the old magnet-based one from BTWIN (a Decathlon brand) and the CAD-Sensor from Wahoo (which I can’t recommend since it hasn’t provided any values below 20 rpm during my testings)1
Cycling Power-meter
The Cycling Power (CP) Service exposes power- and force-related data and optionally, speed- and cadence-related data from a Cycling Power sensor intended for sports and fitness applications. The Service provides:
- The Cycling Power Measurement characteristic is a variable length structure containing a Flags field, an Instantaneous
Power field and, based on the contents of the Flags field, may contain one or more additional fields:
- Instantaneous Power - Unit is in watts
- Pedal Power Balance - Unit is in percentage with a resolution of 1/2
- Accumulated Torque - Unit is in newton metres with a resolution of 1/32
- Cumulative Wheel Revolutions - Unit less
- Last Wheel Event Time - Unit is in seconds with a resolution of 1/2048s
- Cumulative Crank Revolutions - Unit less
- Last Crank Event Time - Unit is in seconds with a resolution of 1/1024s
- Maximum Force Magnitude - Unit is in newtons
- Minimum Force Magnitude - Unit is in newtons
- Maximum Torque Magnitude - Unit is in newton metres with a resolution of 1/32
- Minimum Torque Magnitude - Unit is in newton metres with a resolution of 1/32
- Maximum Angle - Unit is in degrees
- Minimum Angle - Unit is in degrees
- Top Dead Spot Angle - Unit is in degree
- Bottom Dead Spot Angle - Unit is in degrees
- Accumulated Energy - Unit is in kilojoules
- The Cycling Power Vector
- Cumulative Crank Revolutions - Unit less
- Last Crank Event Time - Unit is in seconds with a resolution of 1/1024s.
- First Crank Measurement Angle - Unit is in degrees
- Instantaneous Force Magnitude Array - Unit is in newtons
- Instantaneous Torque Magnitude Array - Unit is in newton/meters with a resolution of 1/32
-
Sensor Location: Other, Top of shoe, In shoe, Hip, Front Wheel, Left Crank, Right Crank, Left Pedal, Right Pedal, Front Hub, Rear Dropout, Chainstay, Rear Wheel, Rear Hub, Chest, Spider or Chain Ring
-
The Cycling Power Control Point see Bluetooth Specification cycling_power_control_point.xml for details
- The Cycling Power Feature characteristic:
- Pedal Power Balance Supported (Y/N)
- Accumulated Torque Supported (Y/N)
- Wheel Revolution Data Supported (Y/N)
- Crank Revolution Data Supported (Y/N)
- Extreme Magnitudes Supported (Y/N)
- Extreme Angles Supported (Y/N)
- Top and Bottom Dead Spot Angles Supported (Y/N)
- Accumulated Energy Supported (Y/N)
- Offset Compensation Indicator Supported (Y/N)
- Offset Compensation Supported (Y/N)
- Cycling Power Measurement Characteristic Content Masking Supported (Y/N)
- Multiple Sensor Locations Supported (Y/N)
- Crank Length Adjustment Supported (Y/N)
- Chain Length Adjustment Supported (Y/N)
- Chain Weight Adjustment Supported (Y/N)
- Span Length Adjustment Supported (Y/N)
- Sensor Measurement Context (Y/N)
- Instantaneous Measurement Direction Supported (Y/N)
- Factory Calibration Date Supported (Y/N)
- Enhanced Offset Compensation Supported (Y/N)
- Distribute System Support [Unspecified (legacy sensor), Not for use in a distributed system, Can be used in a distributed system, RFU]
Again my personal setup - I use the Assioma Duo from Favero Electronics1
FTMS Treadmill Service providing Treadmill Data
The data available from the various characteristics will be used to a) simulate your current location and b) control your treadmill speed and incline. see Treadmill Section of this manual
FTMS Rowing-Machine providing Rowing-Machine Data
see Rowing-Machine Section of this manual
Additional non-standard BluetoothLE Sensors/Devices supported by GPSLogger
- Shimano Di2 Shifting Information via EW-WU101 or EW-WU111
- Concept2 PM2+ extended Rowing-Machine Data
ANT+
The ANT+ protocol is under the control of GARMIN and is the standard in the cycling world. Since a couple of years ago the required hardware to be able to receive data from an ANT+ sensor is not built any longer into smartphones. Apple started withdrawing the support if I remember correctly with the iPhone 6 (if not earlier) and other hardware manufactures have followed the Apple route.
IMHO ANT+ has reached a dead end for smartphones.
Before you are able to connect any ANT+Sensor with GPSLogger you need:
- Android Device with build-in ANT+ hardware
- The manufacture of the device has to compile valid ANT+ drivers into its Android OS (for my last phone with build-in ANT+ hardware the manufacture has withdrawn ANT+ support on hardware driver level with its latest OS update)
Additionally you need to install:
Just another side note: When I used ANT+ on my phone I ran into serious Wi-Fi-connection issues while my phone was on roaming (on vacation) and trying to connect to my ANT+ HR Sensor (each time Wi-Fi was turned off). So I have my opinion about the quality concerning the ANT+ drivers (built in Canada) but make your own experience.
Supported ANT+ Sensors
- Heartrate Sensors
- Cadence / Speed & Cadence Sensors
Audio Announcements
Overview
Personally I am a big fan of being able to use GPSLogger hands free - a big part of this experience comes from the fact that the app has implemented multiple so-called text to speech (tts) functionalities. Instead of checking your phone every kilometer yourself (in order to look up your pace, overall distance or time) the app can automatically give you this information (if a specified distance is traveled).
You have the choice, if the app should just give you a short audio signal once a certain mileage have been completed or if the app should inform you with overall and interval based information.
In the past years I have just had my mobile phone in the back pocket of my cycling jersey and let it announce every 5 km the overall distance, the time for the last 5 km and the remaining distance (when I was following a previously planed route) - Of course when I am following a planed route, the turn instructions will be also given via audio commands - In combination with being able to control my phone via my Di2 shifting levers this has become extremely convenient to use [e.g. to request details about the upcoming turn (especially the distance)].
These are the following types of audio announcements available (alphabetical order):
- Event Announcements
- Gained Height
- Sector Announcements
- Turn-by-Turn Instructions & Climb-ahead announcements
You can specify the output channel on which the audio information will be submitted. Also, you should know, that if you are listening to music or an audiobook this playback will be temporarily paused and after the signal resumed.
When you in the Application Settings > Speech & Audio Notifications > Make use of speech synthesis, then most of the audio announcement features are disabled. In this case only the Simple-Mode of the Sector announcements will be available as audio notification.
Sector announcements
When you are running or cycling you might want to get frequent information about your intermediate performance. Or simpler, you might just like to be notified once you have completed a certain distance (e.g. after each 1 km).
GPSLogger supports this via a function called Sector announcements, where the Sector length can be configured by yourself. So it’s really up to you, if this should be every km, every mile, every 500 yards or very 5 km (which I use for my cycling activities). [Just for completeness - you can use any number here - if you like to capture every 624 m (for what ever reason) you can do so.]
When you specify a sector distance of 0 the feature is disabled.
Simple-Mode
The simple mode will just trigger the playback of an audio signal of your choice once the configured sector distance has been completed. You can additionally select the duration of the playback - You have the option to choose between ‘play 1 time’ and ‘looping for 2-30 seconds’.
Text-to-Speech Mode
In order to use this feature you need to specify your sector distance. As described above it can be any value larger than 0. Once you have completed the specified distance you will hear a voice (generated via speech synthesis) that will provide you with the following information:
- Total Distance
- Total Time
- Total average Speed (Ø)
- Sector Distance
- Sector Time
- Sector average Speed (Ø)
- Distance to Finish (Navigation Mode)
- Elevation climb to Finish (Navigation Mode)
You can enable/disable each piece of information separately via the application settings!
A few more things you should be aware of:
- If you have enabled Total & Sector Data, then for the first Sector you will hear the Distance & Time only once - since Sector and Total values are identical.
- When you make use of the Speed as Pace feature, and you have configured the sector distance to an equal value to your pace distance (1 km or 1 mile) then a sector announcement can be quite irritating when you have enabled Sector time and sector average speed since you will then hear two time based information announcements (which are hopefully identical).
- Distance to Finish will be only announced if you have loaded a navigation path.
- Elevation climb to Finish (remaining meters to climb) will be only announced if you have loaded a navigation path from which the app could extract climb information (see also Climb View Section).
Turn-by-Turn Instructions & Climb-ahead Information
I hope it’s reasonable to you, the turn-by-turn instructions require that you have loaded a navigation path. And further: Climb-ahead information is only available if climb data could be extracted. More information about the climb extraction requirements and process can be found in the corresponding Climb-View Section.
Additional Options / Functions
-
You can enable, that each announcement can have an introduction (either a simple ‘Attention’ or any notification sound that is present on your device)
-
Turn-by-Turn announcements can be repeated for one time ( via the Application Settings)
-
Of course the announcement will be made, before the actual location is reached. The distance of how many meters before the waypoint the event-announcement will be made, depends on your current speed. As the faster you are, the more meters ahead the announcement will take place. The core idea is, that it’s always some seconds ahead so that you have time to prepare yourself for the turn. In addition, the events will be pre-announced at least 300 m before the actual location - so you should know something is coming.
You can adjust your preferences in the Application Settings > Speech & Audio Notifications > TurnByTurn Instructions & Climb-ahead Information Section.
TurnByTurn Instructions
If turn-by-turn instructions are present in navigation path they will be announced once you are approaching the next navigation waypoint.
Please find below some possible Turn instructions/parts as examples:
- straight ahead - continue _%STREET_NAME%
- …and stay on _%STREET_NAME%
- keep left / turn slightly left / turn left / make a sharp left turn
- keep right / turn slightly right / turn right / make a sharp right turn
- …onto _%STREET_NAME%
- make a U-turn
- at roundabout, take %NUMBER% exit
- reached Finish
Climb-ahead Information
If climbs are present in your loaded navigation path they will be announced once you are approaching them. Even if GPSLogger is support multiple units (like meter, feet or yard) currently all the climb information will be announced in (height) meter (welcome to the metric system).
Please find below some possible Climb-ahead information as examples:
- Climb of %METER_TO_CLIMB% for %DISTANCE%
- %CLIMB_METERS% from %METER_TO_CLIMB% mastered (That’s my half-time motivation)
- Climb of %METER_TO_CLIMB% completed
- Climb of %METER_TO_CLIMB% completed. Then %REMAINING_TOTAL_CLIMB_METERS% remaining to Finish
All these announcements also exist with an additional Climb Category information.
Event Announcements
Low Battery
Are you constantly checking the remaining battery of your mobile device? Or have you ever been caught by an unexpected high power consumption for what ever reason? So you can let GPSLogger II inform you about the current battery level of your device. When enabled you will hear one of:
Attention please your battery is low
- Battery level at 10 percent
- Battery level at 5 percent - charge device now
- Battery level at 2 percent - hey dude! - just two percent left
GPS Status
At the early stage of the application development it happened, that when I kept a phone in my pocket, that I turned Airplane-Mode ON or turned Location OFF by accident. So the app is able to inform you, when it does not receive a GPS location for a certain amount of time, so you are aware that the current location recording process can’t be continued until the signal recovers (sometimes this recovery happens automatically - sometimes it’s required to enable/reset a device setting). In case of an issue with the GPS signal you will hear one of:
- GPS Signal was lost
- GPS Signal recovered
Recording Started / Paused / Resumed / Stopped
When you make use of the AutoSTART / AutoSTOP or AutoPAUSE function of the app you might find it convenient to get an audio notification once one of these function are triggered. In case of one of the events you will hear:
Recording Started
or
Alert Recording was not started
(when there was a technical issue that prevents the app from creating a new file in the storage)
- Recording was Paused
- Continue Recording
- Recording Stopped
Summary after Recording
Additionally, to the Recording Stopped it’s possible to get an announcement of a summary (total distance & total time) for your finished activity.
More than 50 m Off / Back on track
When you are following a navigation path it might / can happen, that you leave the planed route by accident - when this happens you can let it inform you that you are not on the planned route any longer.
When you are off the route and have an online connection the app is able to request a possible detour back to your initial planed route - the app can let you know, when such a detour was found and the app is going to change the next Turn Instructions accordingly.
Finally, once you are back on the route GPSLogger can inform you again.
Obviously these kind of announcements are sort of obsolete when you are able to look at the display of your device - but even then - take these announcements as an additional indicator.
In case of one of these events you will hear:
- You have left the path
- You will be re-directed
- You are back on track
The You have left the path announcement will be playback as a loop - but the pause between the loops will increase over time.
ANT+/BluetoothLE device connection status
If you don’t like to check each time when starting GPSLogger, if the connection to the additional configured sensors (for the current active profile) have been established - or you want to be informed when the connection to a sensor has been lost, then you can enable the device connection status announcements.
In case of one of the events you will hear:
- Heartrate Sensor connected / connection lost
- Cadence Sensor connected / connection lost
- Speed Sensor connected / connection lost
- Power-meter connected / connection lost
- Di2 connected / connection lost
- Treadmill connected / connection lost
- Rowing Machine connected / connection lost
Di2 Battery below 20%
Has your Di2 ever run out of power during a ride as you forgot to check the battery status before you started? This never happens to me! Since I always know in advance when my Di2 will run low on power, thanks to GPSLogger.
This event announcement can be in the Di2 Settings Section of the App
Attention please
- Battery level of your Di2 reached 20 percent
- Battery level of your Di2 reached 10 percent
Gained Height
If your navigation path does not include any climb data, you can enable an announcement if you have completed a certain amount height gain meters.
This is quite an old feature and might be removed in the future. Let me know if you still find it useful.
Auto-START / Auto-STOP logging
Overview
With GPSLogger II it is possible to automatically start and end logging based on the current location - The simple use case is, that when I am leaving my home typically I don’t want to start the recording manually every single time - and the same applies when I am returning - GPSLogger ‘knows’ where I am and that I am at home - so then simply stop logging because the chance that I want to log any further are IMHO very limited.
Another use case is a loaded navigation path - so there are reasons WHY you have loaded a path? - right? - Yes - typically you want to follow this path, and it’s IMHO pretty reasonable to record this as well - so once you load a navigation path the start and end location of this navigation path will be also considered as auto START and END locations.
The open question for you as user is, WHEN does logging start - and WHEN does logging end.
Requirements
- Enabled & active GPS
- GPSLogger app must be started (can be sent into the background - you might like to activate the AutoStart on boot option)
- General Settings > AutoRecording & AutoPause > Auto-START Logging
or - General Settings > AutoRecording & AutoPause > Auto-STOP Logging
- At least one location in the LocationManager that is configured for Auto-START/STOP
or - A loaded navigation path
- If you have configured an Auto-START/STOP location GPSLogger will always launch it’s Background-Service when you start the application and keep the service up and running until you terminate the app by selecting EXIT from the menu (or use the EXIT action of the sticky notification).
Configure AUTO-Start & AUTO-Stop Locations
The central point of add/enable AUTO-Logging locations is the ‘LocationManager’ - you can select any existing location and press the more icon and then choose the Use for AutoStart/Stop from the context menu. Please note that once a location has been selected as an AutoStart/Stop location you can not edit the name or even delete it from the LocationManager. If you want to alter or delete it you have to remove it from the AutoStart/Stop Location list first. This can be simply done by selecting ‘Remove for AutoStart/Stop’ from the context menu in the LocationManager.
I am fully aware, that adding new locations in the LocationManager itself can be quite a hassle - so with the new build of GPSLogger II I have implemented some new/additional ways to add new locations:
- Open any previously recorded path - navigate to the location you want to save via the regular navigation arrows - open the context menu and select Save Location
- In the Map view you can touch & hold at any position of the map to open the context menu - here you have the option to add a new Location - that can then be accessed from the LocationManager
- Open the GoogleMaps application - place a marker “anywhere” by tap and hold at the position till a marker appears - by tapping again on the marker itself some details for this marker will be shown - including some actions like save, label, download or share - select the share action and from the list of available apps select GPSLogger II - after this is done it takes a short while (you need to be online btw) and the LocationManager should list the new location within GPSLogger II.
Theory of operation
Once enabled in the General-Settings-Section the AUTO Start & AUTO Stop locations will be rendered with different colored circles on the map screens where each circle has a certain meaning:
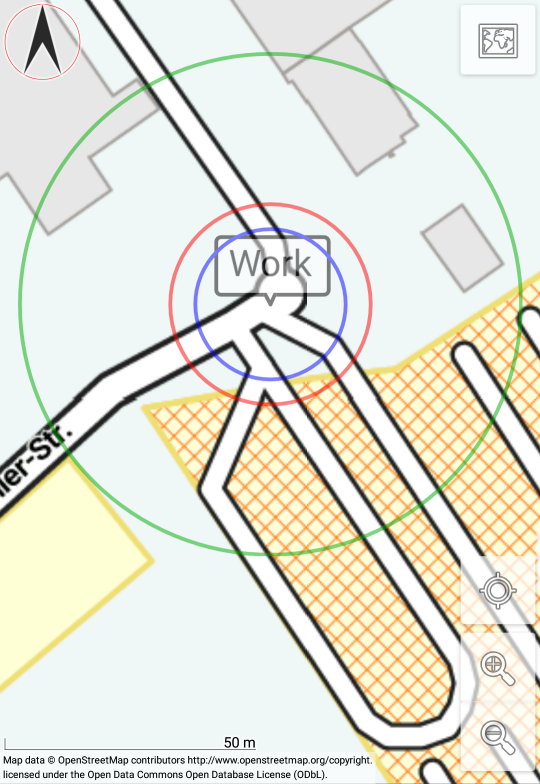
-
The RED-colored circle (20 m radius) is the AUTO-STOP cycle - as soon as you are in the red circle the logging (if it’s running) will be stopped. Please note that there are some additional restrictions for the auto stop logging: a) when you are auto logging a navigation path, then the logging distance has to be at least 75% of the navigation path b) when you make use of a AutoStart/Log location the logging distance has to be at least 1 km.
-
The BLUE-colored circle (15 m radius) is the initial trigger of the AUTO-START process - the logging will only automatically start when you are in the blue cycle. In other words you need to be inside the blue circle in order that the auto start logging code for this location will be activated.
-
The GREEN-colored circle (50 m radius) is the AUTO-Start range - once you are outside the green cycle (and this location has been activated by being in the blue circle before) the recording will be automatically started.
So to sum it up
- Be in range of the blue circle (activate)
- Move out of the green circle to start logging
- Entering the red circle (of any configured auto start/stop location) to stop logging.
Personally I additionally make use of the start logging & stop logging event Audio Notifications to be 100% sure that my cycling tours will be automatically recorded as soon as I leave my home or work. see Audio Notifications
Emergency Alerting
Overview
GPSLogger can automatically send an eMail notification when you do not move a specified distance in a certain time. In order to use this feature you need to authorize GPSLogger to use an eMail account (since the eMail will be sent from this account) to the recipient(s).
This feature was introduced around 2012 - seeing as in the year 2022 Apple Watch 7 TV ads, advertised the brand new feature of an automated emergency call where the latitude and longitude coordinates will be submitted as text-to-speech seems to be ridiculous. Yes it’s nice, that your watch will make an automated call (if you are not able to do so) - but the watch needs either an eSIM or a paired phone (in range) and obviously the same restriction as for the GPSLogger II Emergency Alert function applies: the device needs to be online (a network connection is mandatory).
Requirements
- Configured eMail account
- Emergency Alert Settings
- A time delay (that is not OFF) specified
- A minimum distance > 0 specified
- At least one valid recipient specified
- AutoPause feature
- GPSLogger is actually recording (not STOPPED or PAUSED)
- If previously cancelled: You have to have travelled more than the minimum distance in the configured time again
- Device needs to be Online (since eMails can only be sent, if the device is online)
Theory of Operation
When you are using GPSLogger to record your movement, then it seems to be sort of natural that the app is able to realize when you have stopped moving. This can currently be achieved by using your settings - if you do not move the specified distance in the specified time, then the app assumes something (serious) has happened and is going to send the previously configured email to the recipient(s) - the eMail also includes the current position, a link to GoogleMaps, as well as the complete KML file of your activity (so the recipient can see what path you have followed).
Please note that the notifications will be only send when GPSLogger II is in logging mode - if you stop logging (or enter the pause mode) no alert’s will be sent.
It makes a lot of sense to inform the person who is going to receive this email in advance, that you have configured an application that could automatically send an email in your name, in the case of an emergency.
Please take the time and agree on a procedure that should be followed, once such an email arrives.
So e.g. when you are hiking, then you have an approximated average speed of 2-3 km/h (0.5 - 0.8 meter per second) - also assuming you make short rests of 2-5minutes in between, then selecting as time delta 5 minutes and select a minimum distance of 150 m - 240 m (in the Emergency Alert Settings) would be fine.
You don’t have to focus on calculating your average speed. When not moving, your GPS position is jumping around (sometimes just a few meters - sometimes it can be 25 m or more - this mainly depends on the signal quality from the satellites). When you add some meters to this ‘signal tremor’ (jitter) and then use this value (‘maximum jumping distance’) as minimum travel distance you should be safe.
Personally I have configured 75 m - since moving 75 m in 5 minutes means a speed of 0.9 km/h which is doable as the average speed on my activities.
When you make use of the Auto-PAUSE feature of the application, the app can not send an Emergency Alert that is based on a minimal movement calculation.
Information that an Emergency Alert was sent
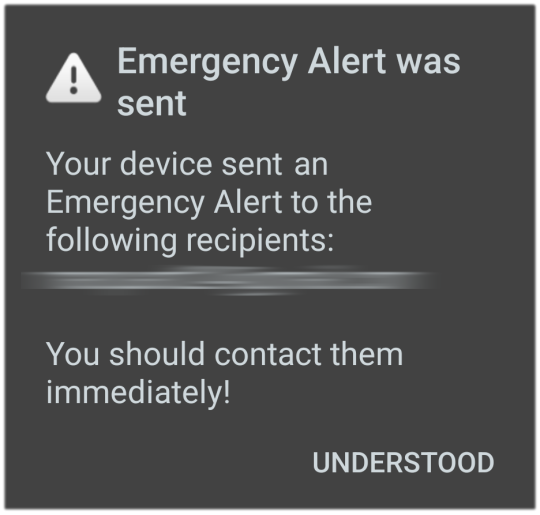 It doesn’t matter if you have selected to
intercept an Emergency Alert or not - once the application has triggered the send process of an Emergency alert to the
configured recipient(s) that app will show you a non-cancelable dialog like this one here.
It doesn’t matter if you have selected to
intercept an Emergency Alert or not - once the application has triggered the send process of an Emergency alert to the
configured recipient(s) that app will show you a non-cancelable dialog like this one here.
So when ever you see this dialog it’s strongly recommended getting in contact with the recipients of the alert eMail.
Option to intercept the Emergency Alerting
It can happen, that when you have enabled the Emergency Alert functionality that you will accidentally send an eMail because you take a longer rest and forget to pause/stop the recording - or you are just moving slower than usual e.g. because of a steep climb.
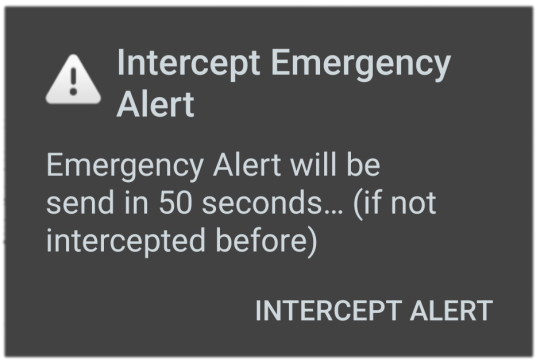 When
Show intercept Dialog, then the app is going to show you for
one minute an additional dialog and will play an alert sound (in an endless loop) in order to make you aware
that the app is going to send out an Emergency Alert email to your configured recipient(s) shortly.
When
Show intercept Dialog, then the app is going to show you for
one minute an additional dialog and will play an alert sound (in an endless loop) in order to make you aware
that the app is going to send out an Emergency Alert email to your configured recipient(s) shortly.
Additionally, to the continuously looped audio alert, a timer is ‘ticking’ in the dialog to shown you are able to
intercept the alerting process. If you do not press Intercept alert in this ‘last-call’ dialog, the app is going to
send out the alert email without further notice.
So by enabling the Show intercept Dialog the Emergency Alert will be delayed by one additional minute.
Select an Intercept-Alert Sound
The audio notification will use the configured sound for the ‘Pace’-Notification. If you haven’t configured one, the sound used for the WayPoint Reached Notification will be used.
If this is also not configured, then the app will use the DEFAULT device NOTIFICATION sound, if that’s not configured then the DEFAULT device ALARM sound will be used and the final fallback sound is the DEFAULT device RINGTONE.
So the complete fallback chain is
- GPSLogger Settings: Pace NOTIFICATION Sound
- GPSLogger Settings: WayPoint Reached NOTIFICATION Sound
- Device Settings: DEFAULT NOTIFICATION Sound
- Device Settings: DEFAULT ALERT Sound
- Device Settings: DEFAULT RINGTONE Sound
What you should do, when you have received an Emergency Alert eMail from GPSLogger
OK - you received an Emergency Alert eMail from GPSLogger - this means, somebody you know is currently not able to move or respond to an alert on their mobile device. The eMail you have received was sent automatically - it’s quite reasonable to assume that the person is unconscious and could not make any call for help by themself.
Of course, you can double-check by giving the sender of the eMail a phone call - but don’t be surprised if they will not pick up the call.
What should you do? Hopefully you have agreed on a procedure to follow with the sender - now is the moment for your action.
With the eMail you have received:
-
A link to GoogleMaps showing the current location of the device that caused the alert (a link, like this one)
https://maps.google.com/?q=HERE_2022-01-21T12:19:56.167Z@47.39553088,11.22492661&z=12
[clicking on the link will show you the position of the device in GoogleMaps] -
The location as plain text in Latitude/Longitude format (like this example)
latitude: 47.39553088 | longitude: 11.22492661 -
A KML-File showing you the route your contact has traveled to far (this can be used in order to see what route has been taken in order to reach the position where the possible accident has happened).
If you received such an eMail by surprise - and did not agreed on a procedure - then you are in a bit of a tricky position.
What has just happened: An application installed on a smartphone, detected that it’s owner did not move a certain distance in a time defined by the owner of the device. This detection caused an automated email - the one you just have received.
There is a probability that the sender of the email has had an accident and needs help. Unfortunately here I am not able to give your any additional advise as to what would be your appropriate reaction.
In my GPSLogger Settings I have configured my wife as recipient and agreed with her on the following procedure, IF she is ever going to receive such an Emergency Alert email from me, she will:
- Try to give me a phone call
- If I do not respond to this call in 2 Minutes she will call an ambulance and submit my position provided in the eMail
Multi Views
Customize your GPSLogger II Screen
Overview
GPSLogger offers multiple ways to allow you to see the different data simultaneously. The simplest way is to enable two additional views beside the main view.
As already described in the Main Views Section it’s possible to start GPSLogger with additional views (or temporary enable/disable them via the main menu) and adjust the aspect ratio between the main and the additional views. You can think of each of the screen parts as a container, that is capable of showing an own screen instance - just in a different size. The alignment of the three views depends on the orientation of your decide (portrait or landscape).
With the concept of allowing up to three different views to be present at once I had the opinion that this would give the user all the flexibility that is needed. As more external sensors has become available, there was the need to offer an additional approach to customize the available screens.
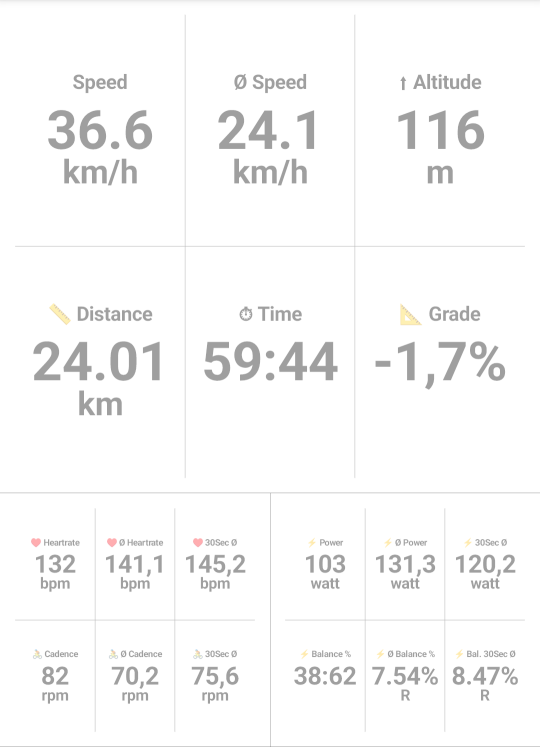 So beside the possibility to show 3 different views on the main application screen, four completely free configurable
views have been added. These views called Multi View I - Multi View IV. For each ot this four views you
can select up to 6 different values tobe displayed.
So beside the possibility to show 3 different views on the main application screen, four completely free configurable
views have been added. These views called Multi View I - Multi View IV. For each ot this four views you
can select up to 6 different values tobe displayed.
Since you can of course also show different Multi Views as one of the three main views, you have the option to configure & show up to 18 different values on your main screen (3 x 6 values). That might already feels like sitting in the cockpit of a plane.
But of course you don’t have to specify for each multi view 6 different values - the size of each value will be adjusted based on the overall screen space, since each value will consume the same space. So the layout of the views is totally dynamic.
To make the setup process even more complex the multi-view field definitions also support the multiple profiles feature.
So for each of your activities you can define a different set of multi-view fields.
Available Fields for Multi Views
| Field | Icon | Description |
|---|---|---|
| Clock | 🕒 | showing the current time |
| Speed | showing the current speed | |
| Ø Speed | if recording, this will show the average speed | |
| Total Distance | 📏 | if recording, this will show the total distance |
| Elapsed Time/Duration | ⏱ | if recording, this will show the total time (excluding breaks) |
| Altitude | ⬆ | current elevation (including corrections/adjustments) |
| Course | 🧭 | current direction/heading |
| Course (simple) [N,E,S,W] | 🧭 | Simple/textual course information N, NNE, NE, ENE, E, ESE, SE, SSE, S, SSW, SW, WSW, W, WNW, NW, NNW |
| Ascent | ⛰⬆ | the total sum of altitude that was gained over time |
| Descent | ⛰⬇ | the total sum of altitude that was lost over time |
| Grade | 📐 | the current slope (based in the previous und current elevation) |
| VAM | ↗ | The current VAM value (see Climb View for details) |
| Next Turn | when a navigation path that contains turn-by-turn information is loaded - additional the distance to the next waypoint will be shown | |
| Relative Speed | This is the speed you approaching to the current active waypoint (next navigation target). E.g. when you are sailing, it can be very interesting to know your relative speed to the target | |
| Distance to Finish | 🏁 | when a navigation path is loaded the remaining distance till the end of this navigation path |
| # BTLE | Number of currently detected BTLE Beacons with a specific UUID | |
| Gear | ⚙ | numeric front & rear gear information (if Di2 is bound) |
| Ratio | ⚙ | the resulting gear ratio (if Di2 is bound) |
| Gear Schema | ⚙ | visual front & rear gear information (if Di2 is bound) |
| Di2 Battery | 🔋 | The current battery status of your Di2 System |
| Heartrate | ♥ | your current heartrate (in beats per minute or %) as provided via an external sensor |
| Ø Heartrate | ♥ | if recording, this will show the average heartrate |
| last 3sec Ø Heartrate | ♥ | if recording, this will show the average heartrate of the past 3 seconds |
| last 10sec Ø Heartrate | ♥ | if recording, this will show the average heartrate of the past 10 seconds |
| last 30sec Ø Heartrate | ♥ | if recording, this will show the average heartrate of the past 30 seconds |
| Cadence | 🚴 | your current cadence (in rotations per minute) as provided via an external sensor |
| Ø Cadence | 🚴 | same as for ♥ |
| last 3sec Ø Cadence | 🚴 | same as for ♥ |
| last 10sec Ø Cadence | 🚴 | same as for ♥ |
| last 30sec Ø Cadence | 🚴 | same as for ♥ |
| Power | ⚡ | your current cycling power (in watt) as provided via an external sensor |
| Ø Power | ⚡ | same as for ♥ |
| last 3sec Ø Power | ⚡ | same as for ♥ |
| last 10sec Ø Power | ⚡ | same as for ♥ |
| last 30sec Ø Power | ⚡ | same asfor ♥ |
| Power Balance L/R in % | ⚡‑Bal. | balance between Left & Right leg from the cycling power when provided from the external sensor |
| Ø Power Balance L/R in % | ⚡‑Bal. | same as for ♥ |
| last 3sec Ø Power Balance | ⚡‑Bal. | same as for ♥ |
| last 10sec Ø Power Balance | ⚡‑Bal. | same as for ♥ |
| last 30sec Ø Power Balance | ⚡‑Bal. | same as for ♥ |
| Stoke Rate | 🚣 | your current rowing stroke rate (in stokes per minute) as provided via an external sensor |
| Ø Stoke Rate | 🚣 | same as for ♥ |
| last 3sec Ø Stoke Rate | 🚣 | same as for ♥ |
| last 10sec Ø Stoke Rate | 🚣 | same as for ♥ |
| last 30sec Ø Stoke Rate | 🚣 | same as for ♥ |
| Stoke Count | 🚣 | total Stoke count of rowing session |
| Stoke Distance | 🚣 | total Stroke distance of rowing session |
| Max Speed | V 📈 | The maximum speed during your current activity |
| Max Grade | 📐 📈 | The maximum grade during your current activity |
| Max Heartrate | ♥ 📈 | The maximum heartrate during your current activity |
| Max Cadence | 🚴 📈 | The maximum bike cadence during your current activity |
| Max Stroke Rate | 🚣 📈 | The maximum rowing machine stroke rate during your current activity |
| Max Power | ⚡ 📈 | The maximum bike power during your current activity - Please note it does not make sense to show a maximum bike power balance value, since it’s probably always L100%/R100% |
| Speed last 10sec Max | V 📈 | The maximum speed in the last 10 seconds |
| Grade last 10sec Max | 📐 📈 | The maximum grade in the last 10 seconds |
| Heartrate last 10sec Max | ♥ 📈 | The maximum heartrate in the last 10 seconds |
| Cadence last 10sec Max | 🚴 📈 | The maximum bike cadence in the last 10 seconds |
| Stroke Rate last 10sec Max | 🚣 📈 | The maximum rowing machine stroke rate in the last 10 seconds |
| Power last 10sec Max | ⚡ 📈 | The maximum bike power in the last 10 seconds |
| Power Balance last 10sec Max | ⚡‑Bal. 📈 | The maximum power balance (L/R) in the last 10 seconds |
| Speed last 30sec Max | V📈 | The maximum speed in the last 30 seconds |
| Grade last 30sec Max | 📐 📈 | The maximum grade in the last 30 seconds |
| Heartrate last 30sec Max | ♥ 📈 | The maximum heartrate in the last 30 seconds |
| Cadence last 30sec Max | 🚴 📈 | The maximum bike cadence in the last 30 seconds |
| Stroke Rate last 30sec Max | 🚣 📈 | The maximum rowing machine stroke rate in the last 30 seconds |
| Power last 30sec Max | ⚡ 📈 | The maximum bike power in the last 30 seconds |
| Power Balance last 30sec Max | ⚡‑Bal. 📈 | The maximum maximum power balance (L/R) in the last 30 seconds |
Is there any value you miss? Please let me know!
As example - for cycling, I have the map as main view and have the three different multi views configured to show 4 different fields each:
- View 1:
- Power
- Heartrate
- 30Sec Ø Power
- Speed
- View 2:
- Distance
- Distance to Finish
- Elapsed Time
- Next Navigation Turn
- View 3:
- Accent
- Grade
- VAM
- Next Navigation Turn
Dark/Night Mode
Being eye friendly
Toggle between Light/Day & Dark/Night Mode
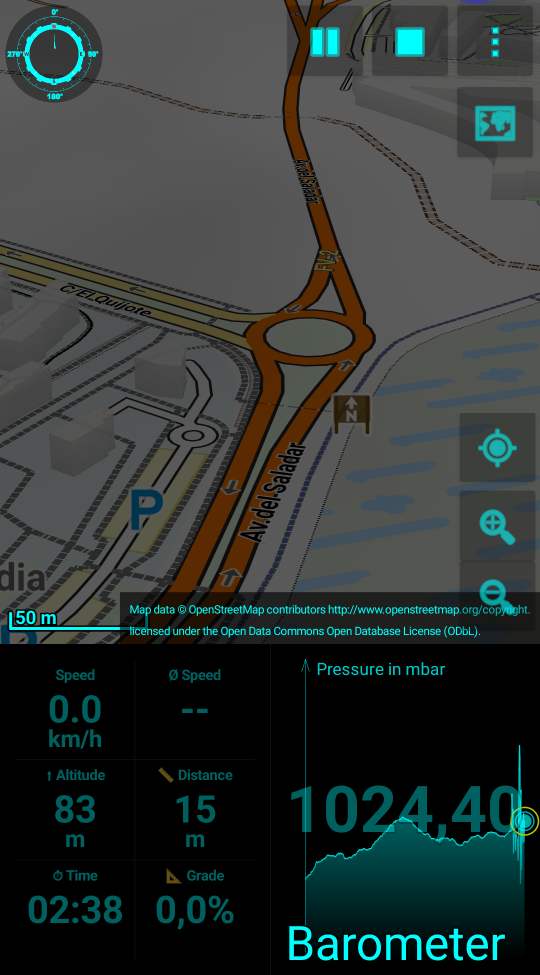 In most of modern GUIs you can select between a light & dark theme - initially the dark mode of GPSLogger started under
the term night mode. The functionality remains the same - instead of the bright white background you can switch to an
all-black display. This black-background make the app way more eye friendly when you use the app during night-time.
In most of modern GUIs you can select between a light & dark theme - initially the dark mode of GPSLogger started under
the term night mode. The functionality remains the same - instead of the bright white background you can switch to an
all-black display. This black-background make the app way more eye friendly when you use the app during night-time.
You can toggle between Day & Night Mode via the main menu of the app.
When you dislike the opacity level of the map in dark/night mode, there is some good news for you - there is a setting
to adjust it. Open Application Settings > Appearance & Startup > Map & Path View Settings > Map opacity (night). The
default value is half, but you can select between full, 4/5, 3/4, half and 1/4. Where full does not dim the map at
all and the 1/4 will give you a bare vision of the map (but it really depends on your use case).
Besides the Map opacity there are additional settings available to configure the Night Mode behaviour:
- Binding Night Mode to OS DarkMode
- Start application in Night Mode
- Specify the Night Mode ColorScheme
You find these options in Application Settings > Appearance & Startup > Font size & Display options… > Night Mode Options
Binding Night Mode to your OS DarkMode will automatically toggle between day & night mode of the app when you toggle between default & Dark theme of your Android. Enabling the binding will disable the option to start GPSLogger in Night Mode by default.
Dark/Night Mode ColorScheme
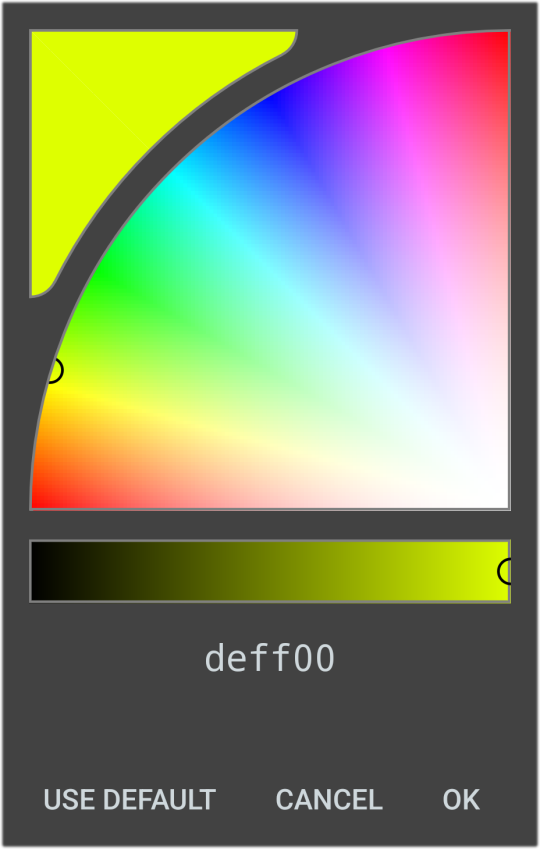 Since there is not a perfect dark mode color, you can choose from any RGB-Color the palette of your device is offering.
Feel free to play around with the color chooser and find the perfect night color for you.
Since there is not a perfect dark mode color, you can choose from any RGB-Color the palette of your device is offering.
Feel free to play around with the color chooser and find the perfect night color for you.
Live Location Sharing
+ HappyPartner - HappyLife
Overview
With GPSLogger it’s possible to frequently share your live location with others. Who is going to be able to access your location is totally up to you. The app does not offer an additional backend-service which is sharing your current location - all is happening from your device only. The sharing happens either by simply emailing or the app can frequently send your location to a custom URL in a given format (including support for Home Assistant). Once the location has been sent to such a URL it is beyond the control of the app - use this feature wisely.
The HappyPartner - HappyLife is an extension of the regular share-current-location functionality that was built into GPSLogger almost from the first day. Initially called HappyWife - HappyLife, the function has been renamed in 2022. The intention of this function is to let a recipient (or multiple recipients) know your current location after a certain amount of time.
When I am on a solo cycling tour, then my wife knows, I usually return after 2 hours. When I am not back at home after a certain time Gaby is going to start to get a bit nervous. Of course, she can give me a call or check otherwise where the heck I am, or she’s simply going to receive frequent emails from GPSLogger when I am not back home after 2 hours, letting her know my current location (so she can judge, if I will return shortly - or if it’s going to take another 4 hours).
Requirement
- App needs to be able to send eMails (be online)
or - The app must be able to complete a URL request in some other way
Sharing your location
In order to be able to share you location you need to start the recording process - the sharing will continue when you are pausing the recording.
You have the option to share your location in three different ways:
- Sharing by email
- Sharing via an own backend / generate custom URL requests
- Sharing by executing a TASKER-TASK
- Sharing via your Home Assistant instance - see Home Assistant section
All these options can be combined with each other.
Start sharing your location after a delay
As described above you might not want to instantly share your location once you start with your activity - therefore you can specify in the application settings an initial delay. Only if your activity takes longer then this initial delay will the sharing process be started.
You can specify such a delay via: Application Settings > Sharing Location Information > HappyPartner HappyLife
Share via eMail
Specify a recipient (or multiple recipients), specify a subject that should be used and additionally specify the content of the email that will be sent by the application. Additionally, to your custom body the app will add other data (used location values are just an example):
Current Location: https://maps.google.com/?q=HERE_2022-01-21T12:19:56.167Z@47.39553088,11.22492661&z=12
Lat: 47.39553088
Lon: 11.22492661
Course: 234°
Speed: 3.2 km/h

Sent via GPSLogger II - https://www.emacberry.com/gpslogger.html
Share your location via TASKER
Please see the dedicated TASKER Integration section of this manual.
Share your location via a custom URL
You can specify a custom URL to which GPSLogger is going to send a simple GET-Request including your current position as decimal latitude & longitude values, as URL parameters, all as plain text, not encoded & not encrypted. A timeout of 5 seconds for the request will be used.
Additional to the defined time interval in which the app is going to send the current location of the device to your
specified URL, the app will send on Start/Stop recording and Pause/Continue recording events additional requests
that contains an additional parameter cmd (with the event type as value) in order to allow you further server side
actions.
You might like to add some sort of ID to your URL, if you want to be able to distinguish between multiple GPSLogger installations on your backend.
It’s strongly recommend that you use HTTPS in your custom URL to protect your data
The GET-REQUEST will have the following format:
{YOUR_SERVER_URL}?lat={LATITUDE_AS_DECIMAL_NUMBER}&lon={LONGITUDE_AS_DECIMAL_NUMBER}[&cmd={start|stop|pause|continue}]
As an example, if you have your own server/domain, and you want to collect your locations there, then you can write some small request processing code yourself and deploy it on your server. Assuming your domain is called www.anyfancydoma.in, and you have written a PHP script called incoming that’s going to process the requests, then you should specify in the application settings the URL https://www.anyfancydoma.in/incoming.php.
If your server URL contains an additional custom device-likeID parameter and therefore already including a ?, the app
will add an & instead of the ? after the given [YOUR_SERVER_URL].
The resulting requests the app generates will then look like this (just as an example - of course lat, lon and id values will be different):
https://www.anyfancydoma.in/incoming.php?lat=47.39553088&lon=11.22492661
Please note that there is no backend available @ emacberry.com that would handle live location requests - simply because of privacy concerns that would come with hosting this kind of data.
Here is some example PHP code that is able to process GPSLogger live location sharing requests and store this data into a local mysql database table with the name gpslogger_live (the config.php has to contain your database credentials):
<?php
    header("Pragma: public");
    header("Expires: " . gmdate("D, d M Y H:i:s", time() + 60) . " GMT");
    header("Cache-Control: must-revalidate, post-check=0, pre-check=0");
    header("Content-Type: image/png");

    if(!empty($_REQUEST["lat"]) && !empty($_REQUEST["lon"])){
        require('./config.php');
        if (defined('ALL_DBOK')){
            $con = mysqli_connect($dbhost, $dbuser, $dbpasswd);
            if (!$con){
                //die('Could not connect: ' . mysql_error());
            } else{
                mysqli_select_db($con, $dbname);

                // logging the incomming live location...
                $cmd = $_REQUEST["cmd"];
                if($cmd){
                    // do something special with 'start/stop/pause/continue'
                }
                $lon = $_REQUEST["lon"];
                $lat = $_REQUEST["lat"];

                // only required when you do in-range queries later..
                $sin_lat_rad = sin($lat * 180 / M_PI );
                $sin_lng_rad = sin($lng * 180 / M_PI );
                $cos_lat_rad = cos($lat * 180 / M_PI );
                $cos_lng_rad = cos($lng * 180 / M_PI );
                $insert = sprintf("INSERT INTO your_location_live_data (
                        lat, lng,
                        sin_lat_rad, sin_lng_rad, cos_lat_rad, cos_lng_rad)
                        VALUES ('%s', '%s', '%s', '%s', '%s', '%s', '%s');",
                    mysqli_real_escape_string($con, $lat),
                    mysqli_real_escape_string($con, $lng),
                    mysqli_real_escape_string($con, $sin_lat_rad),
                    mysqli_real_escape_string($con, $sin_lng_rad),
                    mysqli_real_escape_string($con, $cos_lat_rad),
                    mysqli_real_escape_string($con, $cos_lng_rad)
                );

                mysqli_query($con, $insert);
                mysqli_close($con);
            }
        }
    }else{
        http_response_code(404);
    }
?>
A config.php template - ??? have to be replaced with your mysql db values
<?php
    $dbhost = '???';
    $dbport = '???';
    $dbname = '???';
    $dbuser = '???';
    $dbpasswd = '???';
    @define('ALL_DBOK', true);
?>
Creating the MySQL db with the possibility to create in-range queries
CREATE TABLE `your_location_live_data` (
    `lat` double NOT NULL,
    `lng` double NOT NULL,
    `sin_lat_rad` decimal(10,10) DEFAULT NULL,
    `sin_lng_rad` decimal(10,10) DEFAULT NULL,
    `cos_lat_rad` decimal(10,10) DEFAULT NULL,
    `cos_lng_rad` decimal(10,10) DEFAULT NULL,
    `ts` timestamp NOT NULL DEFAULT CURRENT_TIMESTAMP ON UPDATE CURRENT_TIMESTAMP,
    PRIMARY KEY (`lat`, `ts`),
    KEY `sin_lat_rad` (`sin_lat_rad`,`sin_lng_rad`,`cos_lat_rad`,`cos_lng_rad`)
) ENGINE=MyISAM DEFAULT CHARSET=utf8 COLLATE=utf8_bin;
COMMIT;
Home Assistant
Use GPSLogger II as Location Sensor with your Home Assistant installation
Overview
When you have your own Home Assistant instance running at home and if this installation is reachable via a public URL (https), then you can use GPSLogger II as a location sensor.
Once you have specified your Server URL and a Long-lived access token, GPSLogger II can constantly send your current location to your home. You do not have to start any logging! (This behaviour can be configured).
There is a minimal movement distance of aprox. 1m - this means that the app will not send new locations to your Home Assistant Server when latitude or longitude does not change the 4’th digit.
Requirement
- Your Home Assistant installation is reachable via a public https URL (Android Apps have to use https for communication)
- The app must be able to complete a https URL request in some other way (in other words you need to have internet access)
-
You need to create a long-lived access token see Home Assistant Authentication documentation: long-lived-access-token
You can create such a token in your Home Assistant User Profile (scroll down to the bottom of your profile page).
It is highly recommended to use the ‘copy and paste’ function when entering your long-lived access token.
The token will be used a single time only to create a ‘GPSLogger II Tracker’ in your Home Assistant installation. The token will not be stored on your mobile device.
Configuration
The settings become editable, once you select a Time period
- Specify a minimum time delay/frequency in which the app will send a new location update (if location changed at all)
- Specify your Home Assistant Server URL (have to be https) -> e.g. by using Let’s Encrypt
- Specify your generated long-lived-access-token (use the ‘copy and paste’ function)
- Select, if the app should constantly send your location - or if the updates should be only send while logging (including paused)
Elevation Data optimizations
GPS based elevation information can be so bad
Overview - Improving Elevation data
The app has implemented two independent functionalities to improve the elevation data provided from the GPS signal.
- Use a Mean Sea level altitude reference - correction of WGS84 elevation information to EGM2008
- Make use of Barometer data in order to detect altitude changes (if sensor is available)
WGS84 vs. EGM2008
TLDR; The elevation information provided via GPS is actually not want you want.
I don’t want to waste you time with all the details & reasons why it is what it is - and also I don’t want to start a discussion here & now as to if there are better alternatives to EGM2008 or not (you are invited to start one in the forum).
What’s important to know is, that GPSLogger will record a GeoIdHeight (and if this data is not available, the app will post-calculate it). This GeoIdHeight will be used, to correct the WGS84 elevation data to something that comes quite close to the elevation information we use here on planet earth.
As already described in the How GPSLogger will log your data Section, all GPS data will be recorded as it is, and the MSL correction (when enabled) will be applied when the data is displayed.
If you want to read the full story, use the following Wikipedia link as a good start point:
The use of the Mean Sea level altitude reference is enabled by default - you can disable it in the Application Settings > General Settings > Altitude Reference Model
Using Barometer based Elevation - Theory of operation
With GPSLogger it’s possible to capture barometer data - from the barometer sensor data the app can calculate an internal 500ms average value and then use the avg pressure value as base to calculate your current elevation.
A few things I would like to explain additionally:
-
The app stores the barometer sensor value - from that stored pressure value the elevation value will be calculated during display/export time - To calculate the actual elevation you can base it on the yearly avg pressure at 15 °C and sea level - with this formula you can calculate with a given pressure the current altitude - but of course this will be not quite correct since the pressure is changing weather wise - and we do not have a constant temp of 15 °C (so I decided against that)… What I do is that I calculate the elevation based on the actual pressure change - this generates two small additional challenges: what is the base pressure? and what is your starting elevation?
-
I decided a simple approach to calculate the base pressure and base elevation - When you start the application the app is going to track the current GPS based elevation and the actual pressure - when you start recording I calculate the average GPS elevation and average pressure of the last 30 seconds. Then I use these average values for the actual elevation calculation (BaseGPSElevation + currentPressure/BasePressure) - by doing this, the elevation calculation should be IMHO quite weather and mostly temperature Independent…
Warning some Physics & Maths here - In the actual formula the temperature used is Kelvin - this temp in K will then be divided by 0.0065 and used as the multiplier for the relation of both the pressure values -> so at 0 °C the factor is 42023 and at 30 °C the factor is 46638 - so the difference between both factors is 1,1098 - this will result in a difference of 10 cm when a pressure change happens at 0 °C compared to the same pressure delta at 30 °C
I don’t know how drastically the temperature is going to change during your rides - my initial train of though here is, that a delta of 10 °C might happen… If temp changes more drastically I can add some things in the post-processing that will allow you to also take the temp change also account (therefore it would be cool if you take a device that records the temp over time with you) - I think I have seen some bike computers doing that… [there are really few phones that have an external temp sensor - because the device itself generates quite some heat] -
The app records the gps elevation and the barometer values separate from each other - so in the internal file format there are always two values present - during GPX Export the user has to decide which value should be written into the elevation data field
Preparation before Start Recoding
Before you start with the recording, its recommended being stationary for at least 30sec. The best thing you can do is to put your device on something solid/stable like a table, the ground or the roof of your car. To allow the Barometer sensor to calibrate itself.
When you start the app while moving up or down hill and then start the recording, this will result in non-plausible BaseElevation & BasePressure values. Then the calculated pressure based elevation values will also not be correct. BUT there is no reason to jump out of the window in this case. It’s possible to correct both base values after the recording in order to finally get good elevation values. This adjustment is not an easy task, but you don’t have to be a hacker.
- Export the Path as JSON
- Open the JSON file in a text editor like Notepad
- Search for the fields basealt (, basemslalt) and basepsi and edit them
- Save the file & import the JSON into GPSLogger
Climb-Detection & Handling
Not only for Hiking and Biking enthusiasts
Overview
Being able to judge your walking, hiking or cycling performance in flat terrain is relatively easy (of course this depends on your overall fitness level & endurance).
When you’ve ever planned (or are going to plan) a tour in an alpine area, knowing the climbs ahead of you can become very essential. Additionally, being able to gt some information while you are climbing like: how many meters you have already completed or how many meters you still have to go, can become quite a motivating factor.
GPSLogger is trying to support you in this kind of challenges by offering a Climb-Detection algorithm and a dedicated view providing you with current climb information.
Since GPSLogger obviously hasn’t implemented a crystal ball, it’s required to load a navigation path that you would like to follow (so you have to have an already planed route/path).
Requirements
- Loaded a Navigation Path (that contains elevation data)
- Application Settings > Speech & Audio Notifications > TurnByTurn Instructions & Climb-ahead > Climb ahead Information
- … > TurnByTurn Instructions & Climb-ahead > Minimum climb elevation value specified (climb score)
The Climb-Detection algorithm
Definition of a Climb
GPSLogger will identify and classify climbs based on the needs of the user whilst they are navigating. It will provide the user with key information about those climbs. This includes:
- the number of climbs
- the distance to the next climb ahead of you
- the length of each climb
- the elevation gain left to complete on the current climb
- the current gradient
Essentials about gradient (or slope)
The grade value is a critical part of how GPSLogger detects climbs, so it is useful to make sure that the concept is understood. GPSLogger uses grade as a % in its calculations. Garde or slope is the rise (gain in elevation) over the horizontal distance travelled. So when you’re travelling 500 m and you gain 20 m of height, then the grade is 4% (20 m divided by 500 m, multiplied by 100 - or easier 20 divided by 5).
How does GPSLogger identify climbs?
GPSLogger will identify and show climbs by using a scoring system to select the climbs detected by the elevation changes in your navigation path - this value is called climb score and will be calculated as follows.
Climb Score = length of the climb (in meters) x grade (in percent)
Additionally, in the climb detection the app uses the climb score to classify the climbs. GPSLogger use an objective measure and treats each mountain isolated from each other by the following climb score value:
- Category 4 > 8000
- Category 3 > 16000
- Category 2 > 32000
- Category 1 > 48000
- HC (Hors Category) > 64000
Please note, that the categorizations can differ from those you know from professional road cycling, where the categorization of climbs is subjective and controlled by the race organizers who will take into consideration what elevation the riders have already climbed when categorizing each climb.
The rules for considering an elevation change over time as a climb in GPSLogger
All rules must be satisfied.
- At least a total length of 500 m
- The average grade must be 3% or more
- The resulting climb score must exceed the selected minimum climb score value
(Application Settings > Speech & Audio Notifications > TurnByTurn Instructions & Climb-ahead > Minimum climb elevation value - A climb must have a minimum elevation gain of 30 m
Examples
Here are some examples to illustrate how GPSLogger will apply the given rules to the data in your navigation path. In this example it’s assumed you have configured a climb score of 3100:
- A length of 850 m with an average grade 3.1% -> not detected as climb (Rule 3), climb score not reached
[Climb Score: 850 x 3.1 = 2635] - A length of 1300 m with an average grade 3.8% -> valid climb.
[Climb Score: 1300 x 3.8 = 4940] - A length of 510 m with an average grade 6.2% -> valid climb.
[Climb Score: 510 x 6.2 = 3162] - A length of 510 m with average grade 6.0% -> not detected as climb (Rule 3), climb score not reached
[Climb Score: 510 x 6 = 3060] - A length of 490 m with average grade 12.3% -> not detected as climb (Rule 1), too short (even if climb score = 6027)
- A total length of 18 kilometers, the first 5 km with average grade 7.2% and the remaining 13 km
with an average grade of 2.1% -> not detected as (Rule 2).
Note: GPSLogger will identify the first shorter climb, but not the full 20 km distance in this case.
The GPSLogger climb detection algorithm does not guarantee that the summit of a climb will be included in a climb, if it flattens out near the top - but the app always tries to end climbs at the highest detected point.
What to do, when you do not see any Climbs in your loaded navigation path?
First make sure that the path you have loaded as navigation path contains elevation data. If it does, then the elevation profile is not meeting the requirements of GPSLoggers climb detection. For users in flat regions (like myself) this may be frustrating, but GPSLogger is designed to only report significant climbs. The minimum climb score is 3000.
Possibility of breaking up climbs in case of a descent?
If the overall rule#2 (average grade >= 3%) is not broken then the algorithm allows downhill sections within a certain range - as the longer (distance wise) a climb is, the longer a flat/decent part can be. When the decent is more than 50% of the climb (elevation meter wise) the app will consider the climb has ended (at the highest point).
Climb View
The climb view will only show data if you have loaded a navigation path that contains elevation data. Furthermore, this data has to contain elevation changes that qualify for one or multiple climbs see climb detection.
The Climb view always shows the climb that is the closest to your current position (but in the climbs are ordered by the sequence of their occurrence in the loaded navigation path). So please don’t get confused when you start your activity and the Climb View will doesn’t show the first climb in the sequence.
Before or after a Climb
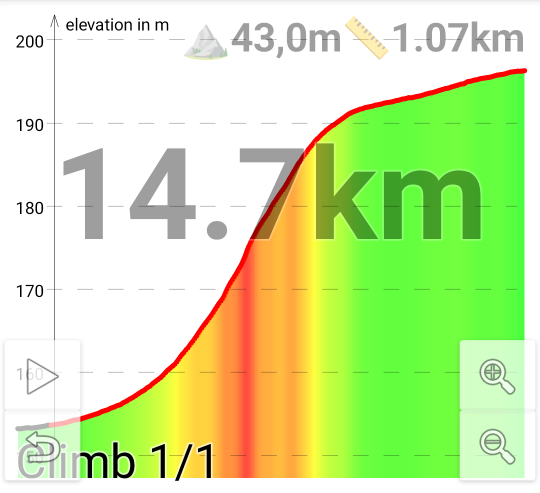
- Graph: Showing the profile of the climb (green: almost flat - red/purple: steep)
- Large Font: Showing the direct distance to the closest climb (can be the climb you just have completed)
- Lower left corner: current climb position (if there are multiple climbs on your route - as example a number like 2/7 means that is the second climb in a sequence of a total of seven is currently shown)
- Upper middle: ⛰ total elevation meters of the climb
- Upper right: 📏 total distance of the climb
So in this example the climb is the only climb of the complete route. It has a length of 1,07 km, and you need to
climb a total of 43,0 m. The Climb has a direct distance (as the crow flies) of 14,7 km to your current position
(not considering the planed route).
During a Climb
When you are in the climb the distance to the climb will change into two lines:
- Large Font Top: completed elevation gain
- Large Font Bottom: completed distance
- Dot-Marker: your actual position in the climb profile showing (might be too small) the current grade
So here in this example you have already completed 25,5 m (of a total of 45.0 m) in elevation gain, and you have
passed 675 m (of a total of 1,07 km) distance wise.
Auto enable Climb View when approaching a Climb
In the Application Settings when you select > Speech & Audio Notifications > TurnByTurn Instructions & Climb-ahead > Auto enable Climb View in Primary View, Secondary View I or Secondary View II the app will automatically switch to the Climb View in the selected main screen area once you are approaching the next climb (and switch back to the original view once the climb has been completed).
Even if I can use my Di2 Shifting levers to switch the current view while cycling - once I am approaching a climb I want to switch my main map view automatically to the climb view - and once I have mastered the climb I find it convenient that the map will be restored as main view - since while I am in a climb I will use the TextToSpeech TurnInstructions anyhow (if there are any).
VAM
need revision
When you record an activity where you have loaded a navigation path and the app could extract climb data (see Climb View for details) GPSLogger will store (while you are in such a detected climb section) multiple VAM data records in order to be able to show your velocità ascensionale media (translated in English to mean average ascent speed) performance after your activity.
https://en.wikipedia.org/wiki/VAM_(bicycling)
long secondsInClimb = (curActiveClimbObj.vamEndCalcRecord.tStamp - curActiveClimbObj.vamStartCalcRecord.tStamp - curActiveClimbObj.vamTotalDecentDuration) / 1000;
_navPath.mClimbData.mActiveVAM = (float) (curActiveClimbObj.getTotalClimbAlt() * 3600 / secondsInClimb);
if (_recording_state == LOGGING) {
    new RecordValueVAM(curRec.tStamp, _navPath.mClimbData.mActiveVAM));
}
Car Finder & Geo Caching
need revision
Firstly you have to know, that GPSLogger II supports two different ways to guide you to a certain place. In one of the modes you will be guided directly in the direction of a previously recorded location (Location-Mode) in the second one you will be guided along a previously loaded path (Path-Mode). It is very important that you understand the core difference between both cases.
Location-Mode [Geocaching]
The first one is suitable for geocaching or situations like finding your car in a parking lot or similar tasks. The direction view of GPSLogger II will always point in the direction of the location that you want to reach – no matter whether there are barriers between you and your target like buildings, rivers or canyons. So basically you have to find the correct route (streets, paths, hikes) to your destination by yourself – so don’t simply look at your display and walk into the direction the arrow is pointing – this might hurt (or result in a catastrophic failure :D) - Disclaimer: The author of this software cannot be held responsible for any damage, harm, injuries caused by the use of GPSLogger II.
Shimano Di2 Support
Overview
Since April 2019 GPSLogger has supported Shimano Di2 D-Fly Channel communication via the wireless modules EW-WU101 or
EW-WU111 [requires firmware v4.5.2 (or higher)].
When you own a wireless module for your Di2 you can now add your device via the additional ANT+ & BluetoothLE Sensor settings - simply press any button of your Di2 (to ensure that it’s powered on) and then start the Search for BluetoothLE Devices within the GPSLogger settings. Once your shifting is found and added you will find a new settings menu called Di2 Settings which will open the Box of Pandora!
GPSLogger II can log each shifting event and include the data in the FIT file format exports (currently Strava does not support shift events - but sites like http://di2stats.com do).
Please note that it might be required to adjust the gears in the Di2 Settings to your actual bike setup - if you want to bind multiple bikes equipped with Di2 to GPSLogger you can switch between them via the multi-sport profiles. GPSLogger allows binding different actions (like media player controls) to the 4 available D-Fly channels (you can configure the different buttons of your Di2 shifters to D-Fly channels via the E-Tube app of Shimano).
And of course there is a main view available that display the current gears and the resulting gear ratio. To make the initial setup as easy as possible a wizard has been added that you can start from the app main menu.
Single Click, Double Click & Long Click (aka Tab & Hold)
Having up to four different D-Fly channels is nice - but in GPSLogger you can have up to three different actions for each possible shifter button - which allows you to have up to 12 different actions that can be triggered from your Di2:
| single click | press and release the shifter button instantly (short-click) |
| double click | perform two single click’s shortly after each other - I do admit that this requires some practise to get use to the timing - the two clicks have to be performed with a pause no longer then 850 milliseconds |
| long click | press and hold the shifter button for longer then 1 second |
Available Actions (that you can individually configure for each D-Fly channel & click-type)
| Action | Description |
|---|---|
| New Lap | Add a Lap-Marker into the Path - Laps will be included in the FIT-file-Export (see Export & eMail for details) |
| Mark Location | Will add a Marker in the recorded path data - you will find them in the recorded path with the prefix Marked via D-Fly |
| Save Location | Will create & save a new Location (gpp file) with the name Marked via D-Fly (see LocationManager for details) |
| Data announcement (tts) | Will announce heart rate (if available) and current speed (more to come on user request) |
| Sector announcement (tts) | If you make use of sector announcements this action will calculate all sector data and will play the announcement |
| Next TurnByTurn Instr. (tts) | If a navigation path containing TurnByTurn information is loaded, the upcoming navigation instruction will be played |
| Cancel any tts output | Cancel any running TextToSpeech output (aka Shut The Fuck Up) |
| Display ON | (try to) Turn the display ON |
| Display OFF | (try to) Turn the display OFF |
| Switch to next View | Show next Main View |
| Switch to previous View | Show previous Main View |
| Launch Voice Assist | Starts the active Voice Assistant |
| Start ’OK Google’ | Starting the active Voice Recognition Assistant (probably that’s Hey Google) |
| Pick up call | Pick up any incoming phone call [Requires Android 8.0 (or later)] |
| Media player: Next | Trigger MediaPlayer NEXT-button press |
| Media player: Previous | Trigger 2 x MediaPlayer PREV-button press |
| Media player: Pause | Trigger MediaPlayer PAUSE-button press |
| Media player: Toggle | Toggle between MediaPlayer PAUSE and PLAY |
| Media player: Start | Start the MediaPlayer playback |
| Media player: Stop | Stop the MediaPlayer |
| Volume Up | Increase the output Volume of your device |
| Volume Down | Decrease the output Volume of your device |
Further Information
Treadmill
Overview
When you own a Treadmill with Bluetooth that supports the Fitness Machine Service (FTMS) standard then you can use GPSLogger to simulate a run anywhere in the world (including up- & downhill simulation).
All that needs to be known has been added into the Treadmill Setup Wizard that can be launched from the main menu.
The Wizard will end with a short introduction of how to use GPSLogger with your treadmill once you have completed the initial configuration.
When you make use of the Wizard the Treadmill will be configured as it’s own profile (that can be managed via the 'multi preferences' settings) - so you can easily switch between the outdoor & indoor usage without the need to alter any of your settings.
GPSLogger can also take over the control of the speed & incline of your treadmill (if this is supported by your device). The app can automatically slow down as the incline increases (and vise versa)
DISCLAIMER
Use the speed & incline control abilities of GPSLogger at your OWN RISK! - YOU CONTROL the app!
IN NO EVENT WILL emacberry.com OR ITS LICENSORS BE LIABLE FOR ANY INJURIES OR OTHER DAMAGES, HOWEVER CAUSED AND REGARDLESS OF THE THEORY OF LIABILITY, ARISING OUT OF THE USE OF THE SOFTWARE, EVEN IF emacberry.com HAS BEEN ADVISED OF THE POSSIBILITY OF SUCH DAMAGES.
DANGER - Allowing speed control can cause fatal injuries
Please understand that when GPSLogger takes control over the speed & incline of your treadmill, it could cause serious accidents. Remember the movie Terminator!
Any speed & incline adjustment will be done within the limits of the capabilities of your treadmill.
As a user, you must expect speed & incline changes at all times and must be able to respond appropriately at all times while using the application.
Use this function ONLY if you are aware of the risk of injury, if you feel sufficiently physically fit and trust the application.
Requirements
- GPSLogger Version 2.0.0.72 (or higher)
- enabled Bluetooth
- Treadmill supporting BluetoothLE FTMS1 that provide Treadmill-Data2
- [Optional] Treadmill supporting the BluetoothLE FTMS-ControlPoint3 protocol in order to allow GPSLogger to control the speed and incline .
- App bound/paired with your treadmill
- [Optional] bound ANT+/Bluetooth(LE) HR Sensor with GPSLogger
Usage
GPSLogger comes with a short wizard that will help you to connect your Bluetooth supporting Treadmill with the App (and create an Indoor Run multi sport profile) - once you have completed the procedure you should hear a “Treadmill connected”… once you have heard this confirmation you can start recording by following these simple steps:
Step 1 - Select a start location
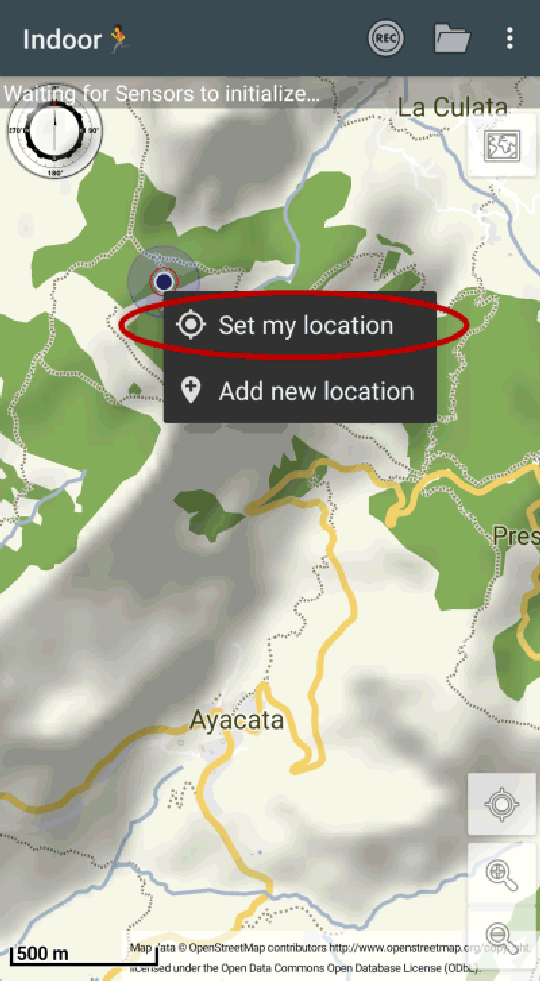 Pan on the Map to any location you would like to start your treadmill activity - tab and hold on the map until the
context menu is displayed - from the menu select Set my location
Pan on the Map to any location you would like to start your treadmill activity - tab and hold on the map until the
context menu is displayed - from the menu select Set my location
Step 2 - Select your destination & navigation type
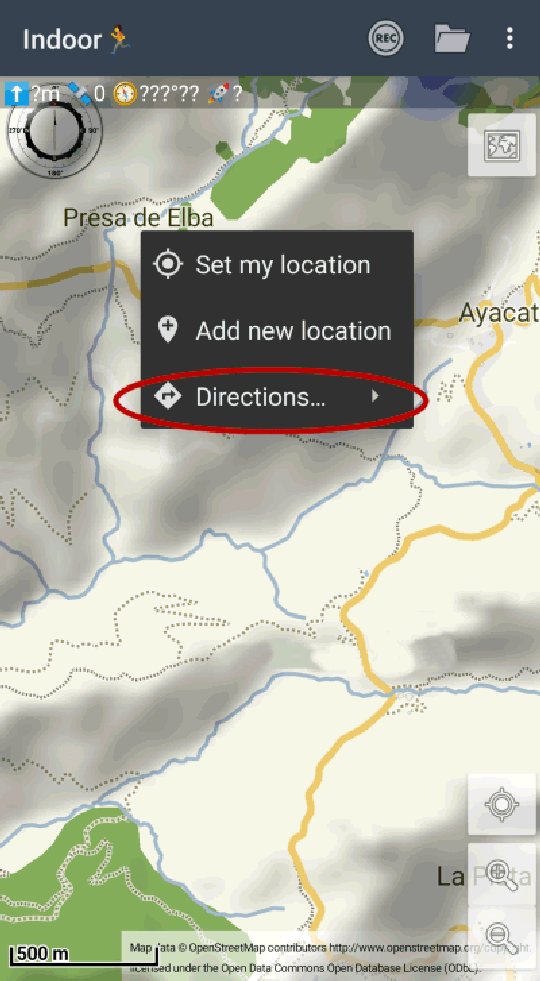 Pan on the Map to any other location you would like to end your treadmill activity - tab and hold on the map again until
the context menu is displayed once more and select from the menu this time
Directions… - please note, that you have to be online in order to use the “instant” navigation function of
GPSLogger. If you are offline you can load any previously recorded activity as a navigation path.
Pan on the Map to any other location you would like to end your treadmill activity - tab and hold on the map again until
the context menu is displayed once more and select from the menu this time
Directions… - please note, that you have to be online in order to use the “instant” navigation function of
GPSLogger. If you are offline you can load any previously recorded activity as a navigation path.
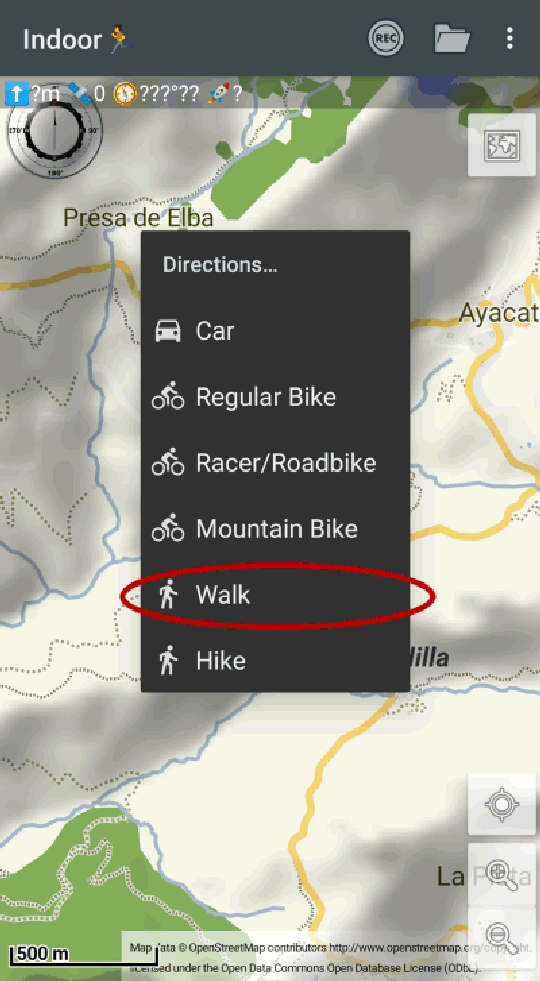 From the following menu select Walk (or
Hike…) - now the route/path will be requested via the
OpenMapRouting service.
From the following menu select Walk (or
Hike…) - now the route/path will be requested via the
OpenMapRouting service.
Step 3 - Start recording
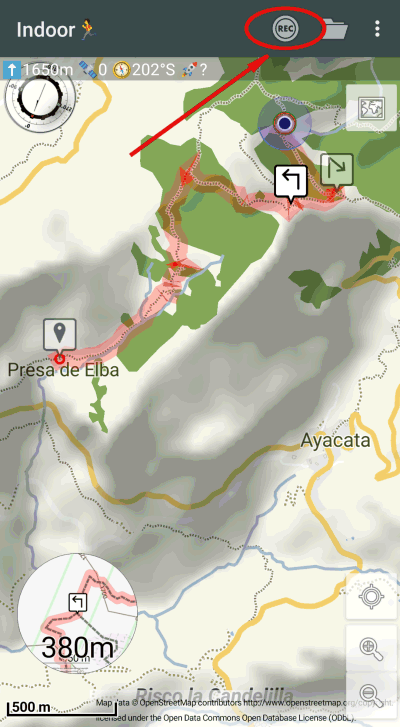 Once a navigation path is present/loaded you can press the
REC button in the top bar of the
application - this will send the start command to your treadmill that should shortly start (mine here has a delay of
5 sec) incl. a countdown. You will now follow the navigation path and depending on your additional GPSLogger treadmill
configuration the app will simulate the slope of the terrain ahead.
Once a navigation path is present/loaded you can press the
REC button in the top bar of the
application - this will send the start command to your treadmill that should shortly start (mine here has a delay of
5 sec) incl. a countdown. You will now follow the navigation path and depending on your additional GPSLogger treadmill
configuration the app will simulate the slope of the terrain ahead.
If you have enabled speed & incline control in the application setting, you need to confirm with every use, that you are aware of the potential fatal injury risk!
You can stop the treadmill via the Stop recording symbol (or simply via the
controls of your treadmill). When you have connected GPSLogger with Strava and
enabled the auto upload activities option, your virtual run will be instantly shared with your friends.
Rowing Machine
On the 28th of July 2021 my Concept2/PM51 rowing machine finally arrived - so I had to start with implementing the Fitness Machine Service (FTMS) Rowing Data Support in my GPSLogger application. Additionally, to this general BTLE standard the PM5 supports a lot of additional data fields [like DriveLength, DriveTime or for each stroke an individual force curve] which is pretty cool. All this additionally available data will be captured & logged with the App.
Requirements
- GPSLogger Version 2.0.0.186 (or higher)
- enabled Bluetooth
- Rowing Machine supporting BluetoothLE FTMS2 that provide Rower-Data3
or - A Concept2 with a PM2 (or higher)1
- App bound/paired with your rowing machine
- [Optional] bound ANT+/Bluetooth(LE) HR Sensor with GPSLogger
Overview
In order to make the initial setup and installation process as easy as possible the existing setup wizard has been extended in order to set up/configure your rowing machine. Once you start the wizard you need to turn on your PM5 and go to the ‘connection’ menu. Once the display reports “waiting for connections” you can press the “Search for BT-Devices” in the GPSLogger settings screen (to which the wizard has directed you).
I am fully aware that the setup could be much simpler if you had a dedicated rowing machine app. GPSLogger is a more multi sport/activity tracker app - therefore you have plenty of settings and configurations that are useful for other activities like hiking or cycling… On the other hand all these additional features [like voice sector announcements or the possibility to select you preferred distance unit (meter, feet or yards)] can have some benefits even when rowing.
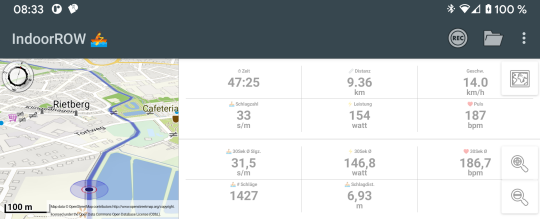 As a new GPSLogger user you can simply ignore all the other settings to start with - when using the wizard the app will
make some additional adjustments that IMHO match the indoor rowing workout quite well. The “only” quite important
information for new GPSLogger users is, that you can swipe left/right on every screen in order to toggle the current
view. In the initial rowing machine setup, there are 3 different views that will be displayed on the main app screen for
the start: the map and two additional multi-views like you can see it here on the screenshot
As a new GPSLogger user you can simply ignore all the other settings to start with - when using the wizard the app will
make some additional adjustments that IMHO match the indoor rowing workout quite well. The “only” quite important
information for new GPSLogger users is, that you can swipe left/right on every screen in order to toggle the current
view. In the initial rowing machine setup, there are 3 different views that will be displayed on the main app screen for
the start: the map and two additional multi-views like you can see it here on the screenshot
A map? Yes - a map - that’s probably just a personal thing - for all my indoor activities (so far cycling & running) I prefer to simulate a real outdoor activity - so instead of following a strict workout plan I enjoy the surrounding scenery ;-) Initially you can select between three different rowing locations (via the Rowing Machine Settings): the Ems river (365 km), the Rhine river (1167 km) and the Amsterdam Amstel Marathon 2022 (55 km).
Obviously these built in rowing location distances are slightly too long to complete in a single workout (except Amstel Marathon). Each time you stop the recording the app will store the last position in the simulated rowing path and will automatically continue at this position when you start your next workout. I hope it’s reasonable that this only works as long as you don’t alter the rowing location (Amsterdam, Ems, Rhine).
If you like you can connect GPSLogger with your Strava account and share your training with others and compete on existing segments (currently there is no exchange with the concept2 logbook yet - but this is on my to do list as well).
When you own a Concept2/PM5 and you want to use the data (like force curves) with external applications, you can make use of the CSV or JSON export function (via the Path-Manager). The CVS or JSON contains all the captured data.
Please note, that in this initial version no new/additional views have been implemented yet! So e.g. currently the stroke force curve data will be logged, but will not be displayed yet (but the data is included in the CSV/JSON export).
As soon as I receive some feedback, I will start with the implementation of additional views (like showing the force curve data).
How to start ?
- Select your workout (or “Just Row”) on the PM5 and start to row…
- As soon as GPSLogger receives the first Message from the PM5 the app will automatically start recording…
- Once you finished your workout and the PM5 sends the WorkoutEnd Message the app will stop the recording process and switch to the “view” mode
- If you used the “Just row” Mode of the PM5 you need to stop the recording manually by pressing the “STOP” button in the upper right corner (the “white square” or by accessing the app menu via the “3 dot” button)
- You can export the recorded data via the PathManager (that can be accessed via the folder icon in the main application bar)
Just a last hint - when you own a combined ANT+/BT HR Sensor - connect the sensor via BT to GPSLogger (can be done via the settings)… Once you have bound the app, there is no need to “rebind” the sensor for any training later… For me, it’s a bit of a challenge to remember each time when I start with my training on the rowing machine, that I need to bind my HR-Sensor again… So I let GPSLogger capture the HR (independent of the PM5) - but also I can bind the HR Sensor via ANT+ with the PM5 and use at the same time the BT sensor with GPSLogger…
-
Please note this is NOT AN ADVERTISEMENT I just use/own these devices - and I paid the regular price. ↩ ↩2
-
FTMS: Fitness-Machine-Service Bluetooth Specification / Specification XML ↩
Tasker Integration
Overview
Tasker is an extremely powerful tool to automate things on your Android device
- https://tasker.joaoapps.com/
- https://play.google.com/store/apps/details?id=net.dinglisch.android.taskerm
GPSLogger has built in location based autostart capabilities by itself - so you don’t have to use Tasker for that, but of course if you want to give Tasker the control, you can do so. Please see launching GPSLogger with an additional START or STOP logging command for details.
Whatever you choose, GPSLogger has the option to define Tasker tasks that should be called, once certain events occur while your recording. The following events allow you to define Tasker Tasks:
- Start Logging
- Stop Logging
- Pause Logging
- Resume Logging
- Live Location Share Event
(see Live Location Sharing & HappyPartner for details)
The Tasker Tasks for Start, Stop, Pause & Resume can be configured in the Application Settings > General Settings > Tasker-Integration, the Location Event Tasker Task has to be enabled and configured in the Application Settings > Sharing Location Information Section. Each time the app would send an eMail the selected TASKER-TASK will also be executed.
Provided Variables
Whenever a Tasker task is called there is the possibility to provide additional variables to the task. GPSLogger will currently provide the following:
The %action Variable
You can use a single TaskerTask and distinguish by the action variable what you would like to do.
| event | action value |
|---|---|
| start logging | %action = start |
| stop logging | %action = stop |
| pause logging | %action = pause |
| resume logging | %action = continue |
| share location | %action = notify |
Provided additional location & path related variables
| variable | condition / description / sample |
|---|---|
| %raw_latitude | plain decimal latitude value |
| %raw_longitude | plain decimal longitude value |
| %latitude | if no projection is configured / formatted latitude string (as shown in status bar) |
| %longitude | if no projection is configured / formatted longitude string (as shown in status bar) |
| %mgrsprojection | if MGRSProjection is used / location in the MGRSProjection display format |
| %zone | if other Projection then MGRS is used |
| %north | if other Projection then MGRS is used |
| %east | if other Projection then MGRS is used |
| %raw_altitude | |
| %altitude | (as shown in status bar) |
| %raw_heading | |
| %heading | (as shown in status bar) |
| %raw_speed | |
| %speed | (as shown in status bar) |
| %raw_clock | plain UTC timestamp - as long number |
| %clock | formatted local time (as shown in status bar) |
Additional variables when you are recording a path
| variable | condition / description / sample |
|---|---|
| %raw_duration | duration of the activity in milliseconds |
| %duration | formatted duration of the activity (as shown in status bar) |
| %raw_distance | |
| %distance | (as shown in status bar) |
| %raw_climb | if available |
| %climb | if available (as shown in status bar) |
| %raw_totaltime | |
| %totaltime | (as shown in status bar) |
Additional variables from external sensors
| variable | condition / description / sample |
|---|---|
| %raw_hr | if available & when using HR as % |
| %hr | if available / |
| %cad | if available / Bike Cadence as an integer number (in rpm) |
| %pow | if available / Bike Power as an integer number (in watts) |
Start & Stop GPSLogger recording from a shell command line
To start or stop GPSLogger recording you can send the very simple shell command:
am start -n com.emacberry.gpslogger/.GPSLoggerActivity --ez stopLogging true -f 536870912
When the app is recoding, then the recording will be stopped - if the app is not recording (and ist not in the view-mode)
then the recording will be started. Please note, that STOP-recording might be intercepted with a confirm dialog. The -f
is the FLAG option and we will send the FLAG_ACTIVITY_SINGLE_TOP (which has the int value 536870912) - as alternative
the --activity-single-top can be used.
Need more control?
If you want to have more control over start/stop behaviour (and do not like to use the simple toggle) you can make use of this alternative shell command lines:
Start logging
am start -a intent.action.STARTREC -n com.emacberry.gpslogger/.GPSLoggerActivity -f 536870912
Stop logging
am start -a intent.action.STOPREC -n com.emacberry.gpslogger/.GPSLoggerActivity -f 536870912
Start & Stop GPSLogger recording from TASKER
Please use the following intent details if you want to launch GPSLogger and trigger START or STOP from Tasker:
Start Recording Intent
<intent
    android:action="intent.action.STARTREC"
    android:targetPackage="com.emacberry.gpslogger"
    android:targetClass="com.emacberry.gpslogger.GPSLoggerActivity"
/>
Stop Recording Intent
<intent
    android:action="intent.action.STOPREC"
    android:targetPackage="com.emacberry.gpslogger"
    android:targetClass="com.emacberry.gpslogger.GPSLoggerActivity"
/>
So as an example, when you want to start logging via Tasker you have to specify in the Tasker Action-Dialog:
| Action | intent.action.STARTREC |
| Cat | none |
| … | … |
| Package | com.emacberry.gpslogger |
| Class | com.emacberry.gpslogger.GPSLoggerActivity |
A Example Tasker Script from GPSLogger User napalmfires
See Forum Post: “Tasker integration basics” (by napalmfires)
Direct download link to the Scripted provided by napalmfires - use it at your own RISK
Multi Preferences/Mode
Overview
When you use GPSLogger for multiple types of activities you will sooner or later run into the situation where settings that work great for the use case A does will cause trouble in use case B.
Just a very simple example - assuming you are using audio announcementsfor your running activities and every completed kilometer you get a detailed summary of your pace via text to speech. Today you are sitting in a plane and want to log your flight from San Francisco to Tokyo. This will create a lot of fun when the app generates an announcement every single kilometer - actually to be totally fair this will sooner or later crash the app since the audio announcements are going to be stacked on top of each other and can’t be completed before the next announcement arrives.
So instead of remembering each time when you have a different use case with diametrical requirements to reconfigure the settings in GPSLogger, the app offers a simple way to save different application configurations and load them all at once.
This feature is called Multi Preferences/Mode.
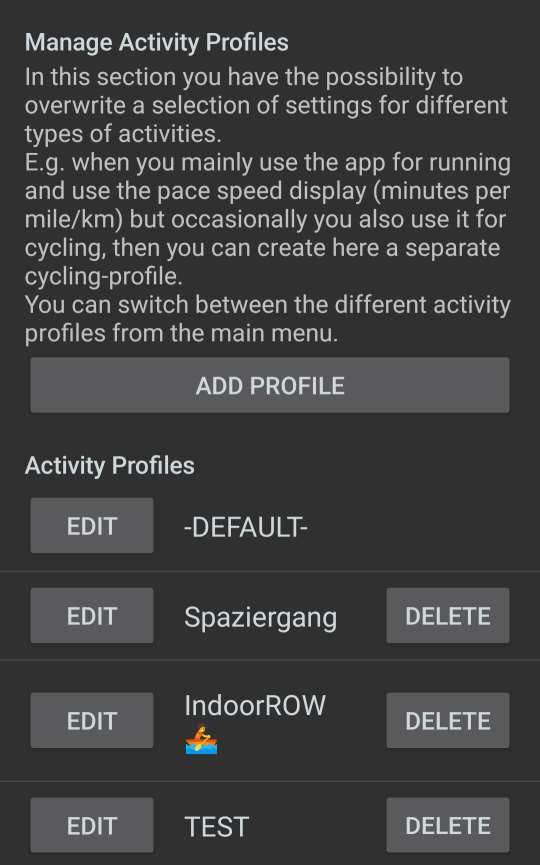 As soon as there is more than a single Profile present, you will find in the
main menu a Profiles… entry, that allows you to quickly switch
between the different configurations of GPSLogger.
As soon as there is more than a single Profile present, you will find in the
main menu a Profiles… entry, that allows you to quickly switch
between the different configurations of GPSLogger.
The ActionBar will show you the currently active profile (apart from when you have selected the -DEFAULT- Profile when the ActionBar will show the application name).
Personally besides my default one I have, profiles for: Hiking, RoadBike, IndoorRow, Indoor Run and Flying (+ multiple different profiles dedicated for certain application test cases). One reason for using this amount of multiple profiles is that in each Profile I use a different set of external sensors.
Not all settings are profile dependant. This generates some sort of challenge when you want to modify some app settings. How should you know which of the common/global application settings have a value in the multi-profile section?
When any profile is active, when you open the application settings, each setting/switch whose value would be overwritten in the multi-profile section will get a Prefix [Profile!] and the setting itself is disabled/not editable. So when ever you come across such a setting field, you should switch to Application Settings > Multi Preferences/Mode and select the current active profile to adjust it.
Create a new Profile
Open Application Settings > Multi Preferences/Mode and press the ADD PROFILE button. Specify a name (include emojis if you like) and select OK.
This will create a new entry in the list of Activity Profiles that are shown below the ADD PROFILE button.
To delete a Profile, simply press the DELETE button on the right-hand side - but caution, there is no additional confirm dialog. Once it’s deleted it can only be recovered by using the RESTORE-BACKUP functionality.
Edit a Profile / Available profile dependant Settings
Well surprise surprise - pressing the EDIT button will show you a condensed version of the Applications Settings dialog. The Profile Settings are structured into the following Sections:
- General Settings
- Appearance & Startup
- Voice/Audio Notifications
- Sharing Location Information
- Additional ANT+/BluetoothLE Sensors
General Settings
GPS-Sensor & Smoothing Setting
- GPS-Signal required
- Save NMEA Data
- Overwrite GPS-Speed
- Smooth Speed
- Path-Smoothing
- GPS update interval
- UUID Beacon Scanner
Additional Direction Sensor
- Use Direction Sensor
- Update interval
Additional Barometer Sensor
- Use Barometer Sensor
- Use as Elevation provider
- Autosmooth
- Update interval
AutoRecording & Auto Pause
- Auto-START Logging
- Auto-STOP Logging
- Auto-Pause
- AutoPause ON trigger
- AutoPause OFF trigger
Appearance & Startup
Unit & Format Options
- Default navigation profile
- Speed in Minutes per KM
- Heartrate in %
- Maximum Heartrate
Startup View Configuration
- Main View
- Secondary View I
- Secondary View II
- Multi View configuration…
- MultiView I - MultiView IV Configurations
Font size & Display Options
- Font Size
- Display always on
- Backlight ON Distance
- Afterglow after waypoint has been reached
Voice/Audio Notifications
- Make use of the speech synthesis [TTS]
Simple audio Notifications [when TTS ]
- Distance & interim (sector length)
- Notification Duration
- Notification Sound
Speech Synthesis Options [when TTS ]
- Enable Display during TTS output
- Output stream for the text to speech synthesis
- Configure Event announcements…
- Low Battery
- GPS Status
- Recording Started / Paused / Resumed / Stopped
- Summary after Recording
- More than 50 m Off / Back on track
- ANT+/BluetoothLE device connection status
- TurnByTurn Instructions & Climb-ahead…
- Use Introduction
- Repeat Announcement
- TurnByTurn Instructions
- Climb-ahead Information
- Maximum climb elevation
- Auto enable Climb View
- Configure Sector announcements…
- Distance & interim (sector length)
- Use Introduction
- Repeat Announcement
- Total Distance
- Total Time
- Total average Speed (Ø)
- Sector Distance
- Sector Time
- Sector average Speed (Ø)
- Distance to Finish (Navigation Mode)
- Elevation climb to Finish (Navigation Mode)
- Gained Height
Sharing Location Information
- Time Period
- HappyPartner HappyLife (delay of initial sharing)
Additional ANT+/BluetoothLE Sensors
- List of from the overall list of available external sensors.
- Crankset (FrontGears) (Di2 related)
- Cassette (Rear Gears) (Di2 related)
Build in BluetoothLowEnergy Beacon Scanner
Don't call this UUID0xFD6FTracer!
Overview
Google is extremely restrictive when it comes to apps in PlayStore that use the words ‘COVID-19’ or ‘pandemic’ - I have tried multiple times to release the little UUID0xFD6FTracer app in the PlayStore - but it has always been removed after a short while for (IMHO) silly reasons. So I gave up and release the via app the FDroid-Store and Amazon AppStore.
While the UUID0xFD6FTracer app is showing you the current situation you might like to be able to record the number of visible BluetoothLE beacons around you over time. This can be archived by enabling the BluetoothLE Beacon Scanner feature of GPSLogger II.
Requirement
- Enabled Bluetooth
- Using Bluetooth you need to grand the permission to access the device location
- General Settings > UUID Beacon Scanner
- Start logging - this is really essential - the app only start to display detected BluetoothLE beacons while you record (or if you have loaded a previously recorded path)
- [Optional] Beacon View: Appearance & Startup > Available View configuration… > BTLE Beacon
- [Optional] Appearance & Startup > Map & Path View Settings… > Show BTE-Beacons
BTLE-Beacon View
The build in UUID Beacon Scanner have a dedicated view in order to display the number of beacons in range over time. See View Documentation for details.
Stored location information
![]() For GPSLogger II it’s not
possible to detect the exact position of a BluetoothLE beacon - so each time GPSLogger detects a new BTLE beacon
your current position will be associated with the beacon. So just to be precise: the app does not store the location
of any BTLE beacon - the app stores your location where a beacon was detected for the first time!
For GPSLogger II it’s not
possible to detect the exact position of a BluetoothLE beacon - so each time GPSLogger detects a new BTLE beacon
your current position will be associated with the beacon. So just to be precise: the app does not store the location
of any BTLE beacon - the app stores your location where a beacon was detected for the first time!
When you continue to move and the beacon is moving with you, the location information stored in GPSLogger will not be updated for this specific beacon!
When there are more than a single beacon at a location the app will render an additional number on the map-marker
How GPSLogger II is counting Beacons
(in contrast to the UUID0xFD6FTracer App)
In contrast to the UUID0xFD6DTracer, GPSLogger is counting the unique Beacon IDs that are discoverable from your current location. Imagine the following scenario:
When your location is static and there is a single beacon in your area the UUID0xFD6DTracer keeps showing you 0 or 1 (depending on the range). If the ID of the single beacon will change this will have no effect for UUID0xFD6DTracer, the app will show you still 0 or 1.
On the other hand GPSLogger II counts every single beacon ID that is reported by the scanner - so if the ID is going to change the counter will be increased by one. I.e. if 10 beacons pass you, the number 10 is also displayed in GPSLogger II (at the location you encountered a total of 10 beacon IDs).
Export of recorded beacon data
When you record beacon data you probably want to do something with it - Since none of the standard file formats is supporting this type of data (at least I am not aware of) - the app offers a simple CSV Export.
You find this Export in the PathManager.
- Select the path from the list
- select the more icon
- select Export
- select UUID 0x’ as CSV
The file will then be stored in the default share folder of the app - if you need help accessing exported data on your device please see: access GPSLogger files
Show your 15 km Radius
Overview
This functionality might be only related to Germany - nevertheless it might be useful in other countries as well. In the first Corona-related-lockdown there was a restriction, that you should stay in your local area in a radius of 15 km around your home.
In order to give users a hint how far this 15 km would be from a specific location, GPSLogger is able to render a well visible circle around any location that you load into the application.
In order to make this feature more useful also for other regions, I have added Implement custom radius settings on my TODO-List - let me know if you are interested.
Requirement
- Load a Location via the LocationManager
- Map View: Settings > Appearance & Startup > Available Views configuration… > OpenMapData View
- The Map has to be displayed as the main view (15 km radius will not be rendered in Secondary View I or II)
- Settings > Appearance & Startup > Map & Path View Settings… > Render 15 km radius
Example Screenshots
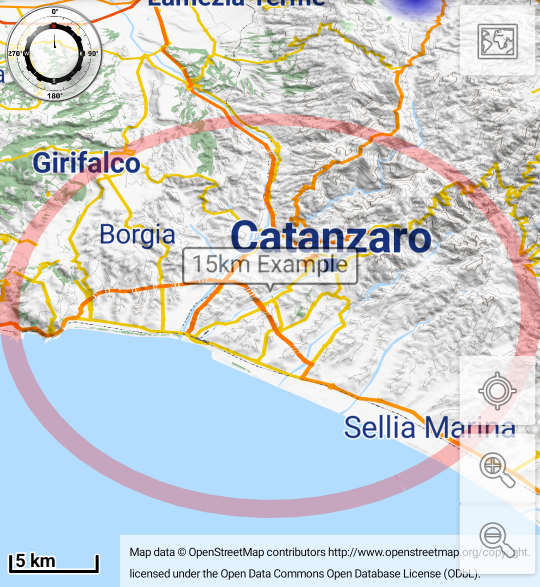
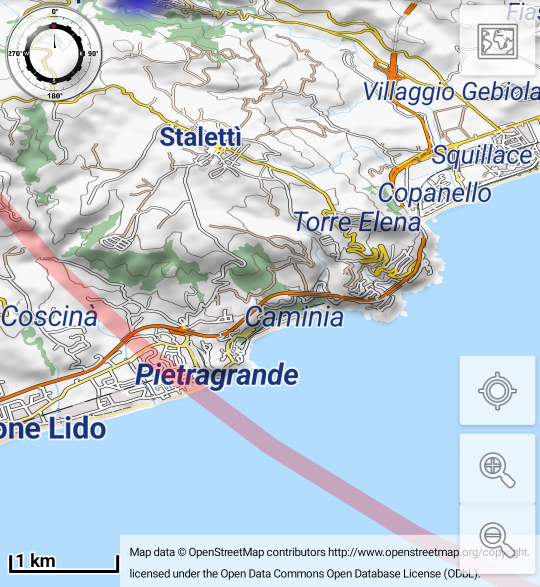
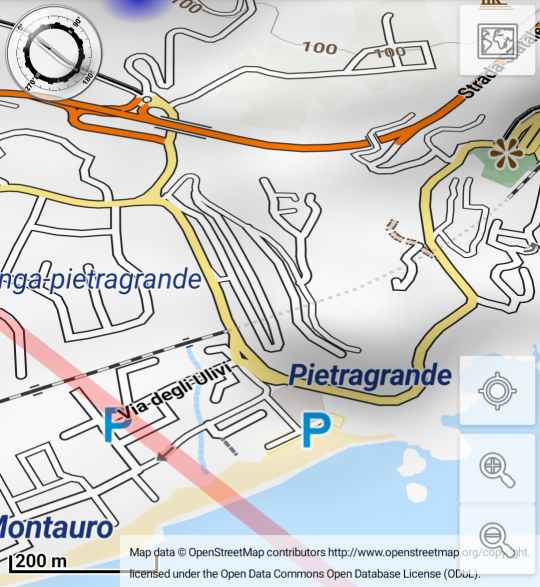
Export & eMail
Overview
Import & export - exchange files - see also the integrated eMail options (for your convenience)
Requirements
- File System related Permissions: WRITE_EXTERNAL_STORAGE & READ_EXTERNAL_STORAGE
Some General Notes
With Android 11 / SDK30 (and the Google Play Store requirement to support SDK30 since November 2021) it has become quite complicated to export files.
I can fully understand the motivation from Google behind the changes with SDK30 - but it makes it quite complicated for existing users to understand, why it’s no longer possible to do what had been so convenient in the past few years. The general train of thought is, that Apps should only be able to access their own files and directories. This situation is quite similar to iOS - with the only difference that the iOS users are used to this since day one.
Nevertheless, I’ll stop whining here - I just felt the need to explain the reasons behind the exporting/importing changes - and that I did not have the intention to ruin your life when I released GPSLogger 2.0.0.195.
Access exported files in the share folder
As just stated in the general notes it has become quite difficult for a normal app like GPSLogger to get read/write access on none default application folders.
A brief (simplified) introduction to storages on Android
Internal application storage
This storage is only available for the app - it’s typically part of your device built in storage, and it’s not accessible for the user (if the device is not rooted - but that’s a totally different story anyhow).
External application storage
By calling the storage external you might already think, that this means an external/additional SD-Card - but this is not the case for Android - Every storage that is not internal is labeled as external. So even Android devices without an extra SD-Card slot have an external storage. To the best of my knowledge this internal external storage is labeled as emulated or embedded storage/sd-card (or a combination) in most cases.
Permissions to access external storage
When you want to read/write the external Storage the app needs to request additional permissions from the user - these permissions are called READ_EXTERNAL_STORAGE & WRITE_EXTERNAL_STORAGE. The app requests both permissions on application start. It’s up to you to grant or deny these permission requests - but obviously without the permission to access the external storage it’s impossible for the app to create a file that you could access afterwards.
It’s correct that when you as a user grant EXTERNAL_STORAGE read & write access that the app would have the possibility to scan the complete content of the external storage and use it for what-ever-you-might-think-of.
YES that thought is correct - the app would have this possibility. But this is not the case - the app does not do anything like that, please see also my motivation to develop this app and provide it for free.
The fear that the app could be a potential, hidden data collector is anyhow minimized with Android11 / SDK30, since then the OS restricts the access drastically as described above.
ALL Versions
All exports will be stored in a folder called share - the location of this folder depends on your Android Version, on the version of the app you are using, as well on the GPSLogger application settings. Yes this is a nightmare!
Ok let’s tackle the GPSLogger application settings first.
If your device supports multiple external storages (e.g. the Emulated external and an additional SD-Card), then you have the opportunity via the Application Settings > Storage Settings > Storage Location for Path & Map Data to select the external storage the app should use (see also External application storage).
If you don’t have an additional external SD-Card (probably in most cases), then this setting does not have any effect for the export functionality.
So ok let’s now have a look at the different application version, but one final note before that, the different folder locations have the [storage_root] in common. The location of this storage_root1 can varray from device to device from manufacture to manufacture (and obviously from the external storage that you have configured).
Since GPSLogger v2.0.0.204
[storage_root]/Android/media/com.emacberry.gpslogger/share
This folder should be accessible from other applications (like file-managers or email clients). BUT It is important to know - that this folder, and it’s complete contents will be removed when you are uninstalling the application from your device.
Between v2.0.0.195 and v2.0.0.204
This hopefully becomes obsolete quite soon - between November 2021 and February 2022 a suboptimal version of GPSLogger was released.
[storage_root]/Android/data/com.emacberry.gpslogger/files/share
Unfortunately this folder is only accessible by GPSLogger itself and very few others apps (excluding Googles own Files application). You can access this folder for sure, by connecting your phone via a USB cable with your PC/Mac and then browse into the folder with the Explorer/Finder.
You might be able to access this folder with an app that is listed in OS Settings > Apps > Special app access > All
files access apps. But even then, there is no guarantee that an app with this special right will show you the content
of the [storage_root]/Android/data/ folder or any of its children.
It is important to know - that this folder, and it’s complete contents will be removed when you are uninstalling the application from your device.
Before GPSLogger v2.0.0.195
[storage_root]/GPSLogger II
Big sigh that was just so easy and convenient to use - but it’s no longer possible for an application to read or write in such global folders.
This folder will not be removed when you are uninstalling the application from your device. That was one of the reasons why it was so convenient to use.
File formats
KML [Keyhole Markup Language]
FIT [Flexible and Interoperable]
GPX (v1.0)
GPX (v1.1)
CSV
GPS NMEA-Sentences as TXT
UUID 0x’s as CSV
JSON (GPSLogger2)
Original GPSLogger II GPL
-
The actual location on your device of the storage_root can vary from device to device - please find some examples here (but have in mind that they are just examples):
/sdcard//storage/emulated//storage/self/primary//storage/E5B1-1917/(a real external SD-Card)/mnt/sdcard//misc/android/(e.g. used on BlackBerry 10)
Share your Path with the public
Not really with the public, but technically knowing everyone with the link will have access.
Overview
From the PathManager of GPSLogger you have the possibility of sharing your path with others. By using this feature you make your recording publicly available via the emacberry.com webserver which is currently hosted by hosting-monster.com.
It is important, that you understand that when you make use of this sharing feature that the data of this specific path will be uploaded to emacberry.com webserver and will be stored there without any connection to you or your device. The only reference is a so-called UUID (Universally unique identifier) which is generated for every path automatically.
The UUID is a more or less a random 32 digit HexNumber (0-9, A-F) and should be pretty unique across the world. If GPSLogger generates the same UUID two times then it’s time to have a big party! An example UUID looks like this 7E84A3D9-9517-4A09-9CB0-FF5C36F9C472 and is in general pretty tough (if not impossible) to guess.
Once the path has been uploaded everybody knowing the link-url is able to view your path without any additional restriction (like a login or providing an additional token) - so technically your data is publicly accessible.
Please understand that this none human friendly link-url is only a compromise, and I can fully understand that this approach is not satisfying your personal data protection requirements. In such a case: please don’t use this feature.
If you would like to share your activities but want to have full control over who is able to access the data once you have shared it, please use a different service that allow you to upload one of the given export file formats.
Requirements
- Internet connection to upload the path data to emacberry.com
- Willingness to make your data public only protected by a kind of cryptic link-url
Share a path via emacberry.com
The start point for sharing a path via the emacberry.com server is the PathManager. Once you have opened it, scroll to the path you would like to share and open the more-menu. In the Menu select the Share via emacberry.com entry.
Now it will take a short while - the path will be loaded and then checked whether it has been previously shared, if this is not the case the app will upload the required data to emacberry.com. In any case the app will continue by showing the default Android share dialog, which allows you to select from multiple target apps the final share destination.
Please note that the device has to be able to establish an online connection to perform a server request to fulfill your share request.
Example ShareLink-URL
Please check out the current website that will show your shared path by following the link [https://www.emacberry.com/appsrv/gpsl/index.html?uuid=7E84A3D9-9517-4A09-9CB0-FF5C36F9C472] (https://www.emacberry.com/appsrv/gpsl/index.html?uuid=7E84A3D9-9517-4A09-9CB0-FF5C36F9C472).
This is how a share-link-url is going to look, when you use Share via emacberry.com from the PathManager - but obviously with a different UUID.
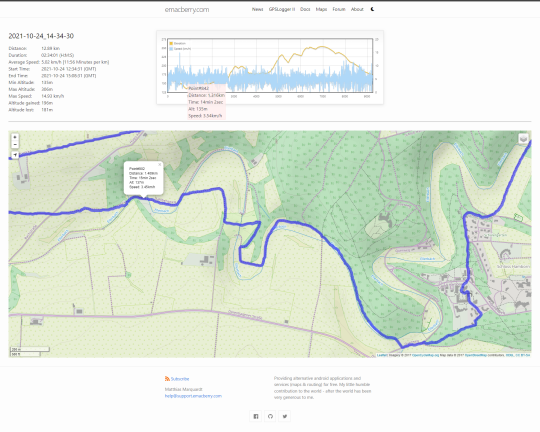 The page itself displays some meta-data of you path like distance, duration and start & end time (in GMT), a speed and
elevation profile and the most important part: the map with your path. The current page is not really suitable to be
used on a mobile device - this will hopefully change in the future.
The page itself displays some meta-data of you path like distance, duration and start & end time (in GMT), a speed and
elevation profile and the most important part: the map with your path. The current page is not really suitable to be
used on a mobile device - this will hopefully change in the future.
You can select a different map type, zoom and when you hover with your mouse over the profile the corresponding location in the map will get an additional pop-up with the location meta-data (distance, time, speed & elevation).
It’s not the most fancy page in the world - but have in mind it’s all for free (this does not imply that you have to
accept crap). If you have any improvements - I am happy to hear from you.
End Sharing & Remove the path from the emacberry.com Server
If you want to remove a previously shared path from the emacberry.com server you can open PathManager, scroll to the corresponding path, open the more-menu and then select the Remove Share from emacberry.com entry.
Please note that the device has to be able to establish an online connection to perform a server request to fulfill your deletion request.
Fallback - Request the manual path deletion from the emacberry.com Server
Since there is no connection between a user (or device) and a shared path - the only existing reference is the UUID. The only person who has access to the UUID of a path is you (and the people you provided the share-link of the path to).
If you don’t have the share link any longer, than the only way to access a path’s UUID is by exporting it as JSON file. In this exported JSON there is a field called uuid. So if you want a certain path you previously uploaded to emacberry.com webserver deleted: Open a support ticket and provide the UUID. The request will be completed within 60 working days, but you will not get a reply from the support (aka me). Requests that do not contain a valid/existing UUID will be instantly deleted.
You can request the deletion by sending an email to help@support.emacberry.com.
Strava Integration
Overview
It’s possible to connect GPSLogger with an existing Strava account. Please note, that this will be a ONE-WAY connection only. GPSLogger will send recorded activities to Strava - but the app will not download (or pull) any data from your Strava account.
Please note that by using this feature, your might be tracked by Strava services, and you must agree to Strava’s privacy policy https://www.strava.com/legal/privacy.
Additional Strava Functions
When you have connected your Strava account with GPSLogger (and there is an online connection) you have an additional menu item in the PathManager context/more menu that is accessible for every previously recorded activity. This additional menu entry is called Upload to Strava, and it exports your path as a special Strava-FIT file and uploads it to your Strava profile (since Strava does not accept just “any” FIT data - it has to be a special one - thanks for nothing btw!). Please note that the upload might fail, when a similar activity already exists in your strava activity list.
Also, when you stop recording you will find an additional Upload to Strava entry in the main menu.
Strava Options
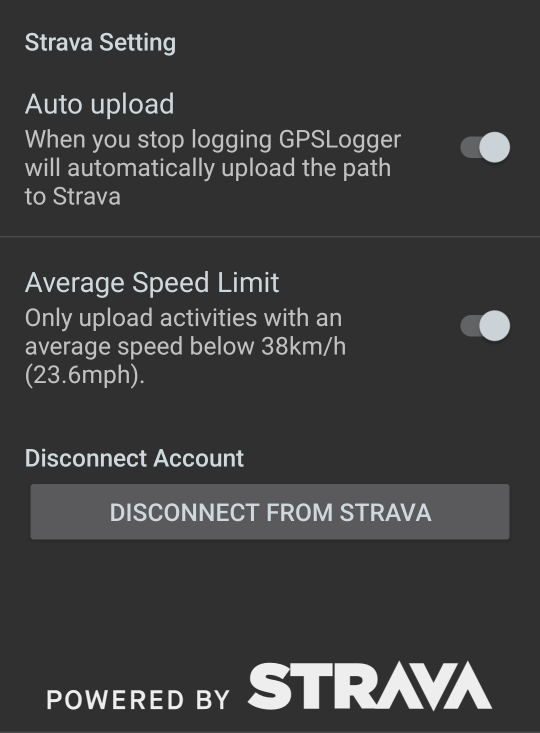 When you have connected your Strava account with GPSLogger the Application Settings will show Strava Options (instead
of the Connect with Strava entry) see Connect your Account.
When you have connected your Strava account with GPSLogger the Application Settings will show Strava Options (instead
of the Connect with Strava entry) see Connect your Account.
Auto Upload
When enabled, GPSLogger will automatically upload the just finished recording to Strava if the following rules apply:
- Your device is online
- The recording has a total length of more than 100 meters
- The recording contains more than 19 positions/locations
- The average speed does not exceed 38 km/h (23.6mph) [if Average Speed Limit option is ]
Average Speed Limit
Strava is for sports activities, and it includes KOM/QOM record-tables for segments.
It is an endless discussion that these record-tables are often led by people who have used a motorized vehicle. In order that you don’t become such a person yourself and upload an activity (recorded while driving by car or motorcycle) by accident you should keep this switch .
Only if you are a pro cyclist who will frequently exceeds an average speed of 38 km/h (23.6mph) should you it.
Disconnect Button
By pressing the DISCONNECT FROM STRAVA Button, the app is calling the de-authorize URL of Strava’s OAUTH flow (https://www.strava.com/oauth/deauthorize) and removes the ACCESS_TOKEN from the application settings.
GPSLogger will not delete any previously uploaded activities from Strava.
Connect your Account
Connecting you existing Strava account with GPSLogger is done in three steps:
 Step 1. If you want to connect GPSLogger with your Strava account you need to open the Application Settings >
Connect with Strava. Strava’s usage policy requires that an app needs to present the orange Connect with Strava button,
that’s the only reason that this additional dialog exists. So if you want to start the connection process. Push this
orange Connect with Strava button to actually start the sequence.
Step 1. If you want to connect GPSLogger with your Strava account you need to open the Application Settings >
Connect with Strava. Strava’s usage policy requires that an app needs to present the orange Connect with Strava button,
that’s the only reason that this additional dialog exists. So if you want to start the connection process. Push this
orange Connect with Strava button to actually start the sequence.
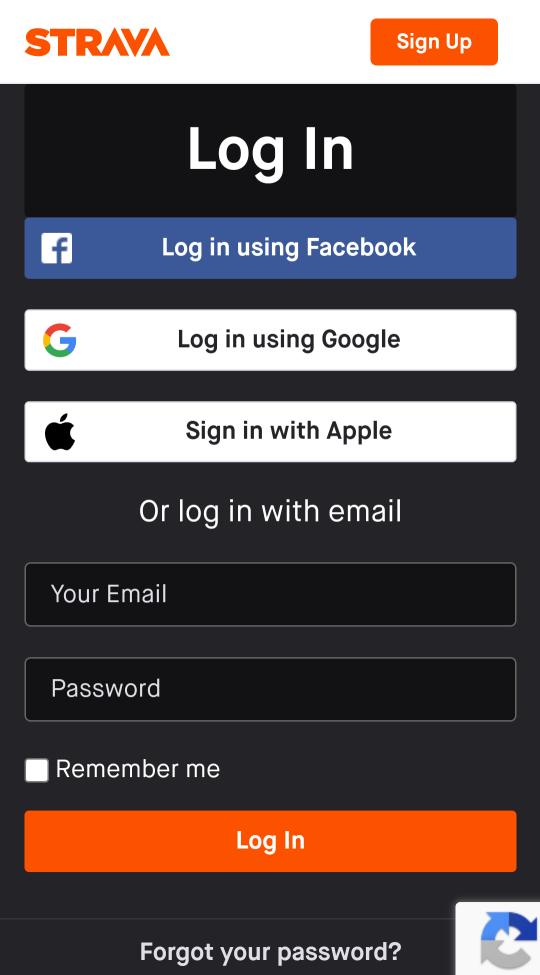 Step 2. The application will open a default browser window, loading the Strava OAuth authorize Page that will
present you with the default Strava Login page (URL: https://www.strava.com/oauth/authorize).
Step 2. The application will open a default browser window, loading the Strava OAuth authorize Page that will
present you with the default Strava Login page (URL: https://www.strava.com/oauth/authorize).
You need to provide your Strava credentials - the login dialog is served from strava.com, so their own privacy policy
applies.
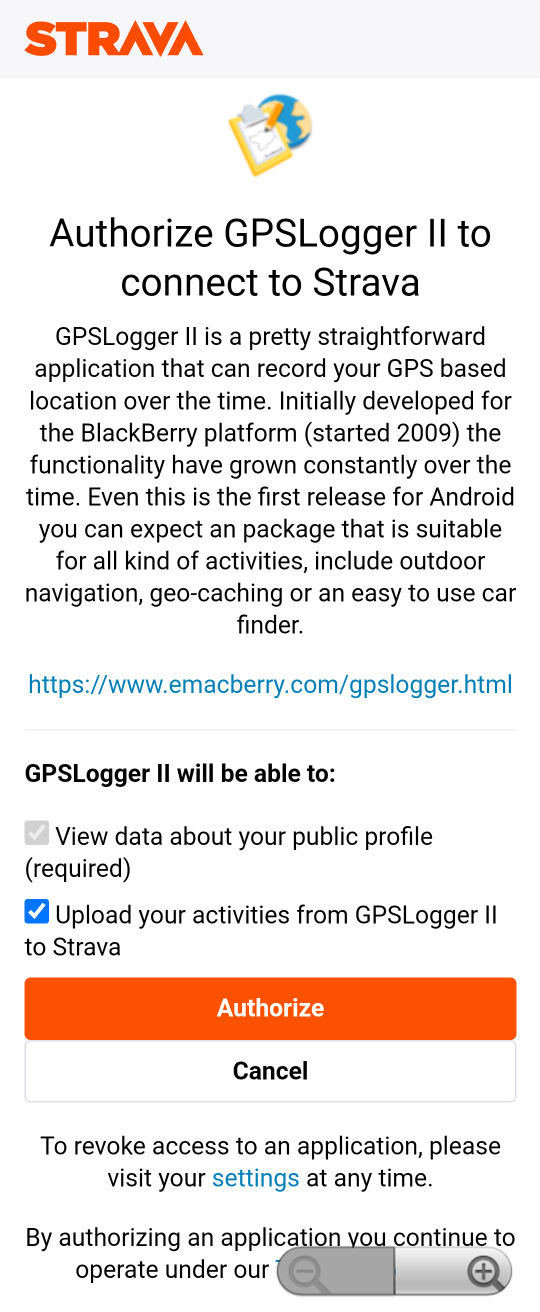 Step 3. After you have logged into Strava, you will be presented with a confirmation dialog, asking if you really
want to allow GPSLogger to upload activities to your Strava profile.
Step 3. After you have logged into Strava, you will be presented with a confirmation dialog, asking if you really
want to allow GPSLogger to upload activities to your Strava profile.
The Confirm-Dialog also informs you, that GPSLogger will be able to View public data about your profile (required). GPSLogger never does that. It’s a restriction of Strava’s API, that an app that want’s to upload an activity needs to have this additional right. GPSLogger only requests scope=activity:write.
So if you still want to connect GPSLogger with your Strava account, complete the connection by pressing the orange Authorize button.
You can withdraw this authorization at any time - either from your Strava profile - or directly in the GPSLogger Settings.
Ok - once this process is completed GPSLogger will receive a so-called ACCESS_TOKEN from Strava - this TOKEN can be only used by GPSLogger in order to upload activities to your Strava profile. GPSLogger does not know your strava account name or your password.
If you ar interested you can read more about Strava’s OAuth Authentication flow on their developers website.
Backup & Restore
need revision
Using Backup & Restore
With the build v2.0.0.146 the overall implementation has been changed from an AsynchronousTask to a Background-Service. This implies that the backup & restore progress will be shown as Android Notifications
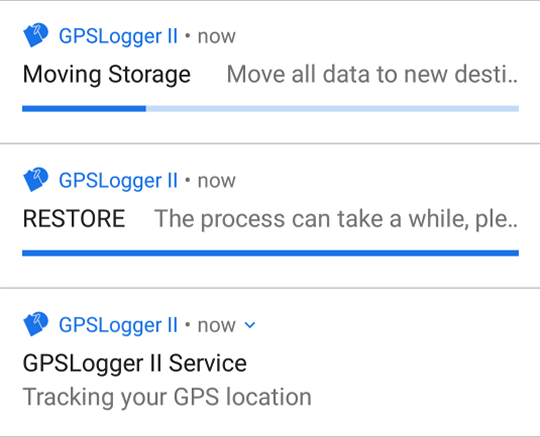
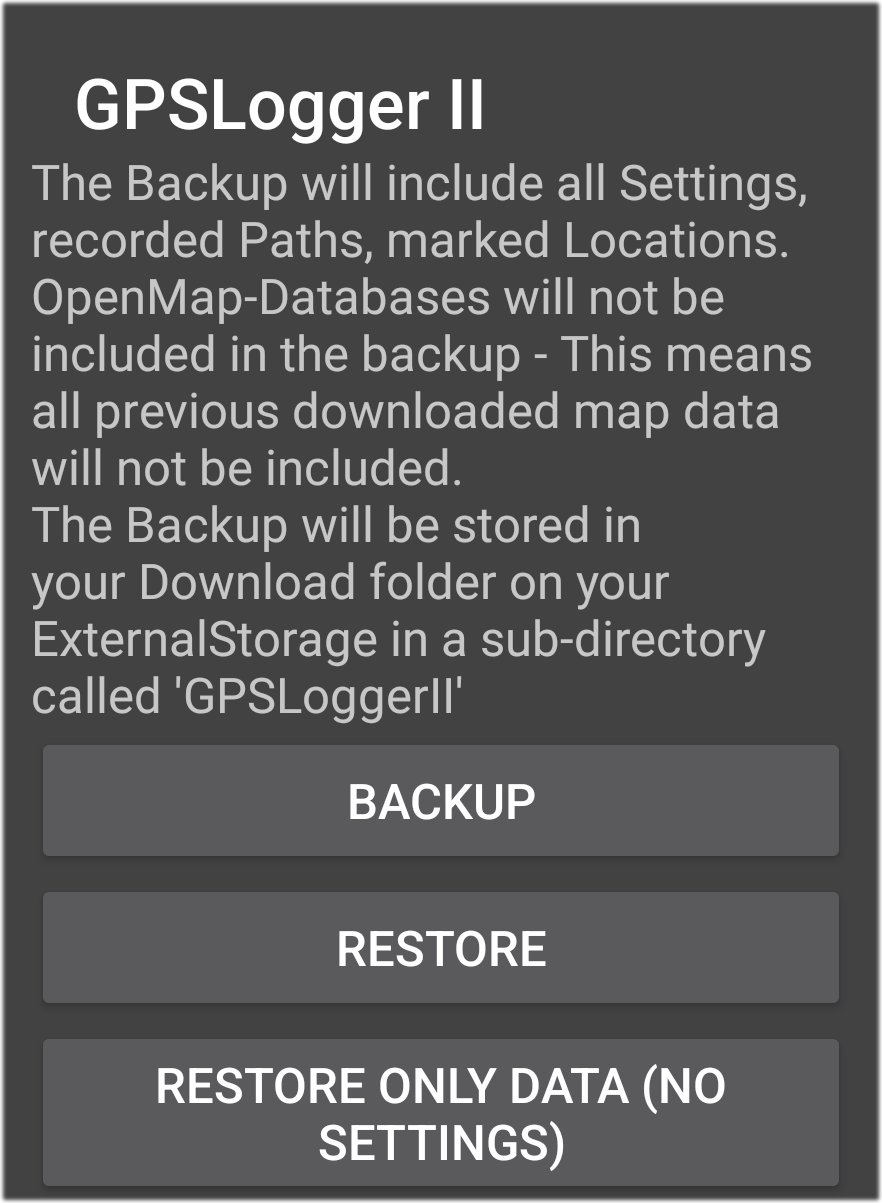 So when you select Backup (or Restore) from the App Settings the current app show a new Window with three disabled
buttons and starts the Backup (or Restore) Service - so in addition to this dialog (I can not do anything here) the
app is doing something as a service - the progress can be viewed as the notification. Please wait until the progress has
reached the end - and ‘yes’ it could happen, that the bar will jump back to 0% and restart from scratch - that’s no
bug - then the app is verifying that the restored path data is present in the local path-database.
So when you select Backup (or Restore) from the App Settings the current app show a new Window with three disabled
buttons and starts the Backup (or Restore) Service - so in addition to this dialog (I can not do anything here) the
app is doing something as a service - the progress can be viewed as the notification. Please wait until the progress has
reached the end - and ‘yes’ it could happen, that the bar will jump back to 0% and restart from scratch - that’s no
bug - then the app is verifying that the restored path data is present in the local path-database.
Why we have this sub-dialog when it does not have any meaningful functionality when using Backup & Restore from the Application Settings?
Starting from Android 8 you can add additional App-Shortcuts to your application - these shortcuts can be accessed by tap & holding the app icon in the launcher.
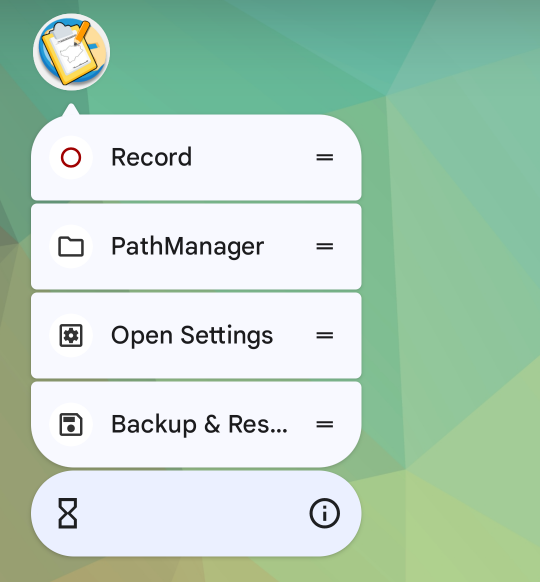 It’s strongly recommended to use Backup - but mainly the Restore function via this shortcut - this will make the
complete restore process so much smoother since the app itself is not running (and accessing resource that might be
changed during the restore process - like location of the internal databases)
It’s strongly recommended to use Backup - but mainly the Restore function via this shortcut - this will make the
complete restore process so much smoother since the app itself is not running (and accessing resource that might be
changed during the restore process - like location of the internal databases)
Restore after a fresh App Installation
When you reinstall GPSLogger on your device (e.g. on a new Device) the app will of course use its default/initial settings - when restoring a backup that contains a larger number of previously recorded paths the app need to regenerate the internal database. This Process can take quite a while, and you might terminate the app (while it’s still recreating the database entries). When you have configured that the app should use an alternative storage location in your previous installation of GPSLogger, and you restore such a backup to a fresh installation of GPSLogger, then after the restoration process has been completed an additional data movement has to be performed. This adds extra complexity to the restore process and adds additional processing time.
In any case if after a restore (for whatever reason) your PathManager does not show you all your previously existing paths, then please: First, select ‘Sync Data…’ and wait a while (the sync process needs to reopen all existing gpl files on your device and check the metadata with the data that is currently stored in the database - depending on the IO performance of your device and the number of paths this can take up to 30min, or even longer). The second thing you can do after the data sync is completed, is regenerate all thumbnails also via the PathManager Menu ‘Recreate all Thumbnails…’
Settings - Table of Contents
-
General Settings
GPS-Sensor Settings, Additional Sensors & Recording Settings -
Appearance & Startup
Sizes, Units, Start View Configuration, StatusBar and display customization -
Speech & Audio Notifications
Logging Status Events, Pace/Distance hints -
Additional ANT+/BluetoothLE Sensors
Support for HeartRate or Cadence Sensors [like ANT+\BT LE chest strap or fitness tracker] -
Multi Preferences/Modes
Use different Settings for different types of activities - e.g. a different speed display for running or cycling -
Open Map Data (online maps)
The OMD Settings allow you to configure your preferred online Map Data provider -
OpenStreetMap Settings (offline map)
Make use of local OpenStreetMap data to have full map support with 100% detail while offline -
Outdoor Navigation Settings
For Off-road guiding direction information -
Connect your eMail Account
In order to use extended features (like ‘Emergency Alert’ or ‘Export via eMail’) you need to connect your GoogleMail account with GPSLogger -
Emergency Alert Settings
Automatically send an eMail notification when you do not move a specified distance in a certain time (requires a gmail account) -
Sharing Location Information
Sending periodically your last known location to your web server and/or eMail recipients -
Connect with Strava / Strava Options (when connected)
Connect your Account or Configure your Strava options -
Storage Settings
Path and other data storing Settings
Optional Sections
-
Di2 Settings
Pandora’s Box is here -
Treadmill Settings
Additional configuration & initial values -
Rowing Machine Settings
Additional configuration & initial values
General Settings
GPS-Sensor Settings, Additional Sensors & Recording Settings
need revision
Prioritized Background Activity
GPS-Sensor & Smoothing Settings…
GPS-Signal Required
Save NMEA Data
Overwrite GPS-Speed
Path-Smoothing
GPS update interval
- As fast as possible
- Every 1 second
- Every 2 seconds
- Every 5 seconds
- Every 10 seconds
- Every 30 seconds
- Every minute
- Every 2 minutes
- Every 5 minutes
- Every 10 minutes
- Every 30 minutes
- Every hour
- Specify custom value
Custom GPS update interval
Additional Sensors…
more…
AutoRecording & AutoPause…
more2
more3
Altitude Reference Model
UUID Beacon Scanner
Appearance & Startup
Sizes, Units, Start View Configuration, StatusBar and display customization
need revision
Autostart App after Reboot
Unit & Format Options
Available View configuration
Startup View configuration
Map & Path View Settings
System Notification Options
StatusBar Customization
- Use Icons
- Accuracy of GPS location
- Altitude/Elevation
- Number of Satellites
- Course/Heading
- Current Speed
- Ø Speed [average speed]
- HeartRate (HR) [When a HR-Sensor is connected via ANT+/BTLE]
- Cadence (CAD) [When a Cadence-Sensor is connected via ANT+/BTLE]
- Power (POW) [When a Powermeter is connected via BTLE]
- Shiftinginfo (Di2) [When a Di2 is connected via D-Fly(BTLE)]
Elapsed Time/Distance Climb in % & gained height [(over last Minute)]
Clock Include seconds in clock GPS-LocationFix Count
Font size & Display Options
Speech & Audio Notifications
Logging Status Events, Pace/Distance hints
need revision
Additional ANT+/BluetoothLE Sensors
Support for HeartRate or Cadence Sensors [like ANT+\BT LE chest strap or fitness tracker]
need revision
Multi Preferences/Modes
Use different Settings for different types of activities - e.g. different speed display for running or cycling
need revision
Open Map Data (online maps)
The OMD Settings allow you to configure your preferred online Map Data provider
need revision
OpenStreetMap Settings (offline map)
Make use of local OpenStreetMap data to have full map support with 100% details while offline
need revision
Outdoor Navigation Settings
For Off-road guiding direction information
need revision
Connect your eMail Account
Required for features like Emergency Alert, Export via eMail or Live Location sharing & HappyPartner
need revision
Overview
GPSLogger II can make use of different authorisation types (OAuth or SMTP) in order to send emails from your mobile device when ever this is requested by you or by an automated function that you have enabled within the settings. The App will never make use of your provided credentials anywhere else.
Emergency Alert Settings
Automatically send an emergency Alert if you stop moving
need revision
Overview
GPSLogger can automatically send an eMail notification when you do not move a specified distance in a certain time. In order to use this feature you need to authorize GPSLogger to use your eMail account (since the eMail will be sent from this account to the recipient(s)).
Please note that the notifications will be only send when GPSLogger II is in logging mode - if you stop logging (or enter the pause mode) no notifications will be sent.
Time period (delay)
- OFF
- in 1 minute
- in 5 minutes
- in 15 minutes
- in 30 minutes
- in one hour
Minimum Distance (in meter or feet)
When you are logging and when you do not travel the specified distance in the specified time, GPSLogger will automatically email the recipients specified below.
Show intercept Dialog
ON: Sending of Emergency Alert message can be intercepted via a dialog (if you forgot to stop/pause logging when you make a break). OFF: Emergency Alert message can not be intercepted
Message configuration
Recipients
Separate multiple recipients with comma [,]
Subject
Alert eMail Subject
Content
Additionally, to this custom message the eMail will include a link to your last known position
Sharing Location Information
Sending periodically your last known location to your web server or/and eMail recipients
need revision
Connect with Strava / Strava Options (when connected)
Connect your Account or Configure your Strava options
need revision
Storage Settings
Path and other data storing Settings
need revision
Di2 Settings
Pandora's Box
need revision
D-Fly Configuration
You find details about the different available actions in the Shimano Di2 Support section of this Manual
D-Fly SHORT Click Configuration
Configure for each of the four D-Fly Channels an SHORT Click action
D-Fly Double Click Configuration
Configure for each of the four D-Fly Channels a Double Click action
D-Fly Tab&Hold Click Configuration
Configure for each of the four D-Fly Channels an Tab&Hold Click action
Gear Settings
Can be overwritten in multi-profile
Custom cassettes & cranksets/chain-rings
Even if the app has already multiple Crankset’s and Cassettes defined - you might have a different setup for your Di2. So if you miss a certain configuration you can add it here in this section.
For cassettes:
- Specify for your cassette the number of teeth for each gear. Start with the lowest number on Pos 1.
For cranksets:
- Specify for your crankset the number of teeth for each gear. Start with the largest number on Pos 1. When you just have a single chain ring, please specify two times the same number at Pos 1 & Pos 2.
As soon as you have a custom cassettes or cranksets configures it will show up in the settings together with a edit and delete button.
Misc
Warn when Battery is Low
Warn via a Speech, when Di2 Battery is at 20% (speech synthesis (tts) has to be enabled in the Voice/Audio Notifications)
F-Droid Tutorial
Add the GPSLogger II repository to F-Droid (hosted via my MAPS Server @ home https://maps.emac.de/)
Overview
You will need to add our repository to your F-Droid client (on your Android device). We will only show steps for adding to the official F-Droid app. There are two ways to add an F-Droid repository.
In case GPSLogger II is already installed on your device, make sure to backup your application data. Uninstall GPSLogger II before proceeding and reinstall it once your are done following the instructions below. After that import your backup.
Install Procedure
The first of these is by scanning QR code or clicking link.

- Scan the QR code or click this link.
After scanning, a FDroid Dialog will appear - Click
OK. The emacberry repository will be added. - Go to F-Droid’s search and search for
GPSLogger II. Click the listing for GPSLogger II. - Scroll down to the versions tab. Expand both of the tabs for the highest numbers at the top. Press
INSTALLon the one that says Repository:emacberry Repository (for GPSLogger II).
Note: If you have installed GPSLogger previously via another Source, you might not be able to see (or install) the GPSLogger II version because it has a different signature. To see it, enable “Include incompatible versions” from F-Droid settings. To install it, first make a database backup of your existing version, uninstall it, then install the new one and restore your backup.
Or you can add GPSLogger II manually.
- Open your F-Droid client.
- Go to settings and click
Repositories. - Click the to add emacberry Repository (for GPSLogger II).
- In the pop-up, after
https://paste the following link: copy me! You don’t need to add to the fingerprint field as the link provided will automatically fill it. - Click
OK. The repository will save and show it as unsigned until all repositories are refreshed. This is because the F-Droid app didn’t compared the fingerprints yet. It will tell you if they do not match. If you want, you can also check it by hand:5707 3767 C5CF 374F 0759 CDD9 3685 795D 83CA 0249 D33E 205C 9D0E 5856 2953 0976 - Go to F-Droid’s search and search for
GPSLogger IIand click the listing for GPSLogger II. - Scroll down to the versions tab. Expand both of the tabs for the highest numbers at the top. Press
INSTALLon the one that says Repository:emacberry Repository (for GPSLogger II).
Note: If you have installed GPSLogger previously via another Source, you might not be able to see (or install) the GPSLogger II version because it has a different signature. To see it, enable “Include incompatible versions” from F-Droid settings. To install it, first make a database backup of your existing version, uninstall it, then install the new one and restore your backup.
Frequently asked questions
Questions
-
Stop logging is not possible - the stop logging overlay button is not shown?
-
The Application is always talking - How to disable all Text2Speech audio announcements?
-
Why should I disable the OS battery optimization for the app?
-
Opening Web Links with GPSLogger using Android 11 (or earlier)
-
Opening Web Links with GPSLogger using Android 12 (or later)
-
I have a setting with the prefix [Profile!] that is not editable
Answers
How can I change the current view?
If the TabBar is not visible (either you have disabled it in the options or it is hidden because you are using multiple views), you can swipe left/right in order to change the current view. Please also note, that on the map view you have to start the swiping near the left/right margin of the map screen.
Stop logging is not possible - the stop logging overlay button is not shown
GPSLogger’s main screen can be active/display all it’s information, even if your device is in the locked state. This will save you from constantly unlocking your phone when you just want to check your location on the map.
In order to avoid the situation that you terminate the logging process by accident while the phone is located in your pocket (or stored somewhere else), the stop logging overlay button is only active, when the device is in its unlocked state.
So when you take your phone out of your pocket, and you want to stop the logging process (and the stop logging button is not shown) you need to unlock your phone and the missing function/button will become available. You can quickly unlock your device to do so by pressing the and select Unlock from the menu
The Application is always talking - How to disable all Text2Speech audio announcements?
I am sorry that you dislike this feature - but as always there is a simple way to disable the lady from talking: Open Application Settings > Speech & Audio Notifications > Make use of speech synthesis
Before disabling the feature completely you might like to disable specific announcements only - all details can be found in the Audio Announcements section.
Where do I find my exported file?
Please see access GPSLogger files
Settings are so complicated & complex?
What can I say - yes you are right, the settings seem to be quite complex and might be way too complicated from the start. The main reason why the situation is what it is: I don’t want to restrict users in any way, nor do I want to make decisions for them - I truly believe you as a user are intelligent enough to tweak all the different options to your personal preference. Keeping in mind we are all different and have different backgrounds and plenty of different use cases.
Some use GPSLogger for skydiving - some to track the movement of their RC car/plane others use the app to track their flight (when the airline does not offer any kind of onboard entertainment) - I personally use it as a replacement of my bike computer, to track my hiking activities and use it on my treadmill and rowing machine. GPSLogger is a swiss army knife - and therefore the options and settings cover many aspects.
If you miss a feature/function - just let me know! - That’s how much has started
Why the App needs Permissions…?
You can find a detailed description about the different requested permissions in the Section information about requested Application Permissions - If you have any additional questions - please do not hesitate to ask!
Why should I disable the OS battery optimization for the app?
The Android OS has different possibilities to extend the battery life of your device - one of these possibilities is to restrict the ability to allow apps to make use of the running-as-background-service capabilities. Since GPSLogger is doing all of it’s logging functionality as a background service such a restriction would be counterproductive (if not causing fatal errors).
It might be possible to use the app with enabled battery optimization - but it can’t be guaranteed that longer activities will be recorded completely/correctly. It is strongly recommended to disable this optimization.
How to disable the OS battery optimization for the app?
When starting GPSLogger you will be initially prompted to disable the battery optimization from the OS for the app. If you have ignored this request/prompt, then you have two different options:
Open the InApp Settings > General Settings > Prioritized Background Activity
…and then selecting Allow when asked Let app always run in background?
- Open the OS Settings > App > select GPSLogger II > Battery > select Unrestricted
or (depending on your OS version)- Open the OS Settings > Battery > select in the menu the and then Battery optimization > select All apps > select GPSLogger II > select Don’t optimize
If you don’t have the Prioritized Background Activity switch in the GPSLogger application setting, then your OS version probably doesn’t optimize the battery usage of apps (and so there is no need to disable it).
Opening Web Links with GPSLogger using Android 11 (or earlier)
Normally it should not be required to adjust anything in oder that GPSLogger will open the registered weblinks in the Application - nevertheless - if this does not work on your device running under Android 4,5,6,7,8,9 or 10 then:
Open the GPSLogger application settings of your Android (not the built in GPSLogger settings!) - Typically this can be done by opening the Settings App and then there is a section called Apps or Applications. Open the GPSLogger App settings and then select the Open by default Section
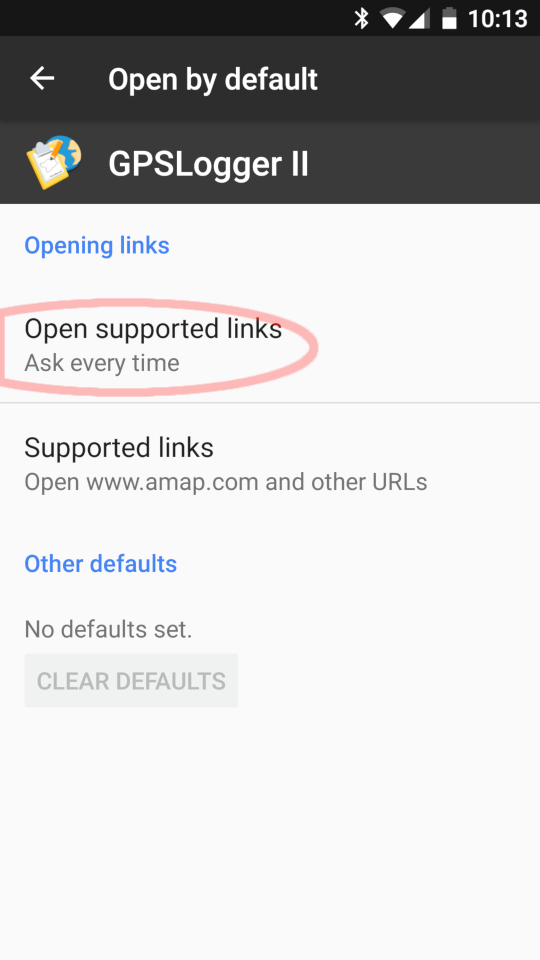
This will show you (hopefully) the following dialog. Please make sure that either Open in this app or Ask every time is selected.
Additionally it could be that another app (e.g. your browser) has already registered itself as default handler for a certain weblink/type.
In oder to check/clear this registration, open the system application settings of the corresponding app (here is the example the Chrome browser)
So now you should be able to open any of the registered weblinks directly with GPSLogger (or at least the OS should show you a selection dialog of which apps can be used to open the link).
Opening Web Links with GPSLogger using Android 12 (or later)
I really love Google for all the changes that have been introduced with Android 12 (SDK 31). The usage of web-links with an app have been massively restricted.
Since Android 12 you need to verify the website with your app - while this approach works quite nicely for websites that are under your own control, this is quite difficult to achieve with sites, that are beyond your control. For these external sites you as the user have to manually allow/edit the link support.
Please note that it can be a requirement to repeat this step after you have updated GPSLogger - GREAT!
To start, open the GPSLogger application settings of your Android (not the built in GPSLogger settings!) - Typically this can be done by opening the Settings App and then there is a section called Apps or Applications.
Open the GPSLogger App settings and then select the Open by default Section
then press Add link
Now select the website(s) from which you want to open GPSLogger directly with certain URLs (typically download links). If you want to open map downloads directly with GPSLogger from the openandromaps website, you need to select:
- download.openandromaps.org
- ftp.gwdg.de
and then press the Add button.
Now you can open map download links directly with GPSLogger on your Android 12.
For a reference of all available webistes/urls that can be opened with GPSLogger see: Registered Weblinks.
My device does not show a dialog (to allow me to select the GPSLogger app) when starting a download on openandromaps! (or directly start to download the file with the used browser)
Using Android 12 (or later):
In order to be able to open download links from openandromaps with GPSLogger you need to enable the corresponding URL’s in the OS application Settings section (Open by default > Links to open in this app). So please enable/add:
- download.openandromaps.org
- ftp.gwdg.de
please see FAQ: Using Weblinks in Android 12 (or later) for details
Using Android 11 (or earlier):
- please see FAQ: Using Weblinks in Android 11 (or earlier) for details
I have a setting with the prefix [Profile!] that is not editable
This prefix indicates, that a) you have currently activated a different profile and b) that the setting has a value in the Multi Preferences/Mode. So when ever you come across such a setting field, you should switch to Application Settings > Multi Preferences/Mode and select the current active profile to adjust it.
How to install GPSLogger II on BlackBerry 10?
Since BlackBerry (aka RIM) decided to drop all their legacy services in January 2022 (including their AppWorld Store) the only way to install any Apps on your existing BlackBerry 10 smartphone is via the AmazonApp Store that hopefully still exists on your device. GPSLogger is available via AmazonApp Store and you should be able to find it by a regular search - in any case once more here is the link (that works on the regular web) https://www.amazon.com/gp/product/B00L9GLGGQ
Glossary
Acronyms used in this manual
| API | Application Programming Interface |
| beacon | BluetoothLE beacon |
| BLE, BTLE or BluetoothLE | BluetoothLowEnergy - don’t mix that up with just Bluetooth |
| BT | Bluetooth |
| CAD | Cadence - cycling - calculating the Crank Revolutions per minute |
| CSC | Cycling Speed and Cadence (BluetoothLE) |
| CSV | File format - Comma seperated values |
| ETA | Estimated Time of Arrival |
| FIT | File format - Flexible and Interoperable data Transfer (a file format from Garmin) |
| FTMS | Fitness-Machine-Service Bluetooth Specification |
| GMT | Timezone - Greenwich Mean Time |
| GPL | GPSLogger II or File format - file extension for path files |
| GPP | File format - File extension for positions / locations |
| GPX | File format - GPS exchange format (v1.0 & v1.1) |
| MSL | Mean Sea Level |
| NMEA | National Marine Electronics Association see NMEA 0183 |
| OMD | OpenMapData Provider |
| OSM | OpenStreetMap |
| SDK | Software Development Kit |
| SMTP | Simple Mail Transfer Protocol |
| TIA | Thanks in advance |
| TTS | Text To Speech - Speech Synthesis / Generated Speech (different engines available based on your model & manufacturer) - can be configured in the OS Settings |
| URL | Uniform Resource Locator, colloquially termed a web address |
| UTC | Coordinated Universal Time |
| UUID | Universally unique identifier |
| VAM | velocità ascensionale media (translated in English to mean average ascent speed) |
| WGS84 | World Geodetic System from 1984 |
| Y/N | Yes or No |
Data Safety & Privacy Declaration
Why Privacy Declaration at GooglePlay is what it is
Principle
I take the protection of your personal data very seriously and treat personal data with the utmost care, confidentiality and in accordance with the legal data protection regulations and this data protection declaration.
Processing operations
GPSLogger II processes personal data only if they are necessary for the app functions. The data will be saved on your mobile device only.
How credible is this statement?
On the one side I claim as developer that I take your privacy as my highest priority and that all data will be stored only on your device. On the other hand the Data Safety declaration at GooglePlay lists that location information (and more) will be collected and processed.
I totally understand that this raises concerns, and I would like to explain in detail the reasons why I have selected, what I have selected in Google’s Data Safty declaration form.
Just as a reference - here is the current GooglePlay Data safety declaration of GPSLogger II:
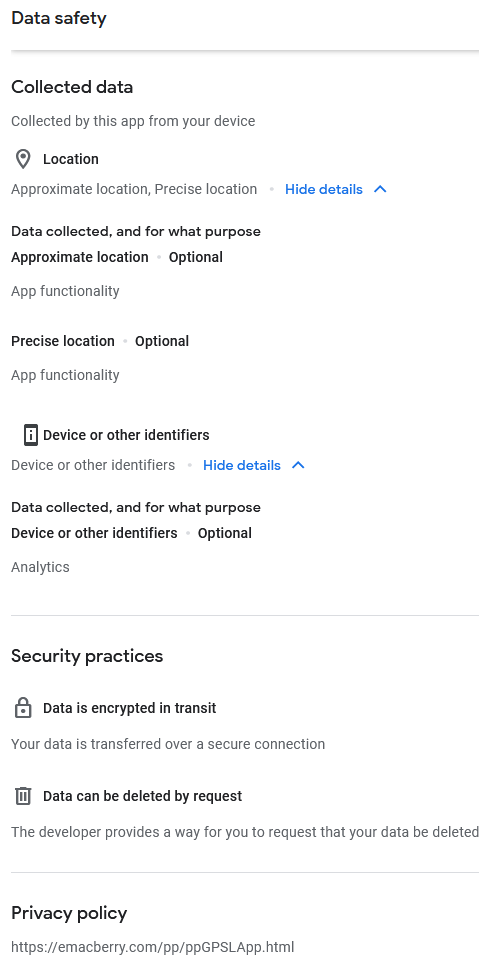
GPSLogger Data safety Declaration at Google Play explained
How does this declaration match with the statement, that GPSLogger will only record the location on the device?
taking a deep breath
None of the points that are listed in the Data Safety Declaration at GooglePlay are relevant for the core use case of GPSLogger.
The problem is, we are dealing with Google here. They are analysing the code of your app for potential issues and once it’s flagged by a machine as suspicious the app will be removed from the store. Once thats happened, the Developer gets informed that your app is not compliant with something and that you should fix it and submit your app again.
Here is the key problem, you’re either dealing with bots/machines and/or low paid (and as a consequence low trained & skilled) support staff. It’s impossible to get qualified information about what part of the app code has been identified as suspicious.
In such a case you as developer has to guess, if there should be additional information provided to the users, if there is anything in the application description that has to be adjusted or if it’s really a functionality (code) that needs to be adjusted.
I have a long history of trying to communicate with the Google Developer support, and I don’t want to waste my life any further with them. GooglePlay Store has a de facto monopoly for Android app distribution and, that there is no neutral control instance (that you can call in the case of a dispute) is IMHO a serious issue for us all. In the end Google is going to decide what apps will be available and which will not.
So the approach of the Data Safety Declaration of GPSLogger is, to be as open as possible. As soon as there is a tiny little section in the app that might be detected as data will be transferred from the app to a server to be processed - it is better to declare it, instead of hoping to be lucky with the monkey army. Since once you get caught, it’s impossible to get out of Google’s claw.
As a quick example - when you use the TurnByTurn Navigation and you are leaving for what ever reason the initial planned route the app is able to find a detour for you. Therefore, the app is using your current (precise) location and sends a request to openrouteservice.org in order to be able to guide you back to your initially planed route. Will openrouteservice store your current location - NO - will it process your location data - well - YES it does. So it has to be declared.
For me, it’s almost impossible to judge what processing means in the legal context for Google. For sure, your location information has to be used in order to find a possible way from A to B. Your location will not be stored, processed or analyzed any further! (there is no server side statistic for locations where people are missing turns most often).
So at the end of the day I decided, it would be better for my mental health to declare every piece of possible external data processing to Google and try to explain here in the manual the reasons (functionalities) where and how this data will be processed.
If you have any concerns - please let me know!
So let’s go through the list step by step
Collected data - Device or other identifiers
GPSLogger itself does not have, store or use any internal (or external) ID at any point1. GPSLogger does not collect any usage data by itself - nor I as Developer (within the best of my knowledge) have integrated any code, that does collect any kind of data.
Having said all that, the app is running under the Android OS. So what ever the OS does (collect, transfer and/or process) is beyond the control of GPSLogger. And before Google has removed the app, because of the OS transfer in the name of my app data, and I did not declare it, I feel much more comfortable declaring it - just in case.
Collected data - Approximate & Precise location
Let’s start with the fact that I don’t understand, why an app that is processing Precise location data can declare additionally, that Approximate location data will be processed. My understanding is, that when I process Precise location data this implies that I process also Approximate location information. So at the end of the day I have selected both - simply because I don’t have a single clue what’s going on in Google’s lawyers minds.
So the bottom line here is, GPSLogger is processing always Precise location data.
In general - the location information recorded by GPSLogger will remain on the device ONLY. Nevertheless, when you use of the following functions, your location (does not have to be your current location) will leave your device and can be processed by a 3rd party. In some cases it is impossible to say if the data will be processed or not - in some cases you can be sure it will (e.g. when uploading to Strava).
Live Location Sharing (including custom URL & TASKER)
When using the Live Location Sharing function, your current location will be transferred either as eMail via the internet to the selected eMail recipient or will be sent via the internet to the server URL you have specified.
It’s recommended to use encrypted eMail transfer and/or make use of HTTPS in the custom URL.
See also: Live Location Sharing manual section
Emergency Alert
When using the Emergency Alert function, your current last known location (and path) will be transferred as eMail via the internet to the selected eMail recipient. It’s recommended to use encrypted eMail transfer.
See also: Emergency Alert manual section
Exports (as eMail)
When using the export options (KML, FIT, GPX or CSV), the location (and additional sensor) data will be stored in the selected format on your local device only. Once the data is stored in the file system it’s beyond the control of the app what will happen with this data - Please use these export files wisely.
When you make use of the eMail Export options the data will be directly sent over the internet to your configured eMail account. It’s recommended to use encrypted eMail transfer.
See also: Export & eMail manual section
Routing Request / Online Navigation
When using the On the fly navigation/detour functionality, your current & target location will be transferred via the internet to the openrouteservice.org server. When using the Openrouteservice, the openrouteservice.org privacy policy applies. https://openrouteservice.org/privacy-policy/
See also: Turn-by-Turn Navigation manual section
Import from Routing Server, planned @ https://route.emacberry.com
When using the Import from Routing Server functionality, your current location will be transferred via the internet to ther emacberry.com server in order to search for routes that have been created in the last 5min in your area. The location data that will be sent, will not be stored on emacberry.com server and be only used for processing the request. When using the Push-Route functionality from the https://route.emacberry.com website, the emacberry.com privacy policy applies. https://www.emacberry.com/pp/pp1.html
See also: Plan a Route manual section
Share Path via emacberry.com
When using the Share Path functionality, the complete path (date, location) will be transferred via the internet to the emacberry.com server and will be made available to the PUBLIC. Everyone who knows the provided shared URL can see this location data over the internet. When you share a path, there will be no connection between you (the user) or the device used for the upload - so the upload does not contain any additional personalized data. When using this functionality, the emacberry.com privacy policy applies. https://www.emacberry.com/pp/pp1.html
See also: Share your Path with the public manual section
Upload Activity to Strava
When using the Upload to Strava function, the recorded location (and additional sensor) data is transferred via the internet to the Strava servers. When using Strava, the Strava privacy policy applies. https://www.strava.com/legal/privacy
See also: Strava Integration manual section
Map Tile Data
When using the OpenMapData functionality (basically the Map View), the corresponding privacy policies of the selected map data providers applies. GPSLogger II will request map tiles from the selected providers and this implies that this requests contain area information (BoundingBox) which might be (but doesn’t have to be) in relation to your location.
See also: Open Map Data (OMD) manual section
Data is encrypted in transit
For all communication that are under the control of GPSLogger HTTPS is always used (this implies the communication to emacberry.com, openrouteservice.org, strava.com or Google’s O-Auth service).
Nevertheless, there are some areas in the application that allow you to specify custom/own URLs and links. It’s the users’ responsibility to take appropriate actions to protect their data. Specifically: If you make use of the live share location functionality via your own backend/URL it’s STRONGLY recommended to use HTTPS URLs ONLY!
Security practices - Data can be deleted by request
There is only a single functionality where data will be stored at a different place that is not under the control of the user by themselves. This is the _Share via emacberry.com feature, where the user can upload a path to the emacberry.com server in order to share this path with the public. It’s important to understand, that the data that is stored at emacberry.com does not contain any device or user identifier, the only reference is a UUID that will be stored together with the path locally on the device of the user. It’s impossible to backtrace the origin of a path with just the UUID.
When you want to delete a previously shared path - simply use the built in Remove Share from emacberry.com that is accessible for every path within the PathManager.
Right of revocation
By revoking the privacy policy of GPSLogger II, the app is not functional and therefore cannot be used. Deletion of your personal data, GPSLogger II stores your data exclusively on the mobile device and this data can be deleted by uninstalling GPSLogger II. You must delete any created backups or export files. This backup data can be found on the device in the GPSLogger II folder of your Downloads.
-
In the past the app has used a random internal UUID - this ID has been removed with the update to v2.0.0.206 (any existing UUID data has been deleted from the device during the update). ↩